Subscribe to my monthly newsletter to get exclusive updates in your inbox
Subscribe Now
Fashion

Everyday Fashion Round Up for Fall 2021

Joan (my social media assistant) always knows about the latest apparel trends, yet stays true to a classic and simple style. I asked her to round up her fall favorites for my readers and I’m loving her picks and outfit inspo to help you pull them together!

by Joan Albrecht

The air is getting a little crisper where I am and it has me thinking all about fall! MN summers are the best but boy has it been a hot one. I am ready for cooler air (not quite winter tho). I absolutely love fall, especially all of the colors. I’ve rounded up some super cute casual everyday clothes that are giving all the fall vibes! I threw in some stable pieces as well as a few pieces that are going to be super trendy this season. I hope you enjoy and cheers to sweater weather!

Patticake Wagner Everyday Fall Fashion 2021 .png

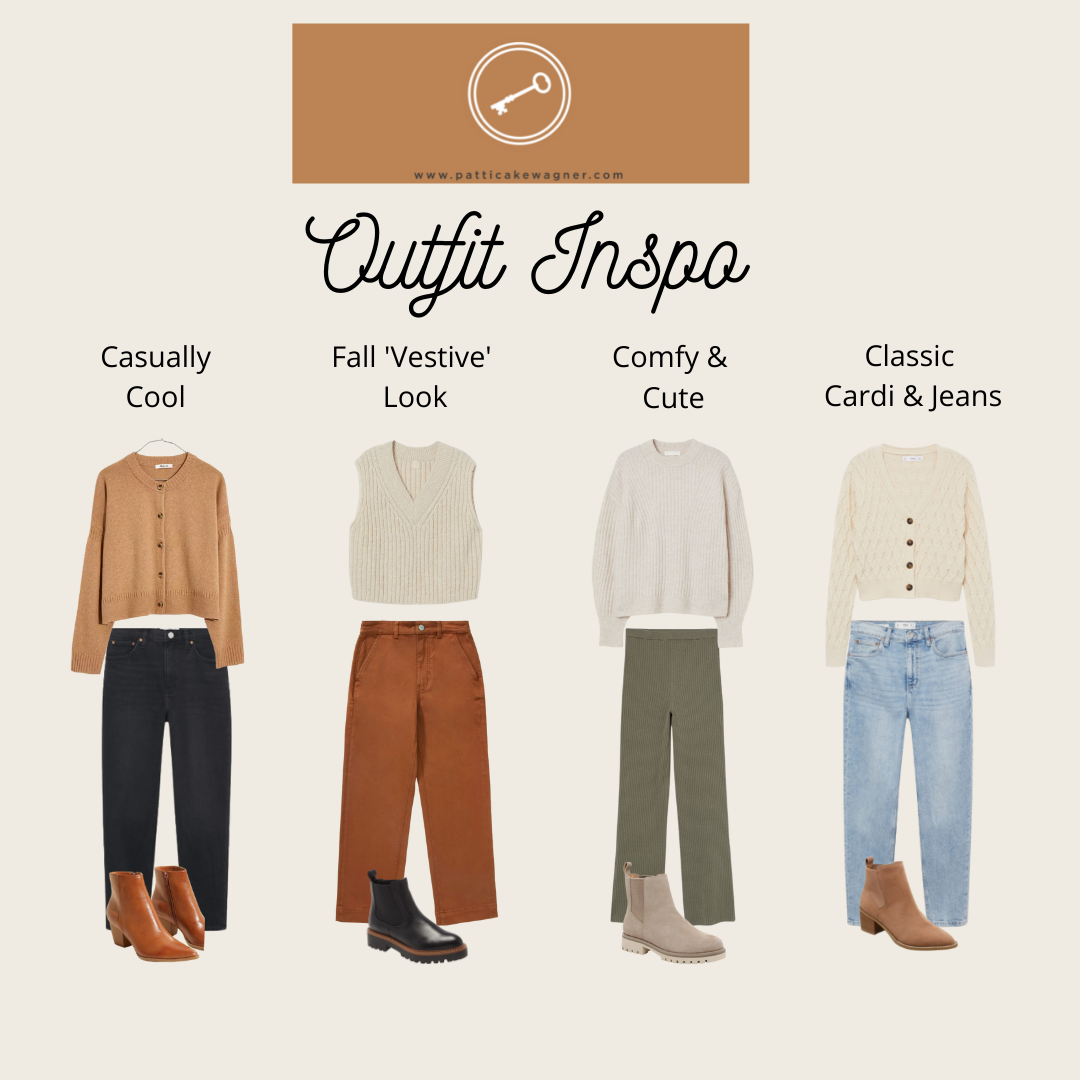
Very relax easy everyday style casual looks

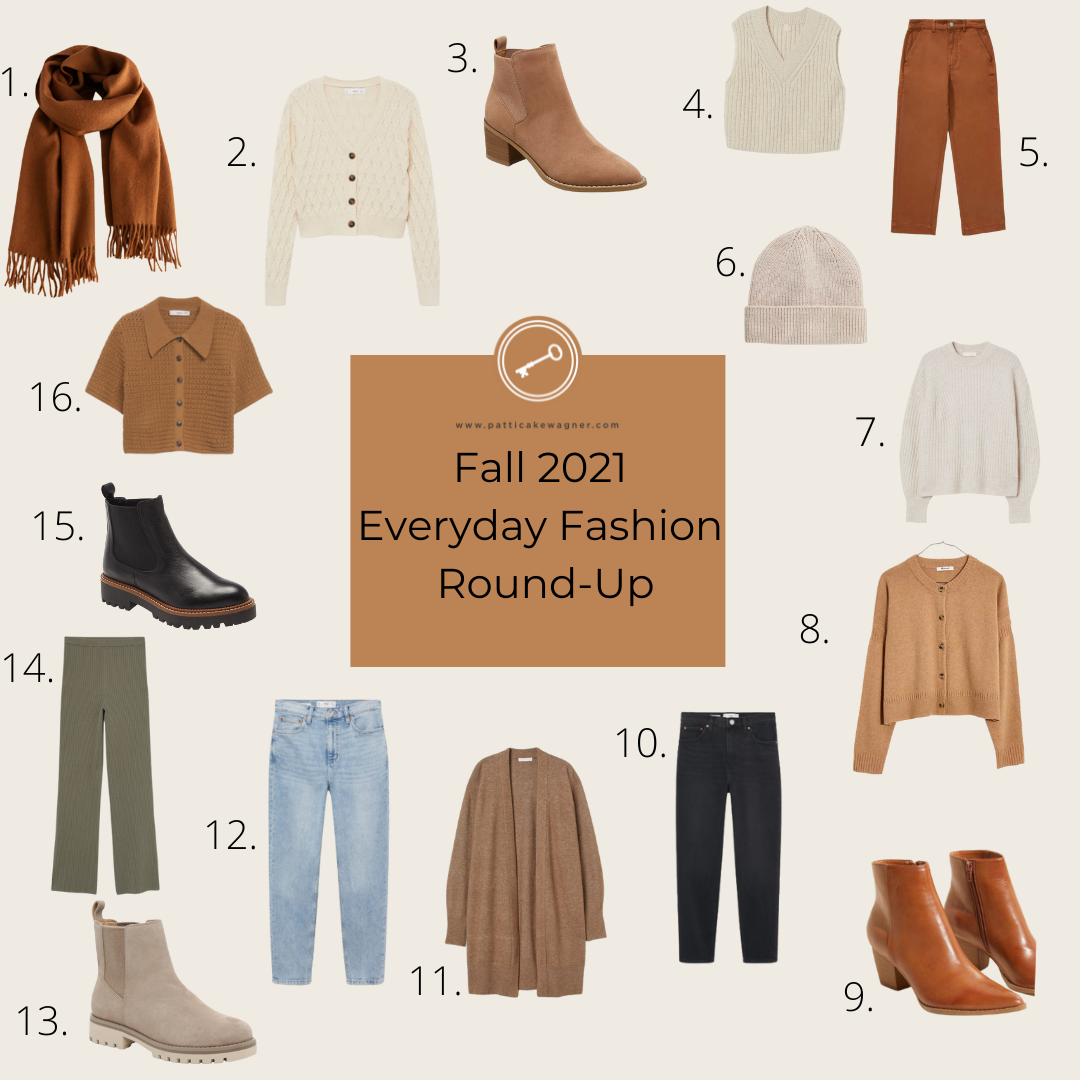
  1. & Other Stories Wool Fringed Blanket Scarf

    (here is a similar look from ASOS Camel Scarf)

  2. Mango Knit Braided Cardigan

    I love the braided detail on this cardigan.

  3. Target Women’s Anya Ankle Bootie

    Such a cute pointed-toe bootie with a little heel that’s perf for everyday wear!

  4. H&M Ribbed Sweat Vest

    Sweater vests are all the rage. I love the neutral look of this one. A good way to subtly look fashion-forward

  5. Everlane The Straight Leg Crop in Cocca Brown

    (Target dupe)

  6. ASOS Fisherman Rib Beanie

    Beanies are a staple accessory! Love this basic one from ASOS and it’s super affordable.

  7. H&M Rib-knit Sweater

    A classic knit sweater you can wear well into the winter

  8. Madewell Clemence Cropped Cardigan Sweater

    I am obsessed with this cardigan from Madewell! It comes with a matching sweater tank and they are the most adorable set!

  9. Free People Going West Boot

    Western Style Boots (especially cowboy boots) are going to be very popular this season!

  10. Mango Mom-fit Jeans Black Denim

    These are perf jeans if you are looking to stray away from skinny jeans. They aren’t too straight!

  11. H&M Long Cardigan

    Grandma sweaters will always have a place in my heart (and closet!)

  12. Mango Mom-fit Jeans Light Wash

    Straight legged jeans in a perf light wash

  13. DSW Taupe/Stone Tipryn Chelsea Boot

    I love the color of these Chelsea Boots! They go with everything!

  14. H&M Khaki Rib-knit Pants

    Cute but comfortable pants! Rib-knit pants and matching sets are here to stay!

  15. Miller Chelsea Boot

    These are the perf basic black Chelsea boots! They are water-resistant and are super durable (perf for Minnesota!)

  16. Mango Openwork Knit Top

    Love the collar and texture on this knit top! A good transitional piece going into fall.

Patticake Wagner Everyday Fall Fashion 2021.png
Sweetest Regards, Patti
design

Our 1930’s Stucco Farmhouse Rental Property and Renovation Thoughts

If you have been following along on my insta you will know that we recently bought a new rental property in partnership with our close friends! It is a beautiful historic 1930’s Stucco Farmhouse Triplex (#stuccofarmhouse) with lots of potential. Read below for our renovation thoughts.

farmhouse triplex_5909.JPG

The property is a side-by-side duplex with a cabin in the back and has a really cool history. Here’s what the previous owners shared with our agent (some personal info has been omitted).

In the late 1800’s it was all farmland in the Glen Lake Area. The house across the street was the original farm owner’s house. They later built the duplex [our property] to house their farm workers. It used to be heated by coal which you can see by the chutes on the front of the house. That was later converted to boiler heat, but the original chimney is still there.

The back house was actually the gardener’s house who maintained the gardens, landscaping etc. The seller’s agent who facilitated the sale to me had co-listed with his father who had originally rented the gardener’s house when he was in his 20’s (about 60 years ago).

I hope your buyers enjoy the property as much as we have. People love living in a real farm house…

Looks like it has always been rented to occupants since it was built. It has had a long life with some good bones but needs a lot of work. We are breaking up the renovation into two phases for timing and budgeting purposes.

Phase 1 (summer-fall 2021): exterior focused which includes cleaning up the yard and quick re-landscaping using what’s already there and paint the exterior. Minor work in the interior by ripping up the old carpet and deep cleaning. If you tuned into my Instagram, you’ll know that we were disappointed by our discovery after ripping up the old carpet and quickly came up with plan B which I’ll do a more detailed post on soon.

Phase 2 (spring-summer 2022): interior focused which includes a long term solution for the floors where there was carpet and vinyl, reconfigure the kitchens, remodel the bathroom, paint interior, etc. For the cabin unit, we plan to add a bedroom to the basement and create a nice walkout patio with string lights.

We’d also like to add rooftop patios above the two garages. Imagine railings, planters and string lights for a nice outdoor space for each unit!

farmhouse triplex_6004.JPG
Main back hallway leading outside.

Main back hallway leading outside.

When we did showings for the farmhouse triplex we were surprised with how many people were interested in renting with a short-term lease so it rented out fast! Our plan was to rent out the two units from August to end of March. That leaves us April and May to do Phase 2 with some cushion to go into June. Ideally, we’d like to have it rented out by July 1st.

Heres a peek into Unit 1:

Some Renovation Thoughts: I love the kitchen cabinets and sink but not sure of their condition. We plan to do a wide cased opening between the kitchen and living room to allow sunlight to radiate across the first floor. The wood floors are in decent shape but may need to be refinished and basement is pretty nice already! The bathroom could use an upgrade though.

Here’s a peek into Unit 2:

Some Renovation Thoughts: So much love for the kitchen cabinets. But the carpet had to go and like I mentioned above, it was not what we expected to find! You can watch my IG reel to see our temporary solution which we love, despite a few naysayers. Our long term plan is to replace the vinyl flooring in the kitchen with wood to feather in with the existing wood in the living room. Like the first unit, we plan to do a wide cased opening between the kitchen and living room and will eliminate the awkward dining nook. Which means the living room floor paint will be sanded off to tie into the new wood (wood purists can rejoiced!). The bathroom will get a makeover and we’ll likely refinish the wood floors here, too.

Here’s a peek into the Cabin Unit: these are from the listing since we couldn’t tour it because someone is living there who we’ll continue their lease until end of April.

Some Renovation Thoughts: we plan to add a bedroom to the basement, paint the walls, possibly refinish floors and create a nice walkout patio with string lights.

Did we mention that this farmhouse property has a large wooded backyard???

farmhouse triplex_5999.JPG

We were told the students in the adjacent elementary school created this bonfire area!

That is a lot to tackle right?! Which is why we are so glad to have partners and break out the renovation into two phases on this 1930’s stucco farmhouse. Having rentals you care for is never a “get rich quick” investment. It’s a slow and steady process. It won’t be perfect but we have to pour some love into a property to maintain its life and hope that our tenants will respect it as their own and be proud to call it home.

Keep on following along to my instagram to see how this rental renovation all unfolds!

Sweetest Regards, Patti
design

How I Easily Painted Our Fiberglass Door

With so many different house projects that are taking a long time to complete, I wanted to do a quick but satisfying project in our home. And this one was so satisfying!

patticakewagner_mudroom painted door_fiberglass door.jpg

We have a fiberglass door in our mudroom that I don’t love. There is nothing wrong with it. It just never looked right for our space and an easy update was to paint it! If you’ve been wanting to paint your fiberglass door but have been scared to, I hope my experience can ease that fear.

before: fiberglass door in faux wood finish

before: fiberglass door in faux wood finish

I have thought about painting this door for years but was afraid to do it. My new motto is to stop dwelling and start doing and this was the perfect project to jump into!

Backstory: When we originally bought our home this room was actually a breakfast nook that we turned into a much-needed mudroom. Living in Minnesota, the winters are, to say the least, very cold and snowy. We wanted a functional space to unload our winter attire and neatly store our shoes.

before: mudroom used to be a breakfast nook w/ a fridge


before: mudroom used to be a breakfast nook w/ a fridge

We all know keeping anything neat with kids is an everyday practice. We were always picking up this room and needed a better storage solution. About three years ago we DIY’ed a built-in bench that has helped us with organizing all our stuff! You can read an article here for my tips to organizing a small mudroom.

Before the renovation, there was actually a window where the door is now. During the reno in 2013, we went for a more cost-effective door because our budget was slowly but surely shrinking. For eight years I thought about painting it and this was the year to finally do it!

After visiting my friend Jason’s Warmhouse Story studio, I fell in love with the cabinet color and it became my jumping off point for our door. Our #1927WagnerTudor has an attraction with the color green…hello little vintage green bathroom!

My friend Jason’s Warmhouse Story studio using Farrow and Ball Vert de Terre

My friend Jason’s Warmhouse Story studio using Farrow and Ball Vert de Terre


Here is my process for painting the door – please note I’m only painting the interior side. *Disclaimer: this is my first time painting fiberglass door

Tools You’ll Need:

Dish Soap + Warm Water

Microfiber cloth

Tack Cloth

Painter’s Tape

Mini Paint Roller (I liked the foam roller for this)

Paint Brush

Paint Tray

Primer

Paint

Wet Rag (to wipe off any unwanted paint splatter)


Step 1: Clean the door with a mixture of 2 cups of warm water + 2 tablespoons of dish soap. *Our door was already pretty clean and in good shape but some articles suggest adding 1/4 cup baking soda to this mix to help scuff off doors that are very dirty. Other suggests using a combo of white vinegar + water. After it has fully dried wipe with a tack cloth to catch any extra debris.

Step 2: Tape off the casing/frame, hinges, threshold and floor to protect from getting paint on them. I found it easier to take off the door hardware instead of trying to tape or paint around them. It may be best to take the door off the hinge if you’re painting both sides.

Step 3: Prime the door. I used Zinser Water-Based Primer for All Surfaces. I used a paint brush for edging and the mini foam roller to roll the surface. For step by step on how to prime, see below for how I painted. It’s the same method to priming, except I did only one coat of primer.

I was nervous after priming it. I always trust my design instincts but get super nervous when I am actually implementing it.

I was nervous after priming it. I always trust my design instincts but get super nervous when I am actually implementing it.

NOW IT’S TIME TO PAINT!

After reviewing numerous sage and olive color swatches against the door and mudroom, it was time! It’s important to review swatches in your actual space throughout the day and would even recommend getting pint size samples to try. Unfortunately, most paint stores around us were out of samples due to the paint shortage.

I spoke to someone at the paint store who recommended the Sherwin Williams SnapDry Door and Trim Paint. I picked up two quart size samples in satin for the sheen. One was a custom color that was similar to Hazel Gaze (SW-952) and the other I had them color match to Designer Color Collection Soft Sage (SW 9647) which I ultimately used.

Step 4: Roll the side of the door. It went on very smoothly and in my case, it doesn’t touch the door frame/jamb when shut.

Step 5: Edging around the hinges and painting all of the grooves first.

Step 6: Roll the surface with paint. Wait about two hours between each coat.

Step 7: Depending on your door color, you may need either 2 or 3 coats of paint for full coverage. I ended up doing 3 coats!

I was nervous after the first coat because it looked kind of blotchy. After the final coat, I knew I made the right choice!

Step 8: Wait for paint to cure before installing back door hardware and removing tape.

patticakewagner mudroom painted door2.jpg


The color is too good! It really softened it and also makes the room look brighter! I love the results so much and it was an easy but gratifying change.

patticakewagner mudroom painted door.jpg

Hope this helps give you a nudge if you’ve been wanting to paint your fiberglass door (or any door). You can also find my video process in my Instagram highlights. Happy door painting!


Product sources in AFTER photos are no longer available but I’ve linked similar options below to get this look:

Sweetest Regards, Patti
design

Top 5 Best Low Maintenance House Plants & Cute Planters

by Joan Albrecht

I love taking care of all my plants! It is deff a form of self-care for me. It is amazing how much life and color a plant brings to a room. Here are the best low-maintenance plants, that Patti actually has in her home and recommends, to keep around the house and tips on how to care for them. I also linked some cute planters to complement your house plants!

Top 6 Favorite House Plants:

1) rubber plant

These plants love indirect bright sunlight. They need to be watered about once a week and need their leaves to be regularly cleaned.

2) Dieffenbachia

This spotted beauty can tolerate low light but will grow with more sunlight. It needs to be watered whenever the soil gets super dry.

3) Snake plant

These plants are the king of low maintenance. They can survive in any kind of light but prefer bright indirect sunlight. They can also go a pretty long time without water. I would do about every 10-15 days.

4) Pothos

This vibrant plant loves indirect sunlight but will tolerate low light. They like to have their soil really dried out so it is okay to forgo watering them weekly. When the leaves start getting droopy is the sign that they need to be watered.

5) Jade plant

Jade plants are my fav kind of succulents! They need a couple of hours of direct sunlight a day but they mostly like indirect bright sunlight. Watering depends on how quickly the soil dries so make sure you water it once the soil is completely dried out.

tip: when watering, make sure not to get water on the leaves, excess water on the leaves can lead to rotting.


Tips and Tricks to Help Take Care of Your Plants

  1. Pick a day that you dedicate to watering mine is Water Wednesday’s!

  2. I always like to keep an eye on the soil and depending on the type of plant, it lets me know that it is time for watering. The number one cause of plant death is overwatering so make sure the soil is dry throughout, before watering.

  3. If the plant’s leaves start to get wrinkly or droopy that is another sign to water it.

  4. It is important to make sure the leaves of the plant are cleaned. A lot of them can accumulate dust and dirt. You can easily clean them with a rag!

  5. Make sure you know what kind of sunlight your plant needs! With some plants that are in direct sunlight, it is important to rotate them. This allows all sides of the plant to get exposed to direct sunlight.

Stylish Planters

I love using a mixture of woven baskets, ceramic planters, plant stands, and hanging planters to hold my plants. Here is a round-up of some of my fav styles!

plant stands

Woven Baskets

ceramic, Terracotta, and clay planters

Hanging planters


Cool Apps to Help with Plant Health

  • Planta: the app shows you how to properly water your plants, helps you identity different plants, and tells you the best place to put your plant in your house

  • Florish: this app can help you pick out the perfect plant for your space and can help you care for the plants you already have. It has a light detecting feature you can use to scan your house to see what kind of plants will “flourish” in the lighting you have!

  • Picture This: with just a picture this apps can tell you the name of a plant or flower! it can also tell you how to care for your plant and diagnose any problems with the plant.

  • Gardenia: perfect for people who are just getting into gardening/ finding their green thumbs. this app has a ton of information on over 2000 different plants and flowers. You can use it for your plants that are indoor or outdoor!

  • Blossom: an app that sends you reminders for plant care, lets you track your plant’s progress with a plant journal, and a plan identifier all in one!

Sweetest Regards, Patti
community

How We Painted Our Wood Floors in the Stucco Farmhouse Property

Last summer, we purchased a 1930’s historic fixer upper stucco farmhouse style triplex rental property that we’ve dubbed #stuccofarmhouse so you can follow along on my Instagram! If you have no clue what property I’m talking about, read here to get caught up and tour this historic farmhouse!

When bought it, we did showings right away and were surprised with how many people were interested in renting with a short-term lease. A lot of people wanted to move in by August 1st, so we had to react quickly! Our plan was to rent out the two units from August to end of March while we did exterior work for our Phase 1.

We now have until June or July to complete the interior remodel with Phase 2! Can we all admire at how far this exterior has come??

BEFORE

AFTER


How We Painted Our Wood Floors in the Stucco Farmhouse Property

For the purpose of this post, I’m focusing on the controversial temporary solution we did with the wood floor after we ripped out the carpet.

With our Phase 1 renovation, we intended to do some minor updates to the exterior (mainly landscaping) and deep clean the interior.

The triplex came with dingy carpeting. We were so excited when we first bought the property and looked underneath the carpet to see hardwood floors! We were hoping that there would be decent hardwood flooring throughout. Unfortunately, that was not the case.

Before:

After:

*The image all the way on the right is the dining nook and is actually linoleum flooring.

We had to act fast because one of our tenants needed to move in ASAP. We had two nights to come up with a solution and execute it. The best solution for our case was to paint the floors which we relayed to our tenant. Although this is only a temporary solution, I think if done right, painted floors could be so beautiful.

Just like my friends Melissa and Katie’s kitchen floors!

Melissa @theslowerhome

I reached out to Melissa to see what her process was for painting her floors. She started with a new floor that was not pre-finished and used Farrow and Ball floor paint. She used a roller for the primer and a brush for the paint. Also, she didn’t use a sealer because she didn’t want it to turn out yellow.

Her kitchen is right by heavy traffic areas (her garage and backyard doors are right off the kitchen) and her floors have held up super well! They look SO good!

image via @theslowerhome instagram


image via @theslowerhome instagram

Katie @florencerevival

My friend Kaite, an amazing Instagram DIY’er, also painted her kitchen floors and they look gorgeous!

She started by sanding them with 150 grit sandpaper to make sure the primer would have something to adhere to. Then she vacuumed and mopped them and put on a Zinsser water-based primer. She used a brush around the edges and then a microfiber roller. She used Behr’s porch and patio paint in low lustre with the color match to Accessible Beige at 50%.

She loved how they turned out, but the only thing she wished she had done was to finish with a clear coat. It would have made it easier to clean in her opinion!

image via @florencerevival


image via @florencerevival

At first, we were hesitant about painting the floors but we browsed some articles and came across this one from Country Living Magazine. There are so many beautiful painted floors in their gallery! It helped convince us that painted floors were the way to go.

photo by David Tsay via Country Living

This article from Zillow is also a helpful resource if you are thinking about painting your floors. It talks about the history of painted floors and gives you tips on how to pick your floor color. We know it is controversial to paint hardwood floors but we have a plan and you just have to trust your gut!

We were a little nervous about picking a floor color because the walls are painted two different colors and we wanted to make sure the space looked cohesive. We ultimately, decided on Sherwin Williams Alabaster.

Our Process:

Day 1: Rip up the carpet and clean floors thoroughly. Apply first coat of porch and floor paint and primer combo.

Day 2: Apply second coat. Since this was a last-minute solution (and late at night) all the paint stores were closed so we went to a hardware store. We had them match Sherwin Williams Alabaster and ended up using the brand Dutch Boy for the first time. The porch and floor acrylic paint we used is formulated for wood and concrete surfaces with a durable enamel coating. Only time will tell if we will recommend it for durability, but the application looks really good!

*Update: 7 months in and the floors looked good. There were some scuff marks but overall held up well.


View this post on Instagram


A post shared by Patti Wagner (@patticakewagner)

This project got some people a little heated as you can tell in my reel’s comment but we LOVE how it turned out! Let’s look at the before with the wood floor condition.

AFTER

The floors look bright and fresh! I love hardwood floors, but just like any design element, I think variety makes each interior unique.

Phase 2 Renovation Plans

We chose to break the renovation up into two phases.

This helps us

1) not use all of our funds at once and 2) gives us more time to thoughtfully plan out what we want to do.

In phase 2 our goal is to open up the main floor and renovate the majority of the interior. We hope that the hardwood floors can be saved. Did you know that sometimes with wood floors that have been sanded beyond repair, people will actually paint them to retain them?

We didn’t want to have to sand twice, so we went with the nice temporary paint route. Our long term plan is to sand off the white paint and feather in new wood flooring into the dining room and kitchen for a seamless transition.

This article from the Spruce is a good reference on how to remove paint from painted floors.

Thinking about painting your wood floor? Here are some helpful links:

The paint we used:Dutch Boy Paint

Article: 18 Brilliant Ideas for Painted Floors from Country Living

Article: 3 Reasons Painting Your Wood Floors is Not as Crazy as You Think from Zillow

Article: How to Get Paint off Painted Wood Floors from the Spruce

Article: How (and When) to Paint Wood Floors from Hunker

Sweetest Regards, Patti
Fashion

Perfect White Dresses for Summer 2021

My casual white dress is one of my favorites to wear this season. I can run around the yard with my kiddos but still look chic. I’m sharing some of my favorite white dresses that are perfect for the summertime if you’re on the hunt for one. You can easily throw it on for a summer barbecue, date night, or running errands. White dresses are such a great way to look effortlessly cute.

Button Down Swing Midi Dress with Pockets

This dress is a dupe for the one I have from H&M (unfortunately it is sold out online but I have seen it in stores!) I love the buttons going down and of course the pockets!

Amazon

Flutter-Sleeve Linen Shift dress

Linen is my go-to fabric for the summer! The sleeves on this dress are so adorable and it is currently 25% off!

Banana Republic

Sleeveless Dress

This halter top dress is perfect for a casual or dressed-up look. I love the half-calf length and I am a sucker for anything halter-toped!

H&M

Easy waist Midaxi dress’

This dress from Abercrombie is too cute! I love that it comes in a variety of sizing (petite, regular, and tall). The “Midaxi” style is the perfect length! I love the lace details on top and the elastic waistband.

Abercrombie & Fitch

Textured Cotton-blend dress

The textured design on this dress is so darling! It is 100% cotton, which is the perfect material for summer!

Mango

Flutter short sleeve dress

All the details on this dress are so charming! From the ruffles on the sleeves to the details on the front and back. This dress screams summer.

Target

tiered short sleeve dress

This tiered number is made out of gauzy material. It is lightweight and airy. I love the puffed sleeves and the length.

Nordstrom

Petal & Pup

There are a lot of options out there for white dresses! Petal & Pup has so many cute choices! Here are some that I absolutely love. I want them all!

Sweetest Regards, Patti
before and after

Easy Vertical Paneling Installation

We have been making SO much progress on our garage attic transformation with the installation of the easy vertical paneling. We are excited for this multi-use space (storage, exercise, office, band practice). It has been a slow but steady work in progress and it feels like it is finally coming together! I wanted to give you a step-by-step on how we installed the wall paneling. It is pretty simple and adds a nice design touch.

patticakewagner panelling installation.JPG

Before diving in, here’s a back story on our garage attic. When we converted our old attached garage into a kitchen (the old small galley kitchen turned into the laundry room), we built a new detached garage. The garage design + materials had to be approved by the city to tie in architecturally with our 1927 Tudor home and we were working with limited space. It backs right up to the neighbor’s garage and is adjacent to the alley.

We tried to make the most of it by including the unfinished attic vs. one big open space. Can you spot the little attic window from the outside?

We had been using the unfinished attic for storage. It wasn’t pretty and Brian had this dream of one day diy’ing it into a band practice room with storage space. In December of 2020, he started putting his dream into motion…

After adding insulation, drywall, soundproofing barrier, wall paneling and laying the LVP flooring, the room is almost completed!

Wall Paneling Decisions

Prior to installing the paneling, we trimmed out the window. It was not Brian’s first rodeo with window trimming but it was his first time installing this specific type of paneling. We used painted shiplap MDF. Something I really admire about Brian is his willingness to learn new things, and dive right into it! He is super precise when it comes to these types of projects and handles everything he does with so much care.

Photo Credit: Vertical Paneling via Plain Good Shop
Photo Credit: Horizontal Paneling via Serena and Lily website

Initially, we were deciding between having vertical or horizontal panel placements. I put a poll on Instagram and the results were split!

Ultimately we went with vertical because it gave the illusion of more height to the room. Now let’s get to the step-by-step for our easy vertical paneling installation!


How to Install Vertical Paneling

Step 1: Cut the panel at an angle in order to fit in the slanting wall. Brian was able to cut the panel at an angle with his T-Bevel/Angel Finder pictured and linked below. To use the angler all you have to do is place it at the angle you want (based on the wall angle) and mark it on the panel. Then take the marked panel and cut it with a miter saw.

T-Bevel/Angel Finder

The cut angled panel should look like this on the wall:

patticakewagner panelling installation.png

Step 2: Once you have your cut angle pieces, the next step is to install them. Use construction adhesive on the back of the panel, lay the panel on the wall, tap it with a hammer, and then secure the panel on the wall with a nail gun. It is that simple!

*Pro tip: use a scrap piece of wood when tapping in the panels with a hammer. This helps you to not leave any markings on the panel.

patticakewagner garage attic.png

Step 3: Install final panel. We purchased three extra panels just in case. Luckily it went smoothly and we did not need to use the extra panels. It is always better to be safe than sorry, especially when you’re installing it late at night when stores are closed and you just want to knock it out.

Step 4: Last, paint the wall panels. We made sure to do two coats of paint using a paint sprayer for a smooth finish. This is the sprayer we recommend for the value: Graco Magnum 262800 X5 Stand Airless Paint Sprayer

patticakewagner panelling installation.pngBrian just finished laying the flooring which took him two evenings to complete. Are you ready to see how it all looks??? Just a reminder, here’s what the attic looked like before starting the project.

BEFORE

Reminder this is what we started with

AFTER

LVP Flooring linked here

It looks amazing! Unbelievable. Next up, we will install knee wall storage cabinets, paint and then will be on our way to wrapping up the project!Update: Read here for the installation of the knee wall storage cabinets


Tools Checklist:

T-Bevel/Angle Finder

Panel (Painted Shiplap MDF)

Miter saw

Construction adhesive

Nail gun

Hammer

Scrap wood

Paint Sprayer

LVP Flooring

Sweetest Regards, Patti
Fashion

Classic Wedding Guest Dress Ideas

I LOVE weddings and everything about them! With so many put on hold last year, couples are looking to tie the knot this year. Weddings are in full swing and I compiled a list of my favorite wedding guest dresses.

You know I love my ditsy floral dresses but when it comes to wedding attire, I always go for a more classic elegant look. I made sure to include some budget-friendly, as well as splurge-worthy options. I also added some casual fun-patterned options at the bottom so don’t forget to check them out!

Side Knot Slipdress

This beautiful burgundy colored slip dress is an elegant classic look. The side knot highlights the waist and is super flattering! It’s from Nordstrom and is part of their Anniversary Sale. Originally $79 but with the sale, it is only $49.90! Make sure to add it to your wishlist if you are not an Early Access card member.

Nordstrom

Wrap Midi Dress in Navy

A super classic look, this navy wrap dress has draping that is especially flattering to the torso area. It’s a staple piece to add to your wardrobe. Also, currently on sale and is only $45 (49% off right now). What a steal!

ASOS

Blush Pink Halter Midi dress

Blush pink is one of my favorite colors to wear and is perfect for spring/summer weddings.

Lulus

Crinkle Off the Shoulder Midi Dress

This off-the-shoulder midi dress is absolutely stunning. The warm gold color is vibrant and lively. It’s perfect for standing out on the dance floor and best of all, it has pockets!!

Express

The Cap Sleeve Sheath Dress

A splurge-worthy dress from one of my new favorite places: Ann Taylor. This dress comes in regular and petite sizes. It’s a lovely lilac color and is perfect for a modest look. It’s a very versatile dress and could be worn on several different occasions. Currently on sale for 50% off! Discount applied at check out and totals to only $64.99.

Ann Taylor

Lace Dress

I love a good flattering lace dress. This one has the perfect details and if you’re petite, like me, the length is just right!

Lulu’s

Fun-Floral + Casual Dresses

Some weddings do call for a more casual look with fun patterned dresses and details. I picked some super cute dresses from the popular Lulu’s site! I’ve not purchased any dresses from here yet but they seem to have great style and value with great reviews. I will be trying them out for sure!

*Affiliate links used

Sweetest Regards, Patti
community

Patti’s Guide: Things to Do In and Around the Twin Cities

I’ve lived in CA, VA and SC and never felt quite rooted anywhere in the states until having a family of my own here. Minnesota is where I call home and I love enjoying all it has to offer. I get a lot of messages asking about the Twin Cities when people plan a visit and it made me think, so where would I take you if you were visiting me?

I’m sharing my favorite places to walk around, restaurants, and family-friendly spots. Whether you’re visiting or just want to be a local tourist, pin this post and scroll on through to start planning your adventures!

Neighborhood Strolls

One of our favorite things to do as a family is to go on neighborhood strolls. Fortunately for us, the Twin Cities has so many amazing neighborhoods to walk around and explore! Here is a list of some of my favorite neighborhoods:

1.Linden Hills

In the summer we love to walk to the Linden Hills Farmers Market. There are many great vendors and we love connecting with our neighbors in the community. After the farmers market, we walk to Sebastian Joe’s for an ice cream treat and you may likely spot me at Sunnyside Gardens picking up, yet another plant.

Sunnyside Gardens. Great nursery with loads of curated home + outdoor decor items.

2.Grand Ave & Summit Ave in St.Paul

These iconic streets are perfect for walking around and admiring all the beautiful old homes that are masterpieces. There is a lot of history that can be found in this neighborhood. It has the former home of F. Scott Fitzgerald (pictured below). If you are in the Cities on the first Sunday of June don’t miss the Grand Ole Day festival. We’ve also enjoyed touring the James J Hill House. It is a celebration to kick off summer!

image via Visit Saint Paul


3.Excelsior, MN

Downtown Excelsior is an adorable little town right by Lake Minnetonka. We love walking around and exploring all the restaurants and shops. Perfect place to go with your kids and they have the yummiest ice cream shops! If you are looking for a quaint ice cream shop deff go to Licks Unlimited or if you want some frozen custard try Adele’s!

4.East Isles

Right by Lake of the Isles, the East Isles neighborhood is another beautiful family-friendly area of Minneapolis. I suggest picking up a cinnamon bun from Isle Bun & Coffee and taking a walk around the lake. There are so many cool houses on the Lake of the Isles! I love walking around and admiring all of them.

image via Isle Bun & Coffee

image via Isle Bun & Coffee

5.50th & France

Located on the border of Edina and Minneapolis, 50th & France has a ton of shops and restaurants. Our family loves walking here and checking out all the retail stores. My favorite stores to browse are two locally owned kids’ boutiques. Oh Baby! is an upscale kid’s fashion and decor retailer that has the cutest stuff! You can find the coolest kid’s gifts at Pacifier, from clothing to toys they have it all. After some browsing, we love going to Coalition for some classic American cuisine.

The neighborhoods are also beautiful for a casual stroll, like the Country Club. So many charming old homes with stunning exterior and landscaping ideas!

image via Josh Sprauge


image via Josh Sprauge

6.Downtown Wayzata

Brian grew up in Wayzata so this is his stomping ground! We love all of the shops and restaurants lining its downtown area. It has an amazing view of Lake Minnetonka! For our anniversary a few years back, we stayed at the boutique Hotel Landing for a one night getaway with the kiddos and would highly recommend it! We had brunch there, grabbed lunch at COV, ate dinner at Gianni’s, got some ice cream at Ben and Jerry’s and the kiddos’ played in the nice playground overlooking the lake. After a busy day, a good way to get the kiddos to nap is to drive around the lake to take in the scenery and look at all the beautiful homes!

Restaurants

Brian and I are big foodies! When it comes to birthdays and anniversaries we aren’t big into getting each other presents. Instead, we celebrate through experiences, like going out to restaurants. We love ordering tasty drinks, delicious food, and having good conversations. Here are some of the best restaurants for date night and to meet up with family and friends!

1.Martina

Our go-to date night spot! Martina brings Argentinian cuisine to Minneapolis. With its warm and welcoming environment, it never disappoints. If you love seafood, meat and fancy cocktails this place is a must.

image via Martina Facebook


2.The LynnHall

A restaurant, bakery, and event space, the Lynhall has the most beautiful aesthetic. It is a great place to meet up with friends or make new ones. They put a huge emphasis on the importance of community and the beauty that food has in bringing people together. There is a location in Uptown and a new location in Edina! Both spaces are gorgeous and the food is top-notch.


image via Hyde Development

3.Wakame

We love getting Sushi from Wakame. It has the freshest selection and they really are artists when it comes to presentation. They also have amazing appetizers and soups!

4.Naviyas Thai Bistro

Another one of our go-to’s is Naviyas. It has Thai dishes that are so packed with flavor! They are definitely my comfort food. My family has a tradition, we call it “Thai-day Friday” and love getting our take out from here!

image via Naviyas


image via Naviyas

5.Arezzo Ristorante

If you are looking for some of the best Italian food in Minneapolis I would suggest Arezzo! They have a wood fire pizza oven, an assortment of amazing wines, and the most delectable homemade pasta. (My mouth is watering just thinking about their food!)

6.Spoon & Stable

A hip modern ambiance with French-inspired cuisine that utilizes seasonal food, Spoon & Stable will make your date night extra special. The service is excellent as the food! It is located in the North Loop in an old horse stable (hence the name).

7.Hai Hai

Located in North East Minneapolis Hai Hai is a Southeast Asian-inspired restaurant. I love their twist on flavor of popular dishes. My favorites are the Balinese Cauliflower, Beef Laab, Crispy Rice Salad and Vietnamese Crepe. They have bright drinks, flavorful cuisine, and a colorful atmosphere. It’s such a great casual and fun spot.

image via Food & Wine


image via Food & Wine

Family Fun

Minnesota is an amazing place to raise a family. It is very family-oriented and has so many kid-friendly things to do. Here are some things my family loves to do around the Twin Cities:

1.Lake Harriet Band Shell

Our family has SO much fun whenever we go to Lake Harriet. Our favorite thing to do is go to the bandshell, have a picnic, and watch some live music or go for a bike ride around the lake. The bandshell is right on the water and it has the most gorgeous view of the lake! It’s a recipe for the perfect family day.

2.Baker Park

Brian grew up going to Baker Park. It is located on Lake Independence in Maple Plain, MN, and is about 15 miles outside of Minneapolis. There are loads of fun activities to do! It has a beach, playground, tons of fishing spots, and a golf course. It also has the perfect “steep” hill for sledding!

3.Como Zoo & Conservatory

Right between Minneapolis and St. Paul you will find the Como Zoo & Conservatory. It has animals, an amusement park, and the most beautiful gardens. We could spend all day here, there are just so many things to do! The kids love looking at all the pretty flowers in the gardens!

4.Minnehaha Falls

Known for its gorgeous waterfall (in a city setting!) Minnehaha Falls is a great place to go to get away from the hustle and bustle of the city. It is located right outside of downtown Minneapolis and has hiking trails and a park with a variety of trees. You can rent bikes, including the family-friendly Surreys through Wheel Fun Rentals to explore.

image via Explore Minnesota


image via Explore Minnesota

5.Stillwater, MN

This is one of our favorite places to go in Minnesota. Stillwater is a cute little town about 35 minutes outside of Minneapolis. It is known for its iconic lift bridge and for being “the birthplace of Minnesota”. There are countless activities to do here! You can go on a trolly tour, walk around the historic main street, spend time on the water, pick blueberries, bike through the different trails and even go on a hot air balloon ride! It is a must in the summertime.

I suggest staying at the Lora Hotel. It is stunning! Here is a pic that I snapped when we stayed.

I suggest staying at the Lora Hotel. It is stunning! Here is a pic that I snapped when we stayed.

My list could keep on going but I’ll end it here. There are seasonal activities so look out for my fall guide of things to do in and around the Twin Cities!

Sweetest Regards, Patti
before and after

Stylish Workspace Idea When You Don’t Have a Home Office

I don’t have an actual home office or dedicated workspace. I’ve been working out of our dining room, living room, kitchen, bedroom – wherever I can find space that day. Does this sound like you? With managing our rental business, creating digital marketing and my blog, I’ll admit this is a difficult way to work. Not to mention very disorganized.

patticakewagner home office workspace.jpg

We have plans to turn our old uninsulated back entry into my office someday. Who knows how long that will be so in the meantime, I wanted to think outside the box to carve out a stylish workspace solution for myself.

patticakewagner home office workspace.jpg

We had this empty spot behind our sofa and one day it clicked that we could use that for my workspace! I found the right desk and file cabinet from Pottery Barn and everything came together. Before I share more photos, I wanted to highlight Pottery Barn’s very important sustainability initiative and feel honored to work with them to spotlight it.

pottery barn 2.png


Did you know that Pottery Barn is committed to sourcing their wood responsibly and, with your help, pledging to plant 3 million new trees in 3 years? Trees are a critical life force, contributing to cleaner air, purer water and a reduction in climate impact. There is power in your purchase: when you buy a piece of indoor wood furniture* (*indoor wood furniture containing at least 80% of wood; upholstery is excluded), Pottery Barn will plant a tree in partnership with the Arbor Day Foundation. With your help, this can restore vulnerable critical forest ecosystems around the world. So far this year they’ve planted over 650k trees and are just getting started. That’s a huge impact! 650k trees is the equivalent of taking 94k cars off the road, and those trees remove 2.3k tons of pollutants from the air– they also filter the daily water consumption for over 8.7M people!

pottery barn.png


To put together my “office”, I ordered the Pacific 40” Desk and 2-drawer file cabinet for its clean lines & simplicity, and love knowing that purchasing items from the Pacific collection goes towards their ‘3 Million Trees in 3 Years’ initiative. I also ordered the stylish & comfortable Hardy Leather Chair which is Fair Trade Certified™ – meaning the purchase of this product helps ensure fair and safe labor practices, improve livelihoods, and empower workers to invest in their communities. I drew inspiration from living rooms with desks or consoles that functioned as desks to help me envisioned exploring this concept in our own space.

Source - BlogLovin; interiors designed by Carlos Rocha and Vítor Duarte’s architectural office White & Kaki; Photo: Luis Ferraz


Source – BlogLovin; interiors designed by Carlos Rocha and Vítor Duarte’s architectural office White & Kaki; Photo: Luis Ferraz

Source - House Seven Design’s Instagram page


Source – House Seven Design’s Instagram page

I love how these living rooms show that if you don’t have a real office, you can get creative to incorporate a workspace without compromising design. A beautiful desk placed in the corner or behind a couch can make this room dual function for how you live.

Our living room is my favorite space to work in because of all the natural light. I was super happy that we could place the desk behind the couch and have it fit seamlessly. My tip is to make sure you pick one that isn’t too deep, like the Pacific Desk, and could almost double as a console which is common to have behind a couch.

Love how the Pacific Desk fits seamlessly behind our couch.

Love how the Pacific Desk fits seamlessly behind our couch.

I really like this warm gray wash finish, which they call Fog. It’s made of poplar wood and very sturdy. I’m contemplating adding the 2 shelf bookcase to complete my setup and be the same width as our sofa.  See what the complete set up looks like below.

I’m contemplating adding the 2 shelf bookcase to complete my setup and be the same width as our sofa.

I’m contemplating adding the 2 shelf bookcase to complete my setup and be the same width as our sofa.

patticakewagner home office workspace.JPG

Or do I leave as is? Chime in and let me know what you think!

patticakewagner home office workspace.jpg

It was amazing to use this space for the first time. When the work day was over, I conveniently tucked my laptop away in the drawer and stored my papers/documents/receipts in the file cabinet vs. piling them on the dining room table and staring at them while we ate dinner.

patticakewagner home office workspace with pottery barn.jpg

I feel much more productive and organized. Not to mention the good feeling that these furniture pieces contributed to Pottery Barn’s pledge to plant 3 million new trees in 3 years. Earth Day may be recognized on April 22nd, but we all know that it should be an everyday initiative that we can all take part in with small and big actions.


SOURCES:

Pacific Desk

Pacific 2-Drawer Cabinet

Pacific 2-Shelf Bookcase that I’m contemplating adding

Hardy Leather Chair

Suede Magazine Holder

Handcrafted Terra Cotta Vase

Wood Gallery Wall Frames

Bud Vase

Sweetest Regards, Patti
DIY

Our Top Tips from the Powder Room Remodel

We still can’t get over our tiny powder room DYI remodel. There were some hurdles with the plumbing, imperfect walls, etc. but we got it done and LOVE it so much! Many of you had questions during the process and reveal so I wanted to pull together a post to share some tips and what we learned from this project so you don’t have to make the same mistakes we did if you decide on the DIY route…

patticakewagner powder room remodel header.jpg


Removing the Toilet

This task may seem intimidating but we highly recommend removing the toilet during a bathroom remodel, especially with a small space. We didn’t do this at first but it’s a no brainer.  This will give you more room to work when tiling, painting, installing wall treatments, trim, etc.  Follow these steps for toilet removal:

  1. CLEAN the toilet! This will make it all much more pleasant for you or your plumber.

  2. Shutoff the water supply valve.

  3. Flush the toilet to remove most of the water from the tank. If you want, use a wet/dry vac or sponge to remove the rest of the tank water.

  4. What do you do with water in the bowl? This may seem counter intuitive but the secret to removing nearly all off the water from the bowl is to take roughly 2-3 gallons of water in a bucket and quickly dump it into the bowl of the toilet. This will force the water out and leave you with almost no water in the toilet. This minimal amount can stay at the bottom of the bowl without any issues.

  5. Disconnect the water supply.

  6. Remove the two bolts holding the toilet to the floor.

  7. Pull the toilet by lifting it straight up off the two bolts coming out of the floor. They are heavy so make sure to at least remove the tank cover. if you have a two piece toilet you can also separate the entire tank from the bowl. It will be held on by two nuts located just under the tank.

Paneling on Imperfect Walls

If you don’t know the background to our powder room (you can read it here) , it used to be the size of a phone booth. We were able to enlarge it to roughly 45” x 77” and later found out that our one wall was very out of plum. If you have an imperfect wall like we did, use a long level to measure how far out of plumb the wall is as well as find any large bumps or valleys in the wall surface.  Mark these with a pencil and then fill with drywall mud and/or various thicknesses of sheetrock.

patticakewagner powder room remodel.jpg

In our bathroom we discovered one entire corner of the wall was 5/8” out of plumb.  We attached a layer of 1/2” drywall to this area and then float it out with 20 minute easy sand joint compound.  You can purchase fast drying joint compound which speeds up the process significantly.

patticakewagner powder room remodel.jpg

Also, you can leave your door casing in place during installation.  To help the base moulding meet up with the door casing, simply cut the base at a 45 degree angle.

Panel Installation

When installing paneling (click here for the panel we used), measure the height of the wall, then subtract the height of the baseboard and add 1 inch.  The goal is to end up with paneling that will cover the entire wall and overlap under the baseboard.  Cutting the paneling short makes it easier to maneuver into place.  You can then use a scrap piece of paneling for the remaining space under the baseboard so that it sits even and flush with the wall.

patticakewagner powder room remodel.jpg

Scribing Technique

You can use a technique known as scribing where paneling meets inside corners or door/window trim that is uneven.  There are many great YouTube videos on this and it only requires a pencil and a compass/protractor.  You can also use something as simple as a scrap of wood.

patticakewagner powder room remodel.jpg

The concept is to put the edge of your panel up to the uneven corner, measure the largest gap then use either a compass (or cut scrap of wood) to set the pencil that same distance from the wall.  Then you run the pencil along the edge of the panel while holding the compass against the wall following the contour.  You should end up with a pencil mark that follows the shape of the wall, where you can then cut along that mark using a jig saw.

Pipe and Electrical Box

Measuring for pipe and electrical box locations: measure down from the ceiling and off of the corner of the walls to the center of the pipe cutout and edges of the electrical boxes.

Cutting paneling for electrical fixtures: don’t just measure the box you plan to cut around.  It is a good idea to place the fixture or outlet cover over the proposed opening prior to cutting to see how much margin for error you have when cutting and trying to fit the panel. We this mistake with the lighting fixture and had to do some patching.

patticakewagner powder room remodel.jpg

P-Trap

If you are purchasing a new p-trap it is import to dry fit the pieces together to determine if a slip joint extension will be required for the new drain and trap.  In addition, make sure that it is the same diameter as the existing waste line hookup coming out of the wall.  Common sizes are either 1-1/2” or 1-1/4”.

patticakewagner powder room.jpg

We chose a unique faucet and since our sink had exposed valves and p-trap, we opted to order a matching set of valves and p-trap.  Unfortunately we discovered that the new p-trap was larger than our drain hole and due to the condition and age of our plumbing we needed to cut out and replace the sink drain connection.

In addition, our existing iron water pipe was an odd size at 3/8’ so the valves required an adapter as they were 1/2’ valves.   TIP: if you have old plumbing and are planning to replace valves it is best to try removing them early in the remodeling process.  This way, in the event the plumbing does not come apart as planned and repairs are needed you are not stuck ripping something up that you recently remodeled.

Hope you find some of these tips helpful if you decide to tackle your own bathroom remodel!


Our Tool Checklist for this Powder Room Remodel (read here for product sources or here for a one-click link):

Tape measure

Circular saw (for cutting long straight cuts in paneling)

Jig saw (for cutting scribed panel edges and used for coping trim)

Coping saw (for coping trim)

Oscilating multi-tool (for cutting out electrical box locations)

Miter saw (for cutting trim and cove)

Drill (for drilling pipe openings in paneling and screwing in sheet rock and wood)

Hole saw drill bits (for drilling pipe openings in paneling)

Drywall knife (various sizes)

Utility knife

Hammer

Flat Bar

Nail Set

Finishing nail gun (to nail in paneling, trim and cove)

Saw horses and a sheet of 3/4 plywood (for a work surface while cutting)

Wood Clamps (to hold the paneling in place while cutting)

Caulk gun (for applying adhesive and caulk)

Angle Grinder with metal cut off wheel (for cutting metal pipe)

72 inch level

24 inch level

Torpedo level

Marking pencils

Drill bits

Paint brush

Paint roller

Paint roller pan

Worklight

Wrenches/sockets

Screwdrivers

Alan wrenches

Wire stripper

NCV (no contact voltage) Tester

Sweetest Regards, Patti
design

Powder Room Remodel: Design Direction

We just kicked off our Powder Room remodel and I’m so excited! It’s been on our project list since we moved in and finally wrote it down to take action this year. It has had leaking issues on and off with bandaid fixes because we didn’t want to rip out the wall to investigate until we felt it was urgent. On top of that, it drains very slowly and there has been a lingering odor no matter how much we deep clean. If you’ve followed along in my stories, you’ll know we discovered that our pipe had rotted out with crud badly built up.

IMG_5876.jpg


We have a lot going on right now with the ensuite bathroom and garage attic renovation but we knew it was time to open up the wall before things got worse. And if we’re going to go through that headache, then might as well remodel it, too!

The good news is that we plan to do all the work ourselves so we’ll be in control of the timeline unlike the other two ongoing renovations where we are dealing with subcontractors.

patticakewagner powder room remodel before.jpg

A little background on our powder room. It used to be the size of a telephone booth and during our first renovation phase in 2013, we bumped out the wall bringing the dimensions to roughly 45” x 77″ with a height of 85” tall. We didn’t want the added cost of moving the sink to the other side (relocating the plumbing and adding a pocket door) so the max sink size had to remain at 17” x 19”. Tiny right??? This layout is grandfathered in for our home but the distance between the sink and toilet wouldn’t meet today’s code!

Also, we didn’t realize the wall was very out of plumb after the work was completed until later. All of this, along with the plumbing are challenges we have anticipated for the remodel.

patticakewagner powder room remodel_before.jpg

DESIGN DIRECTION

Here’s a little bit about my design process. I break it out into two phases which I adopted from my 13 years as a product designer.

Phase 1 is about the concept + mood. I pull together visuals to spark a “feeling” for my vision. This part is really fun for me and all about piecing together inspiration and taking notes. I do believe design should be fun in general.

Phase 2 is about the design direction, the actual development of the space. This is where I start pulling products, patterns, color palette, materials, etc to create what I call a style guide or design board (see below). It helps me hone in on the style and where to source, even if it’s not the exact ones on the board. Once this is at a good place, I’ll start ordering products and keep my eyes out for vintage finds.

wagner powder room mood board 2.jpg

TIP: One important thing to note, is that we planned out the design months in advance to source fixtures and hardware to have on hand during the remodel. Before you start, try to nail down your design direction. Then make sure to order all fixtures, hardware and any product needed to arrive during your window of work. Expect some long lead times in this environment. Shipping time can vary and will impact your timeline!

Here’s what’s going on in my head:

  • We’re working with a very small space so definitely want to do some kind of wall treatment to make it feel special and have decided on paneling. At first, I wanted to think outside of this idea because I’ve seen so many paneling projects lately BUT, we truly love the look for this space and want to do what feels right to us.

  • I played around with mixing metals but with such a small space, it looked too busy so we’re sticking with all brass.

  • We were considering between two paint colors but have since made up our minds. Can you guess which color?

  • I’m leaning towards the mirror in my style guide but did order two styles which we won’t make a final decision until the end.

Wish us luck and hopefully we don’t have too many unexpected surprises or setbacks!

Sweetest Regards, Patti
This @sandbergwallpaper brought the charm and coziness to our mudroom/entryway 😍. It makes me incredibly happy! 
Your entryway is the first impression of your home’s interior so go ahead and make it your style. Comment “Benjamin” for the direct link to this wallpaper. 
Sandberg Wallpaper in Benjamin Sage Green
#sandbergwallpaper #ad #mudroominspiration #entrywayidea
My robovac-obsessed son said Rocky is better than a baby “bruddah” lol. The newly launched @Roborock Saros 10R is unlike any other. 
It vacuums AND mops! Plus washes & dries its own mops and auto empties the trash 🤯 . With all the smart cleaning features like dual anti-tangle system (we have 3 long-haired girls in the house), obstacle avoidance, FlexiArm riser side brush to clean corners/edges, 176ºF Dynamic Mop Washing for deeper cleaning + more, Rocky helps our family free up time so we can spend more quality time together and less time deep cleaning.
It’s currently $200 off until Feb 16th. See my stories + link in bio. 
#roborock #robotvacuum #saros10r #cleaningreels #homeinspiration
Filling one room at a time with @mackenziechilds Mocha Check pattern 😍! This may be the longest we’ve had our holiday decor up. It feels good to refresh for the new year and I’m over the moon to share this newly launched Mocha Check collection! From the darling tea kettle to the fabulous squashed pot that I used for my cotton balls + q-tips, there’s something so sweet and charming about this new collection from MacKenzie-Childs. 
Comment MOCHA and I’ll DM you the link to everything you see here!
#MCPartner #homedecor #homerefresh #interiordesign #nancymeyersaesthetic #MCMochaCheck https://liketk.it/53VrW