Subscribe to my monthly newsletter to get exclusive updates in your inbox
Subscribe Now
DIY

Knee Wall Cabinets that are the Perfect Solution for Storage

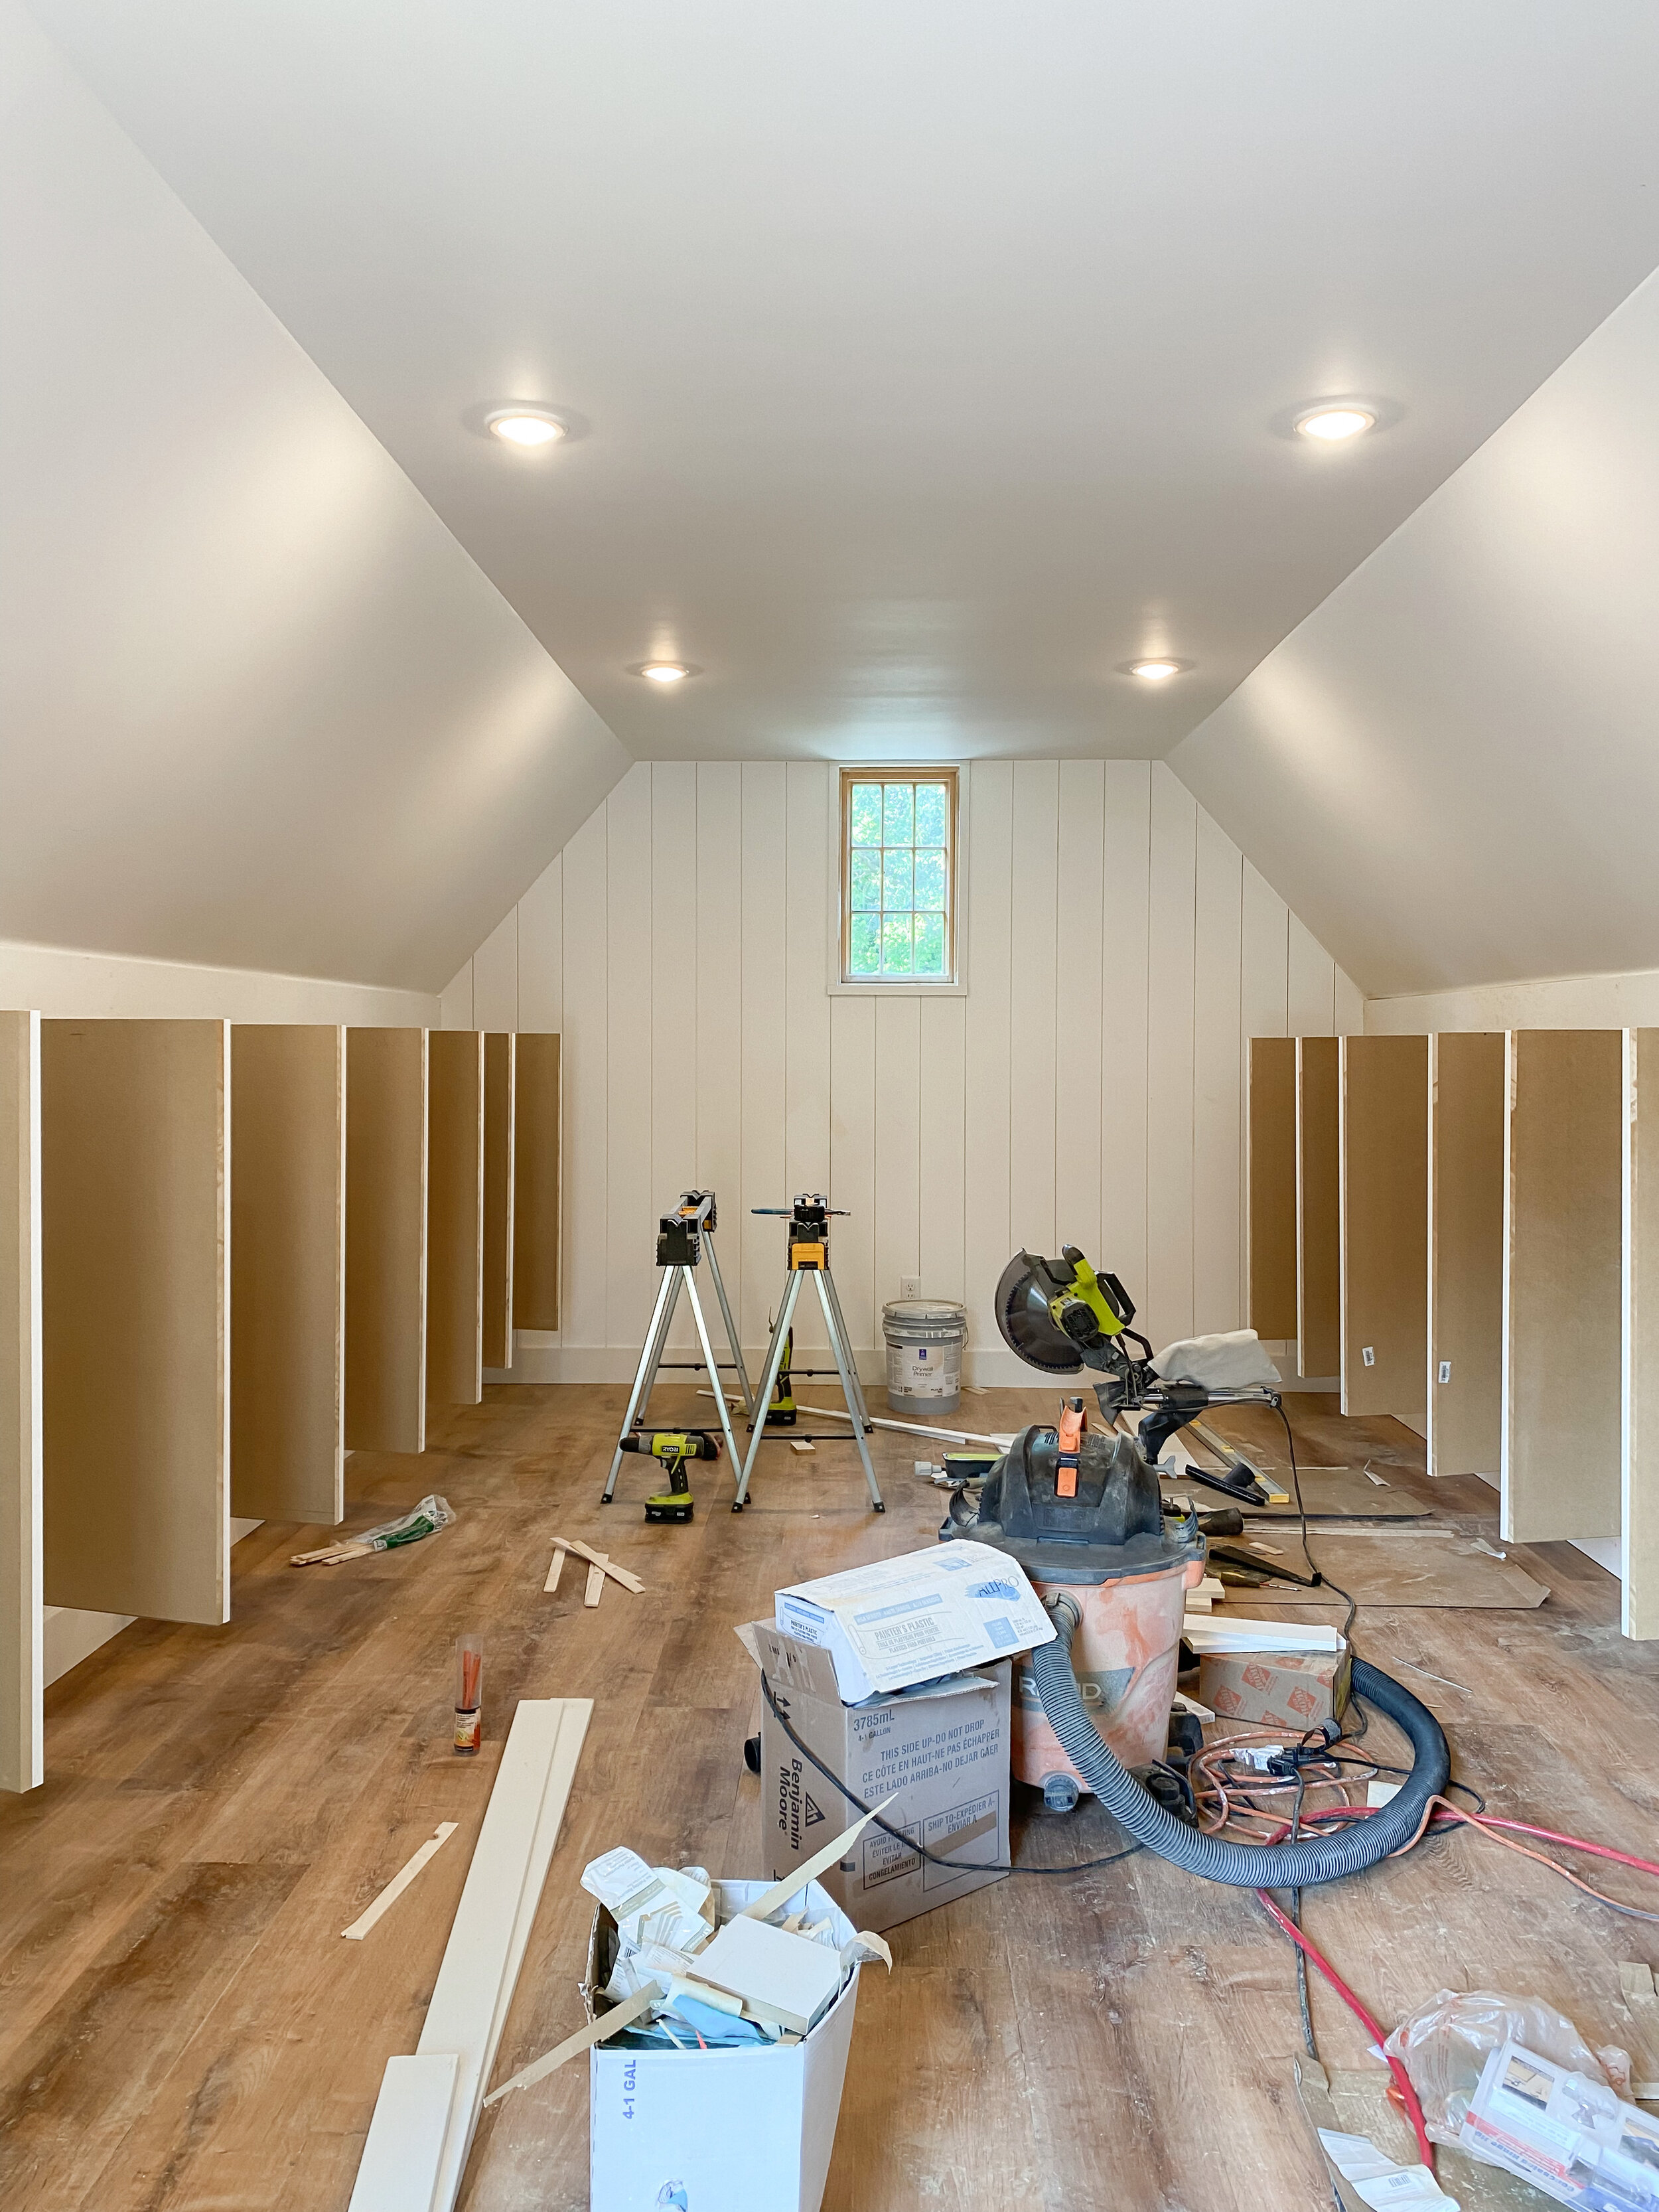
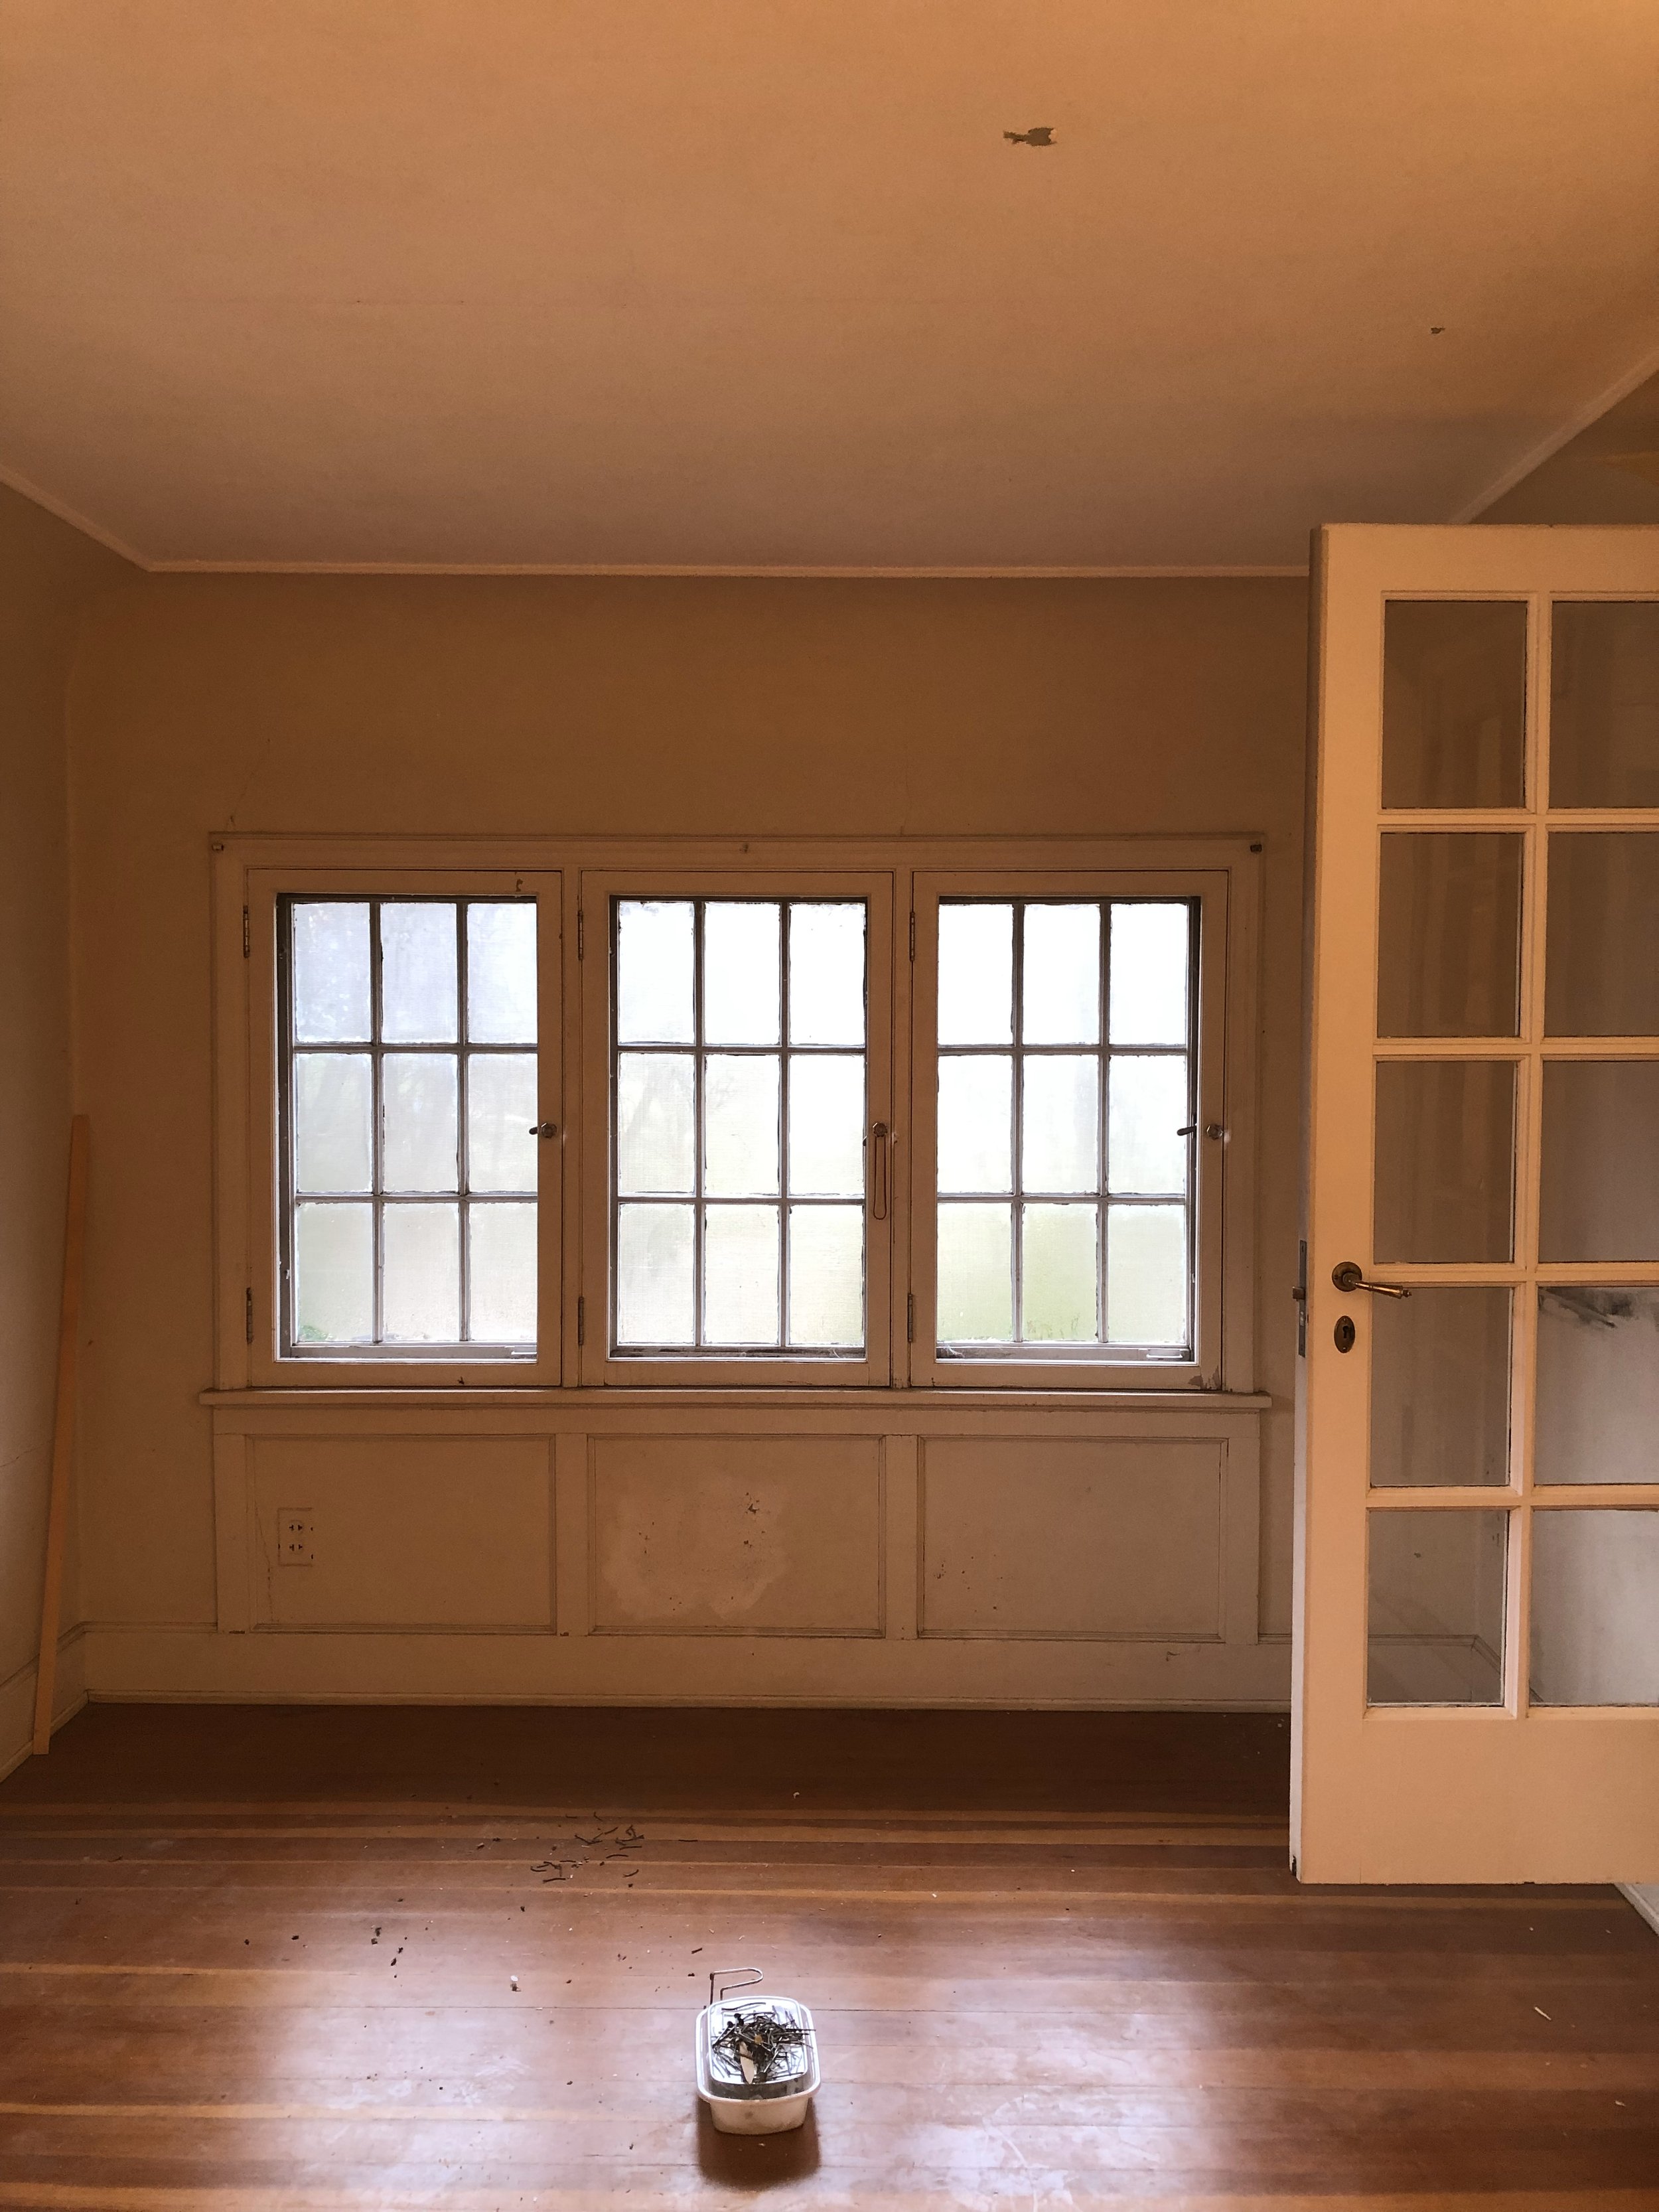
I am three years overdue but finally sharing the steps for the knee wall cabinets that are the perfect solution for storage in our loft, aka Brian’s band practice space. If you followed along with our garage attic renovation back in 2021, you will know that one of our objectives was to make this space very useable. To not only act as a band practice room but for storage, too. To accomplish this goal, we turned the knee walls into hidden storage cabinets and they are everything!

Read here for The Easy Vertical Paneling Installation and see where we started.

knee wall cabinet storage.JPG

If you’re curious about installing it yourself, here’s how we got it done!


5 Steps for Turning Knee Walls into Storage Space

We researched lots of tutorials and referenced Ana White’s DIY blog as a starting guide (it is very detailed so would definitely recommend if you need more info) and modified it to fit our project.

Scroll to the end for the tools and materials list


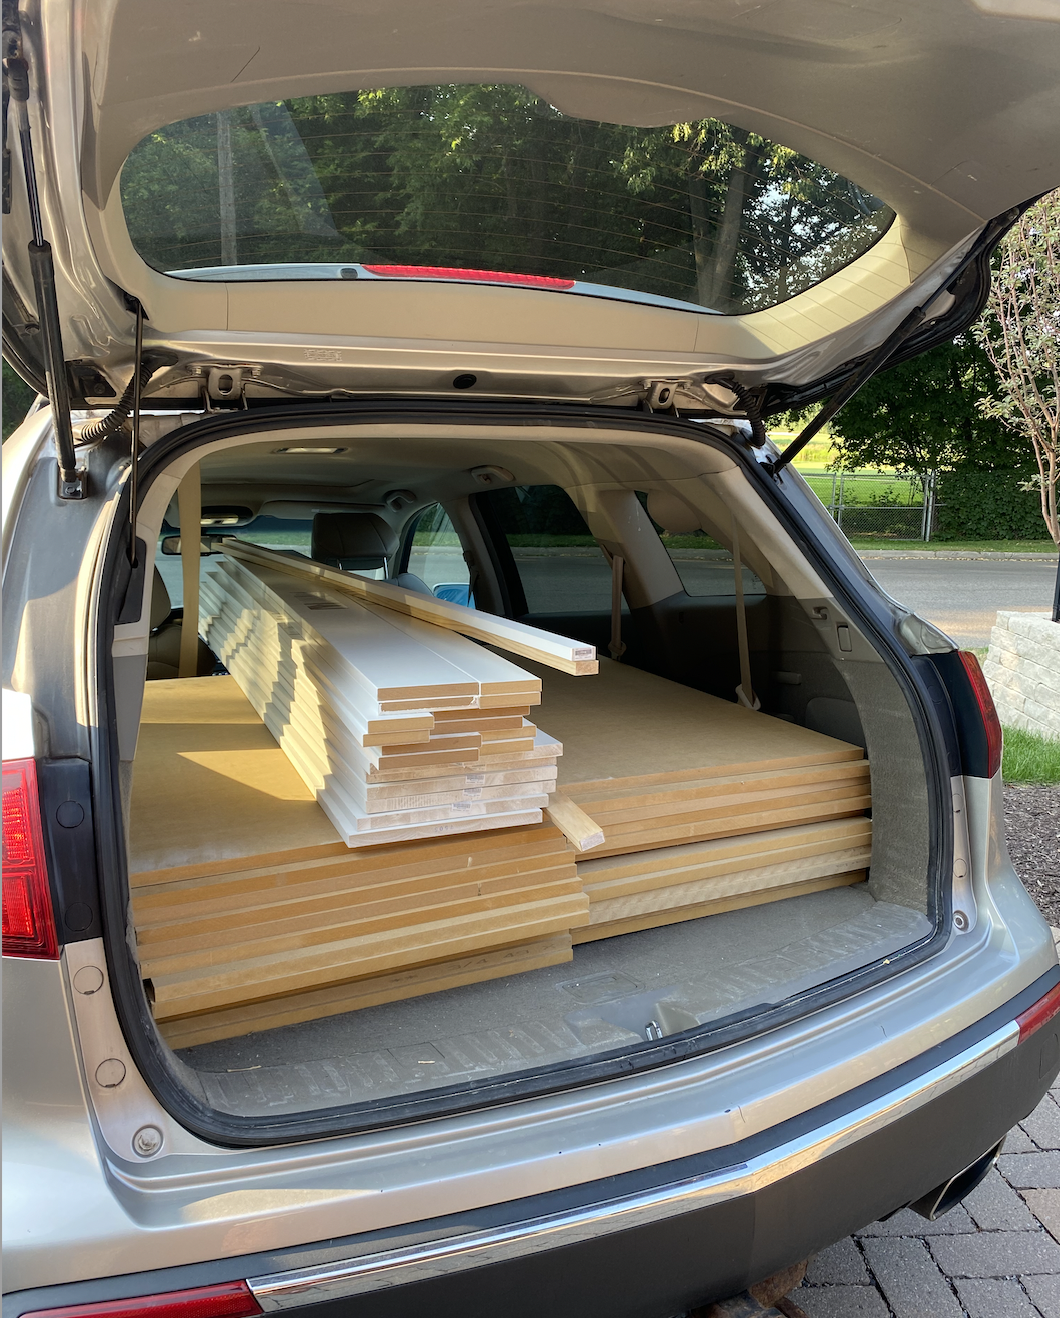
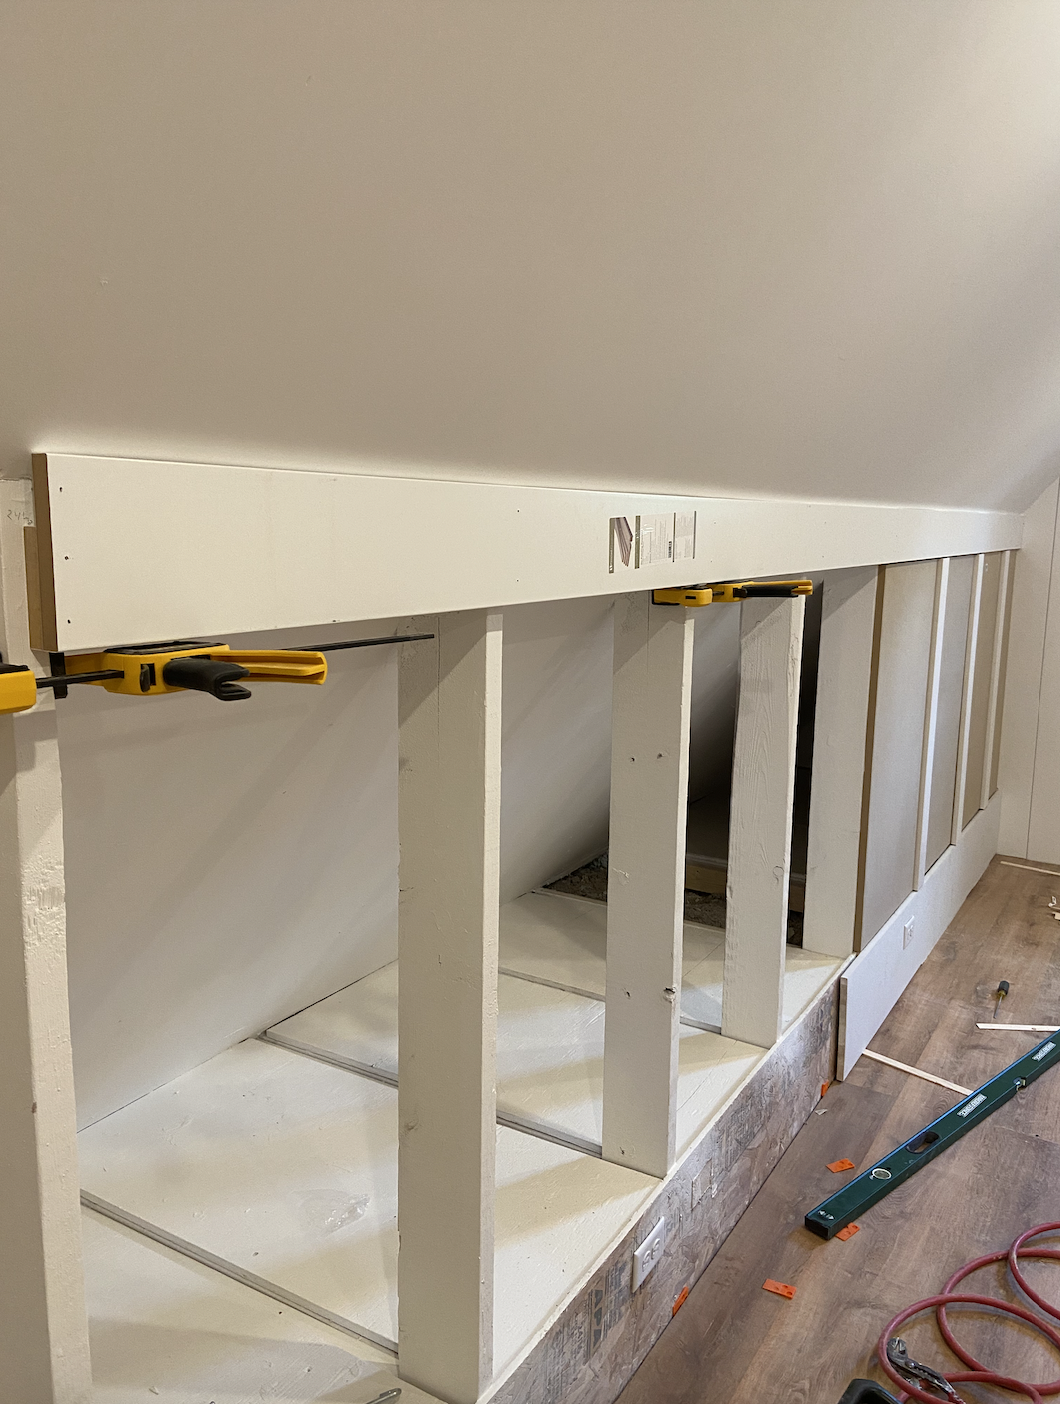
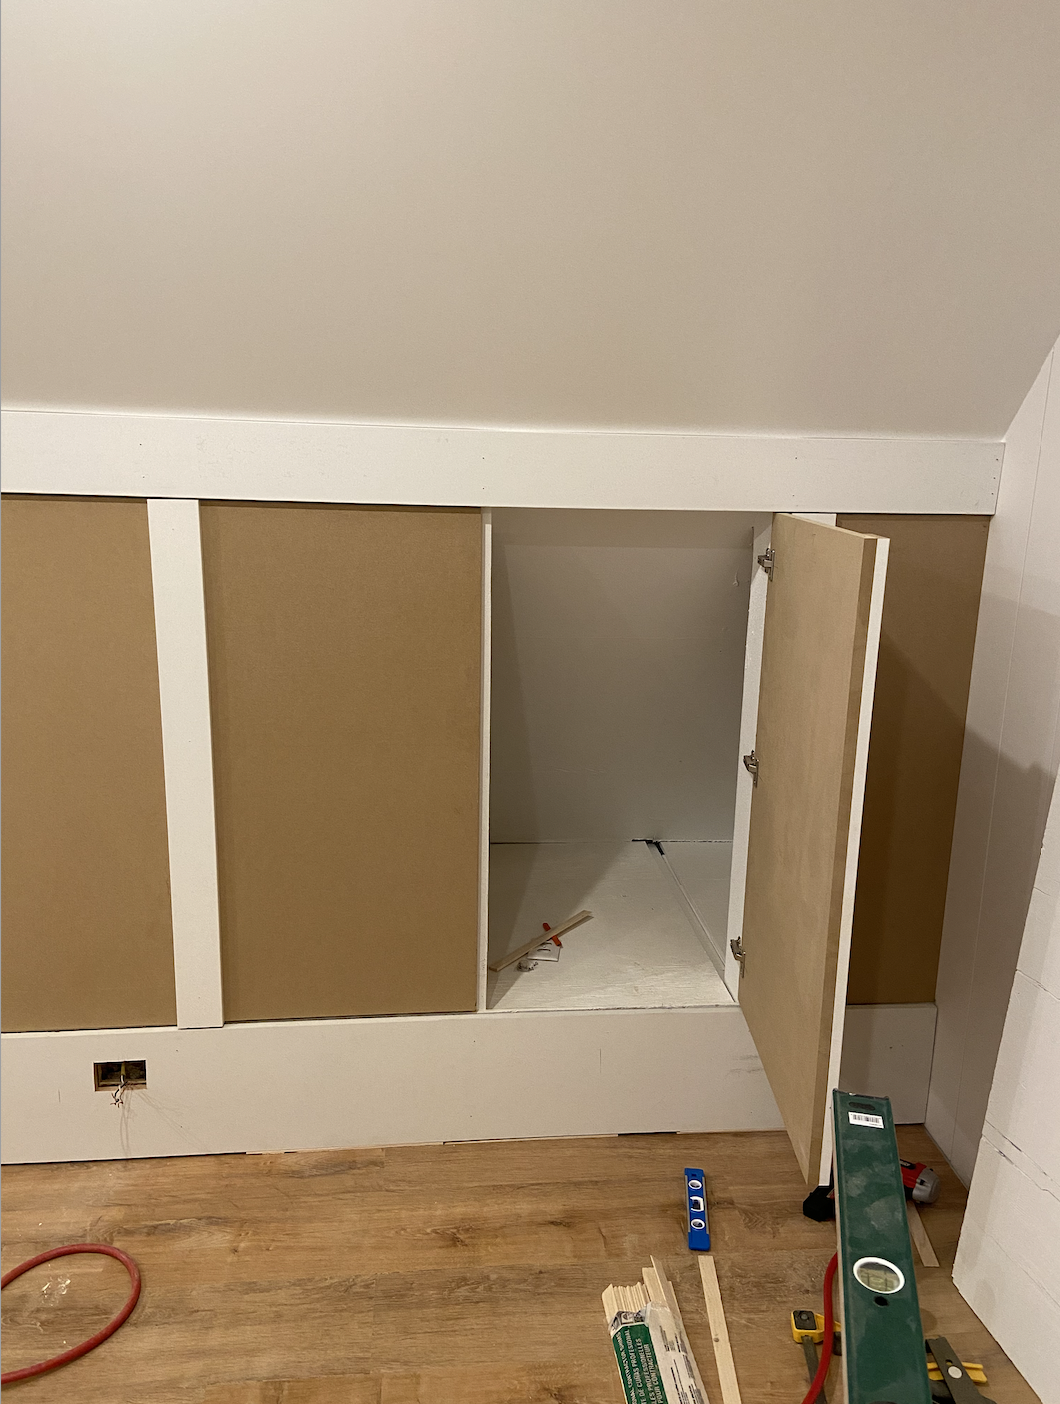
Step 1: Grab MDF boards for the doors and trim. Cut them down to size.


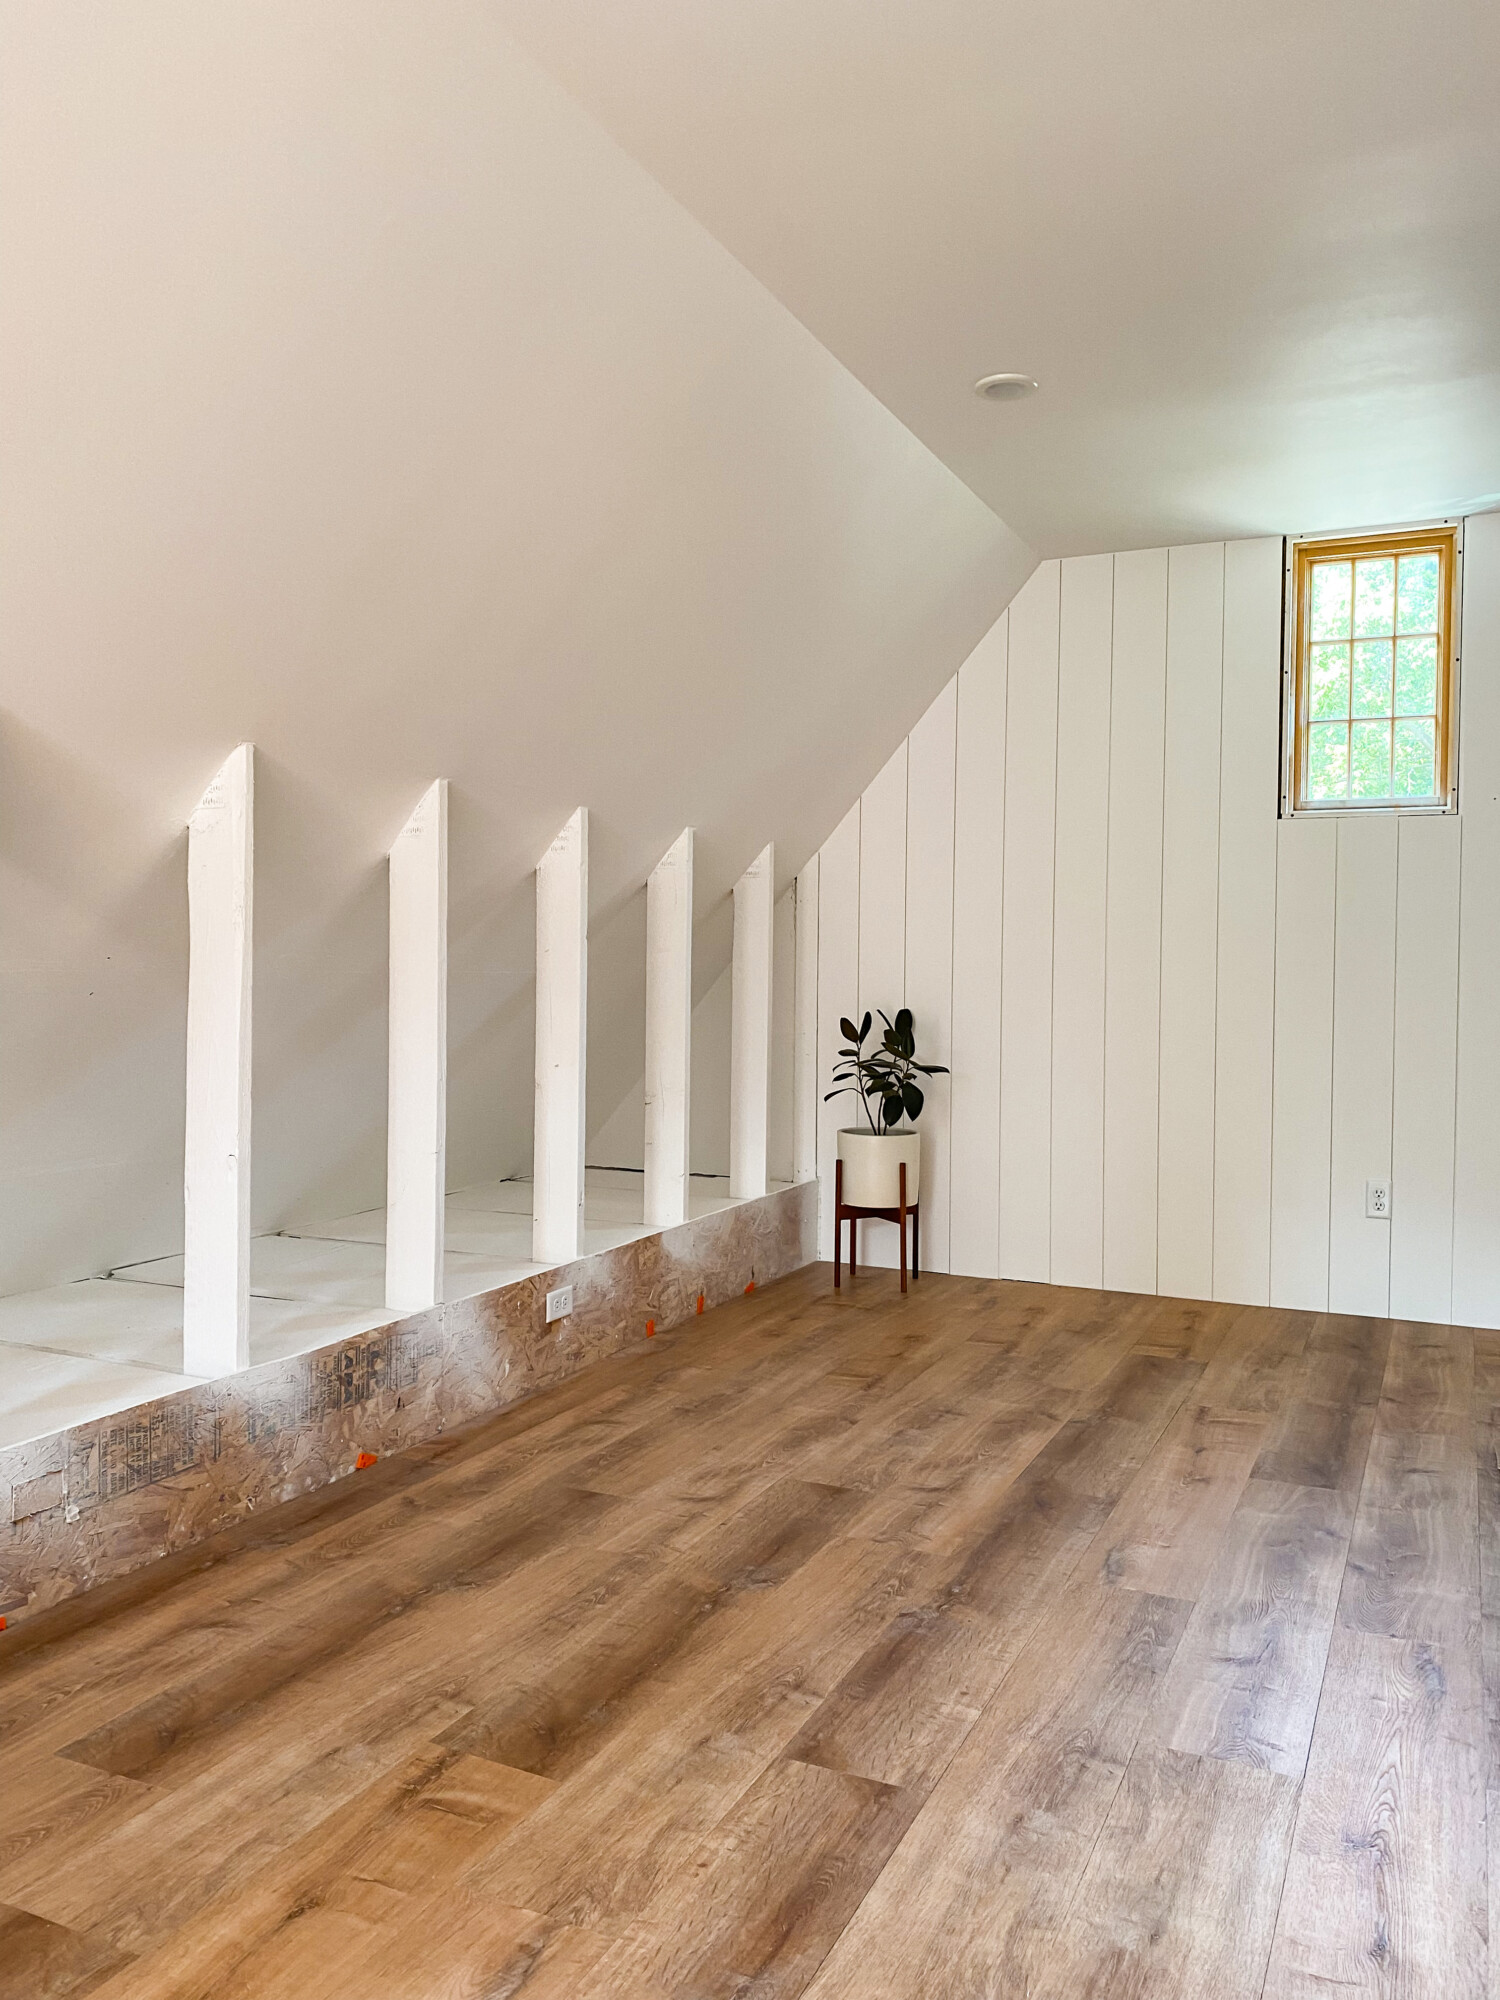
Step 2: Nail the pre-primed boards over the posts where it meets the slope on the top and bottom boards.

*Pro tip: if you are working solo, you will want to use these clamps to help hold the boards in place while you nail it because they are heavy.


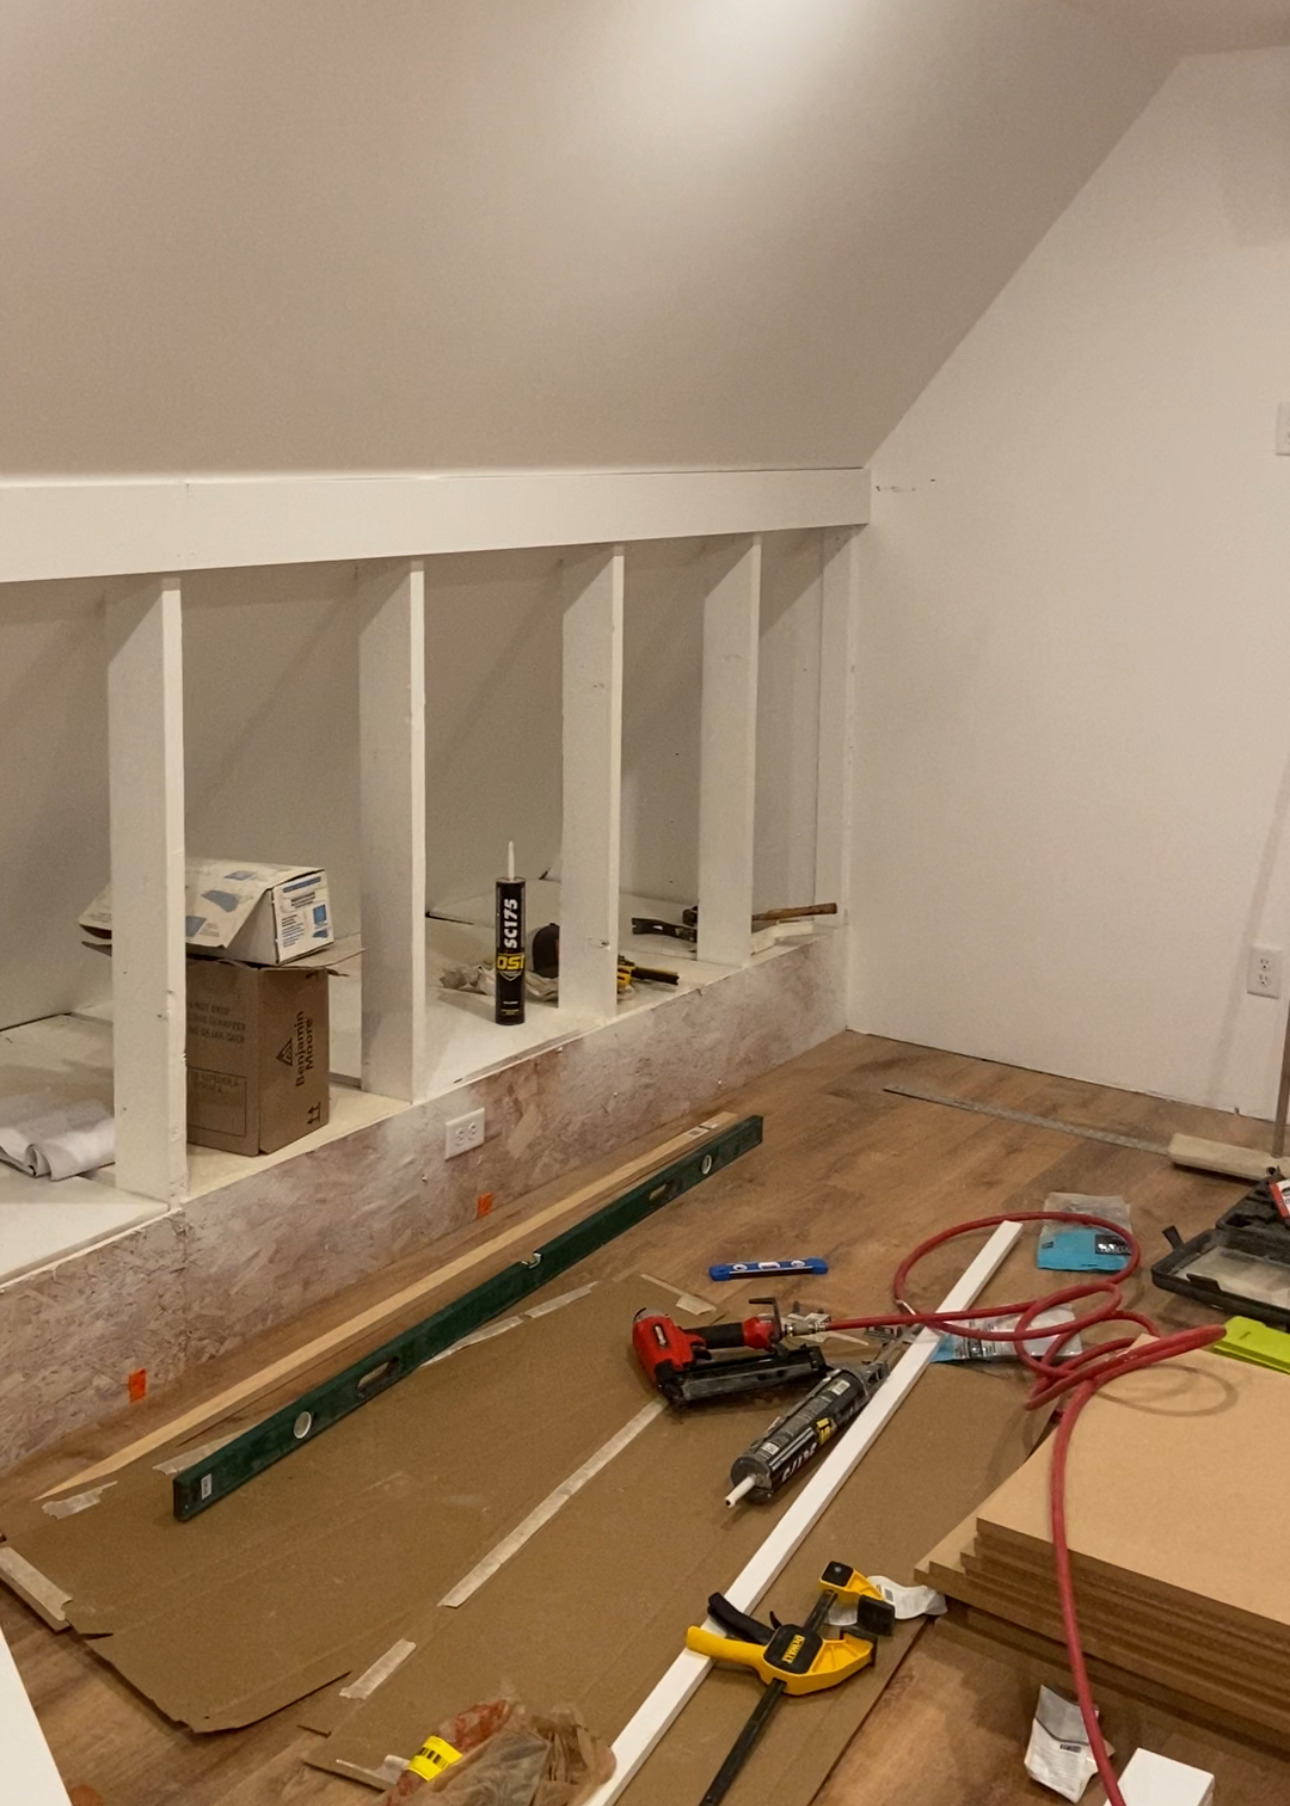
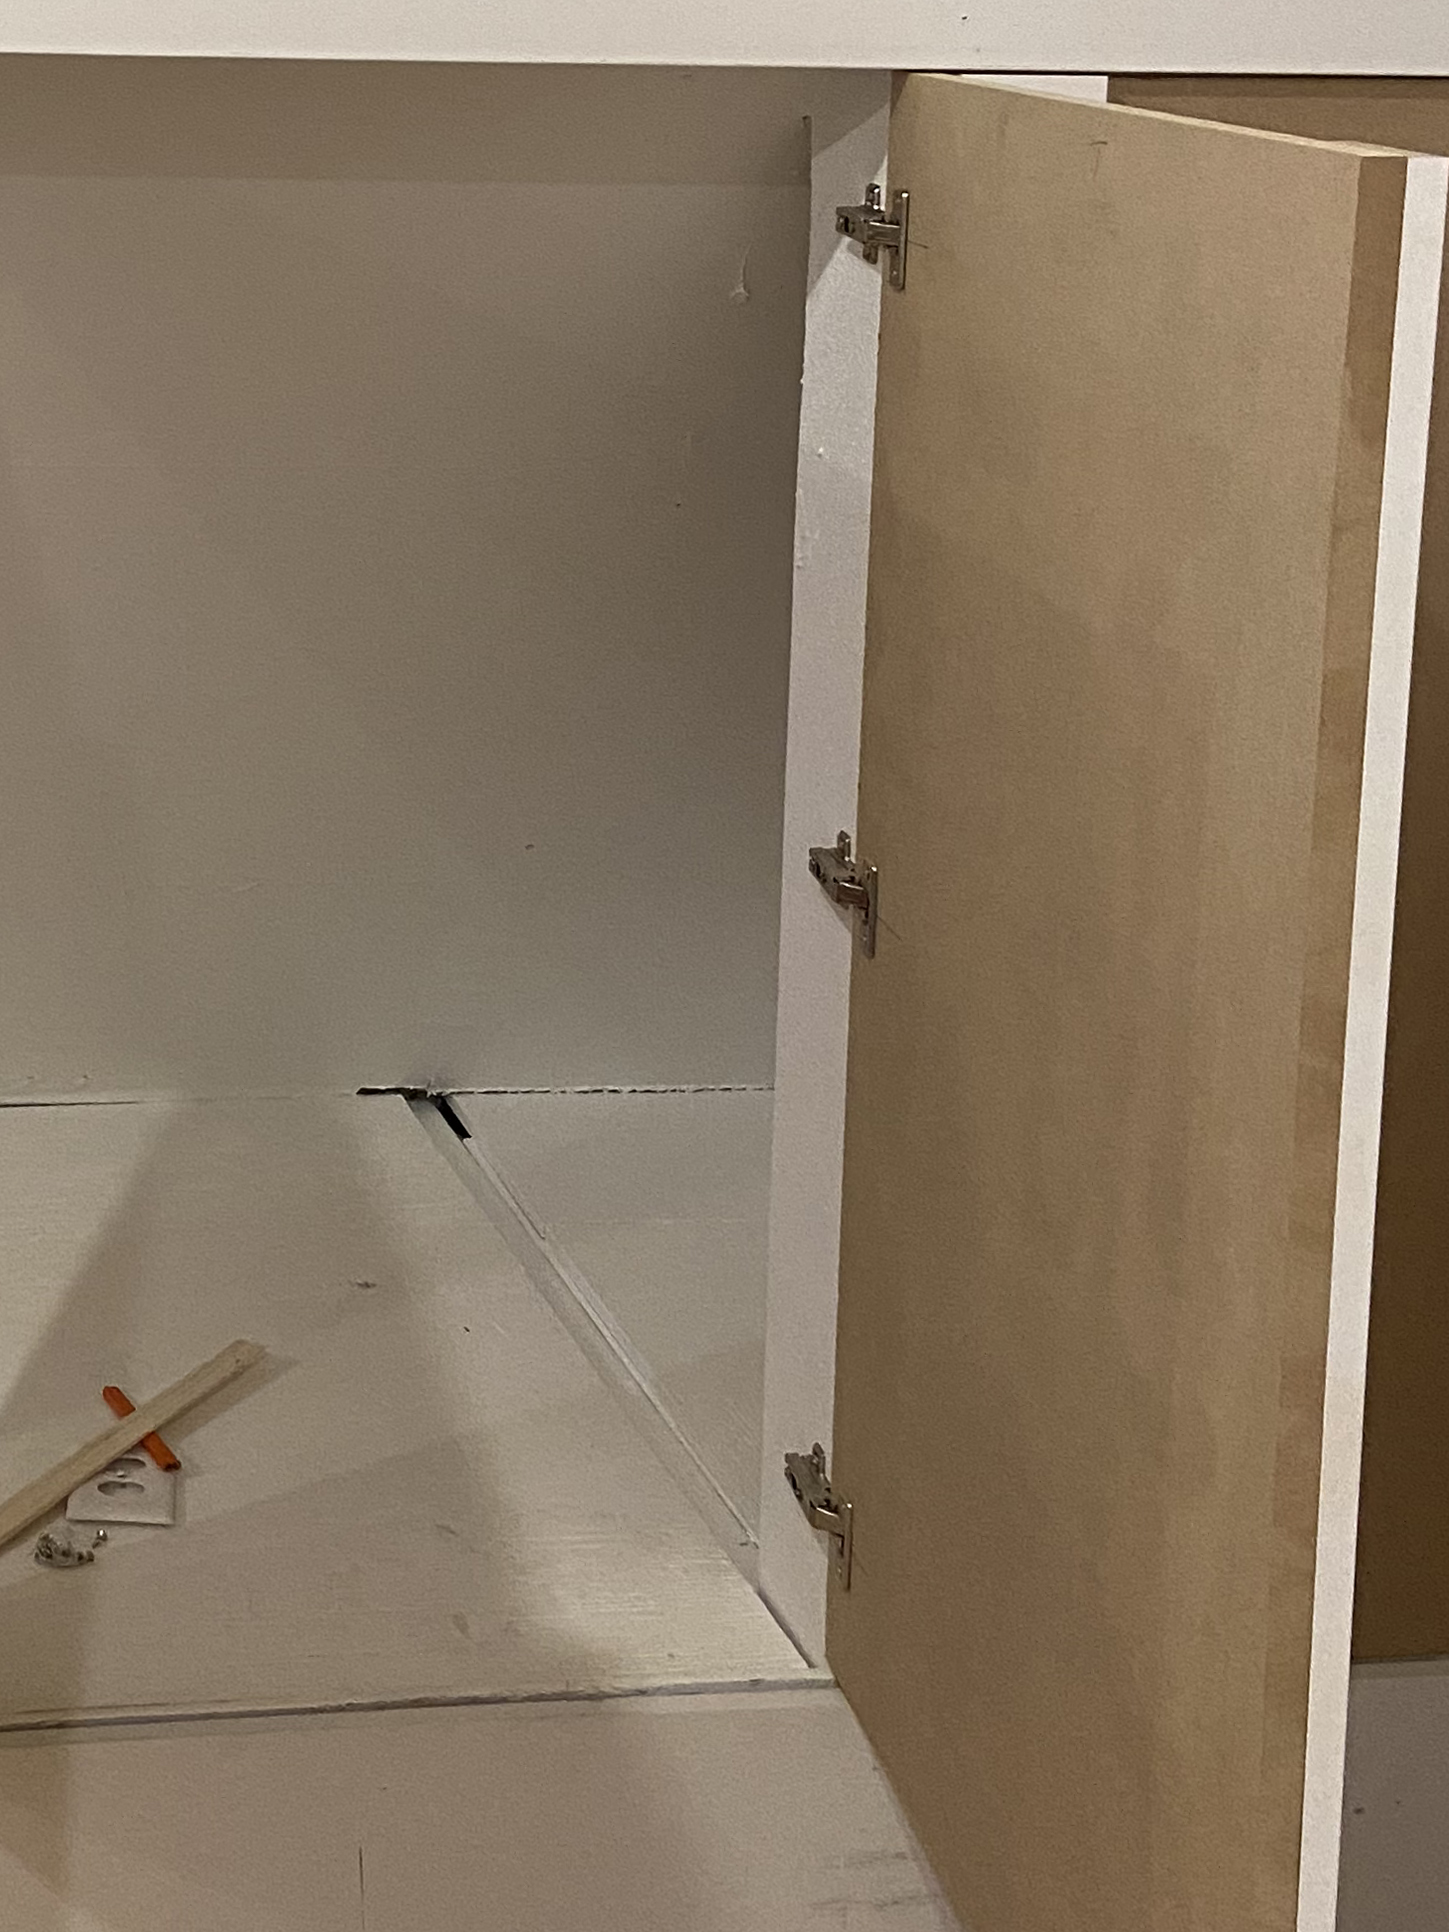
Step 3: Next, make sure to cut your doors down to size and attach the hinges. We used our secret weapon, the Kreg Concealed Hinge Jig to make perfect circles for the hinges.
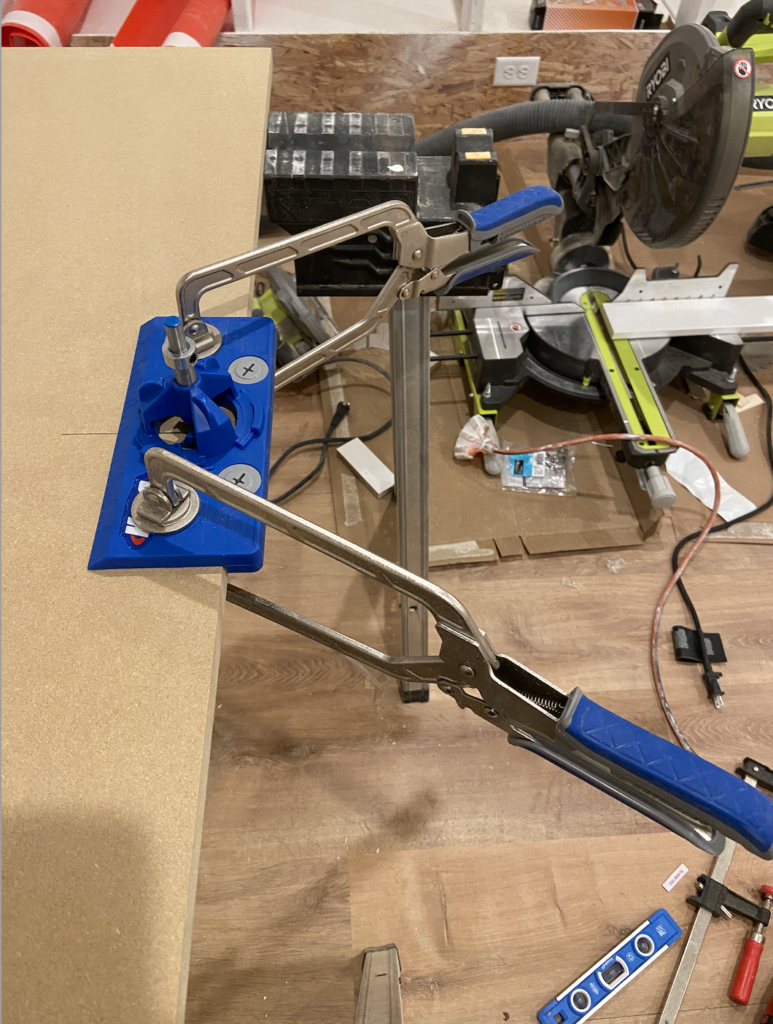
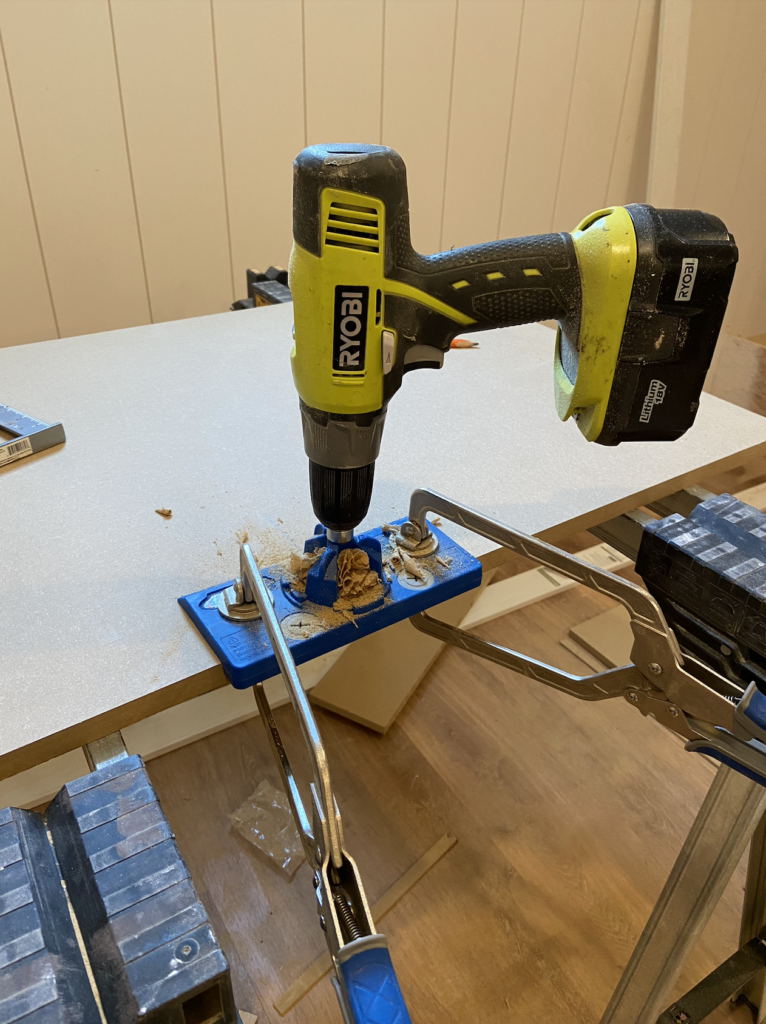
 

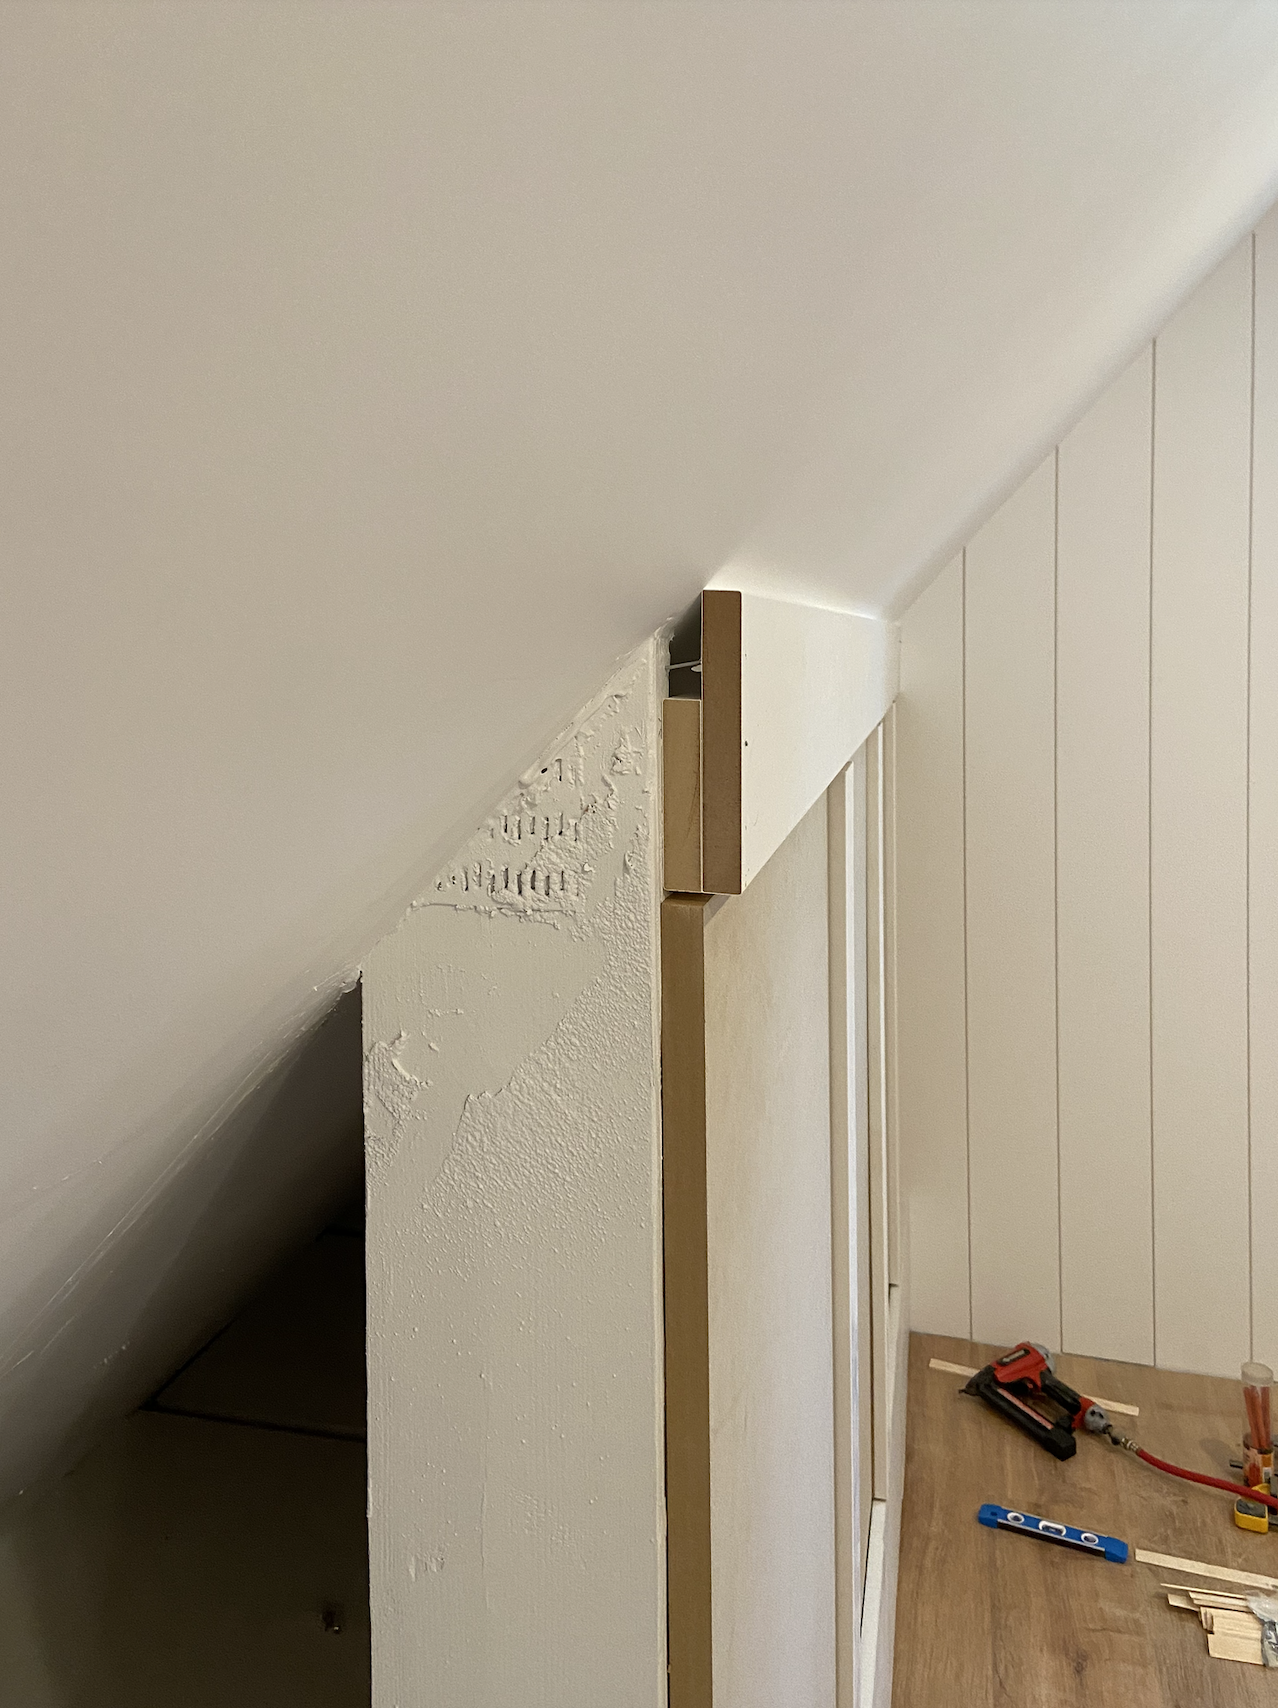
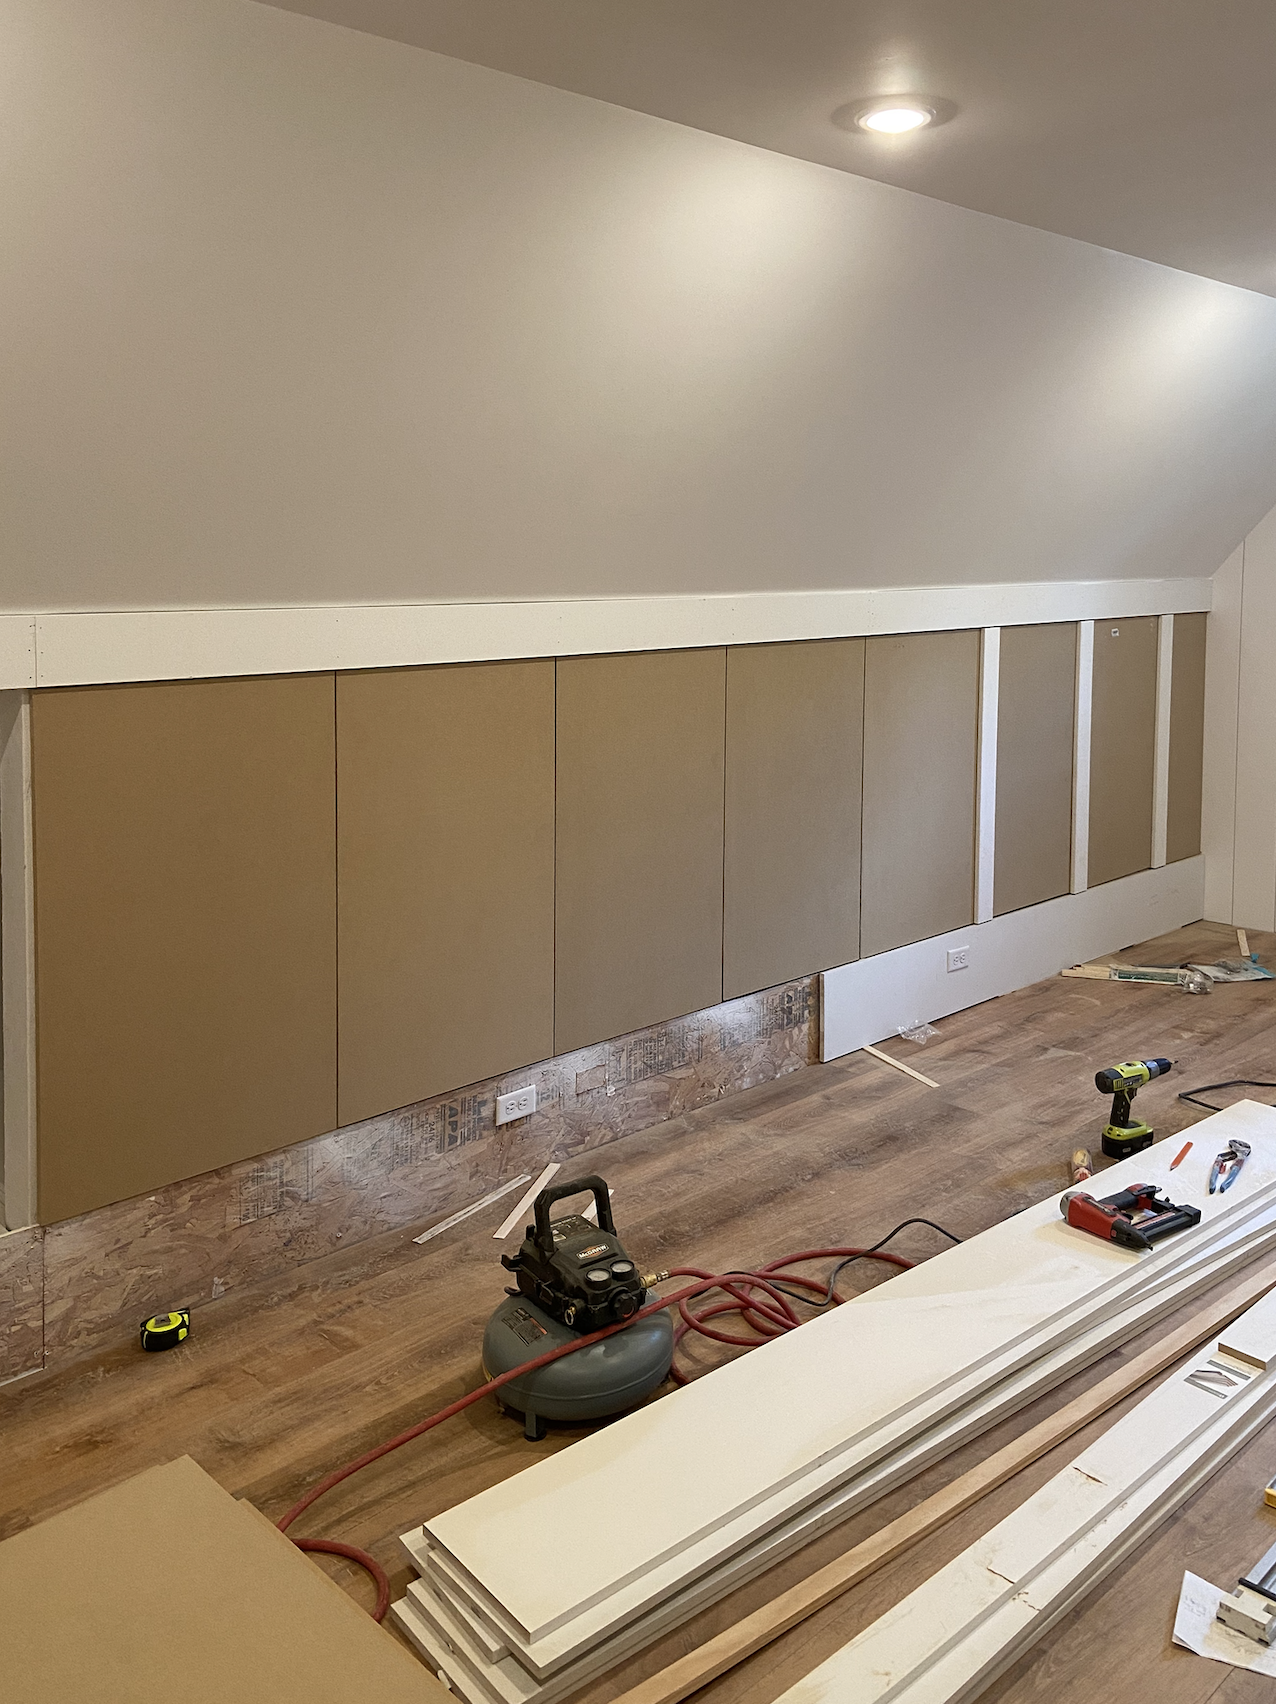
Step 4: Attach vertical handles with a finish nailer. We used Finished Elegance 1″ x 4″ MDF molding boards, which was the perfect width and comes completely finished since our local Home Depot was out of pre-primed MDF.

*Tip: Make sure when attaching vertical handle boards, there is a slight over-hang so when door closes, it overlaps the adjoining door for a seamless look.

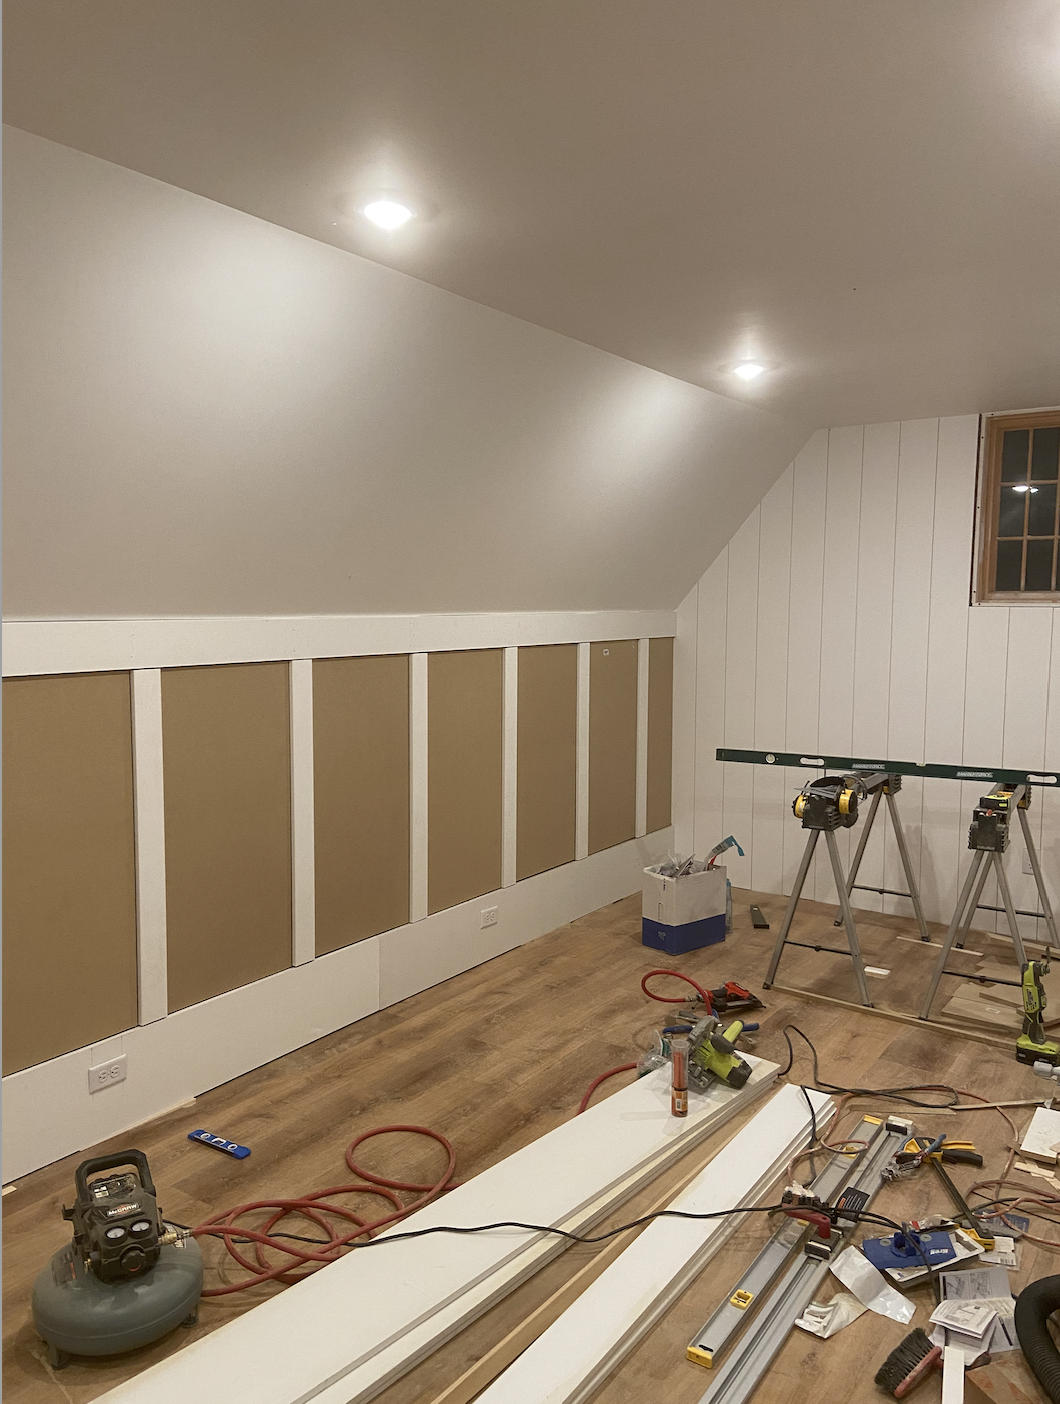
Step 5: Last, caulk and paint! With only one tiny window, we didn’t want the space to feel cramped so we decided on Benjamin Moore Chantilly Lace (not shown here).

*Tip: use oil-based primer to paint un-primed/unpainted MDF

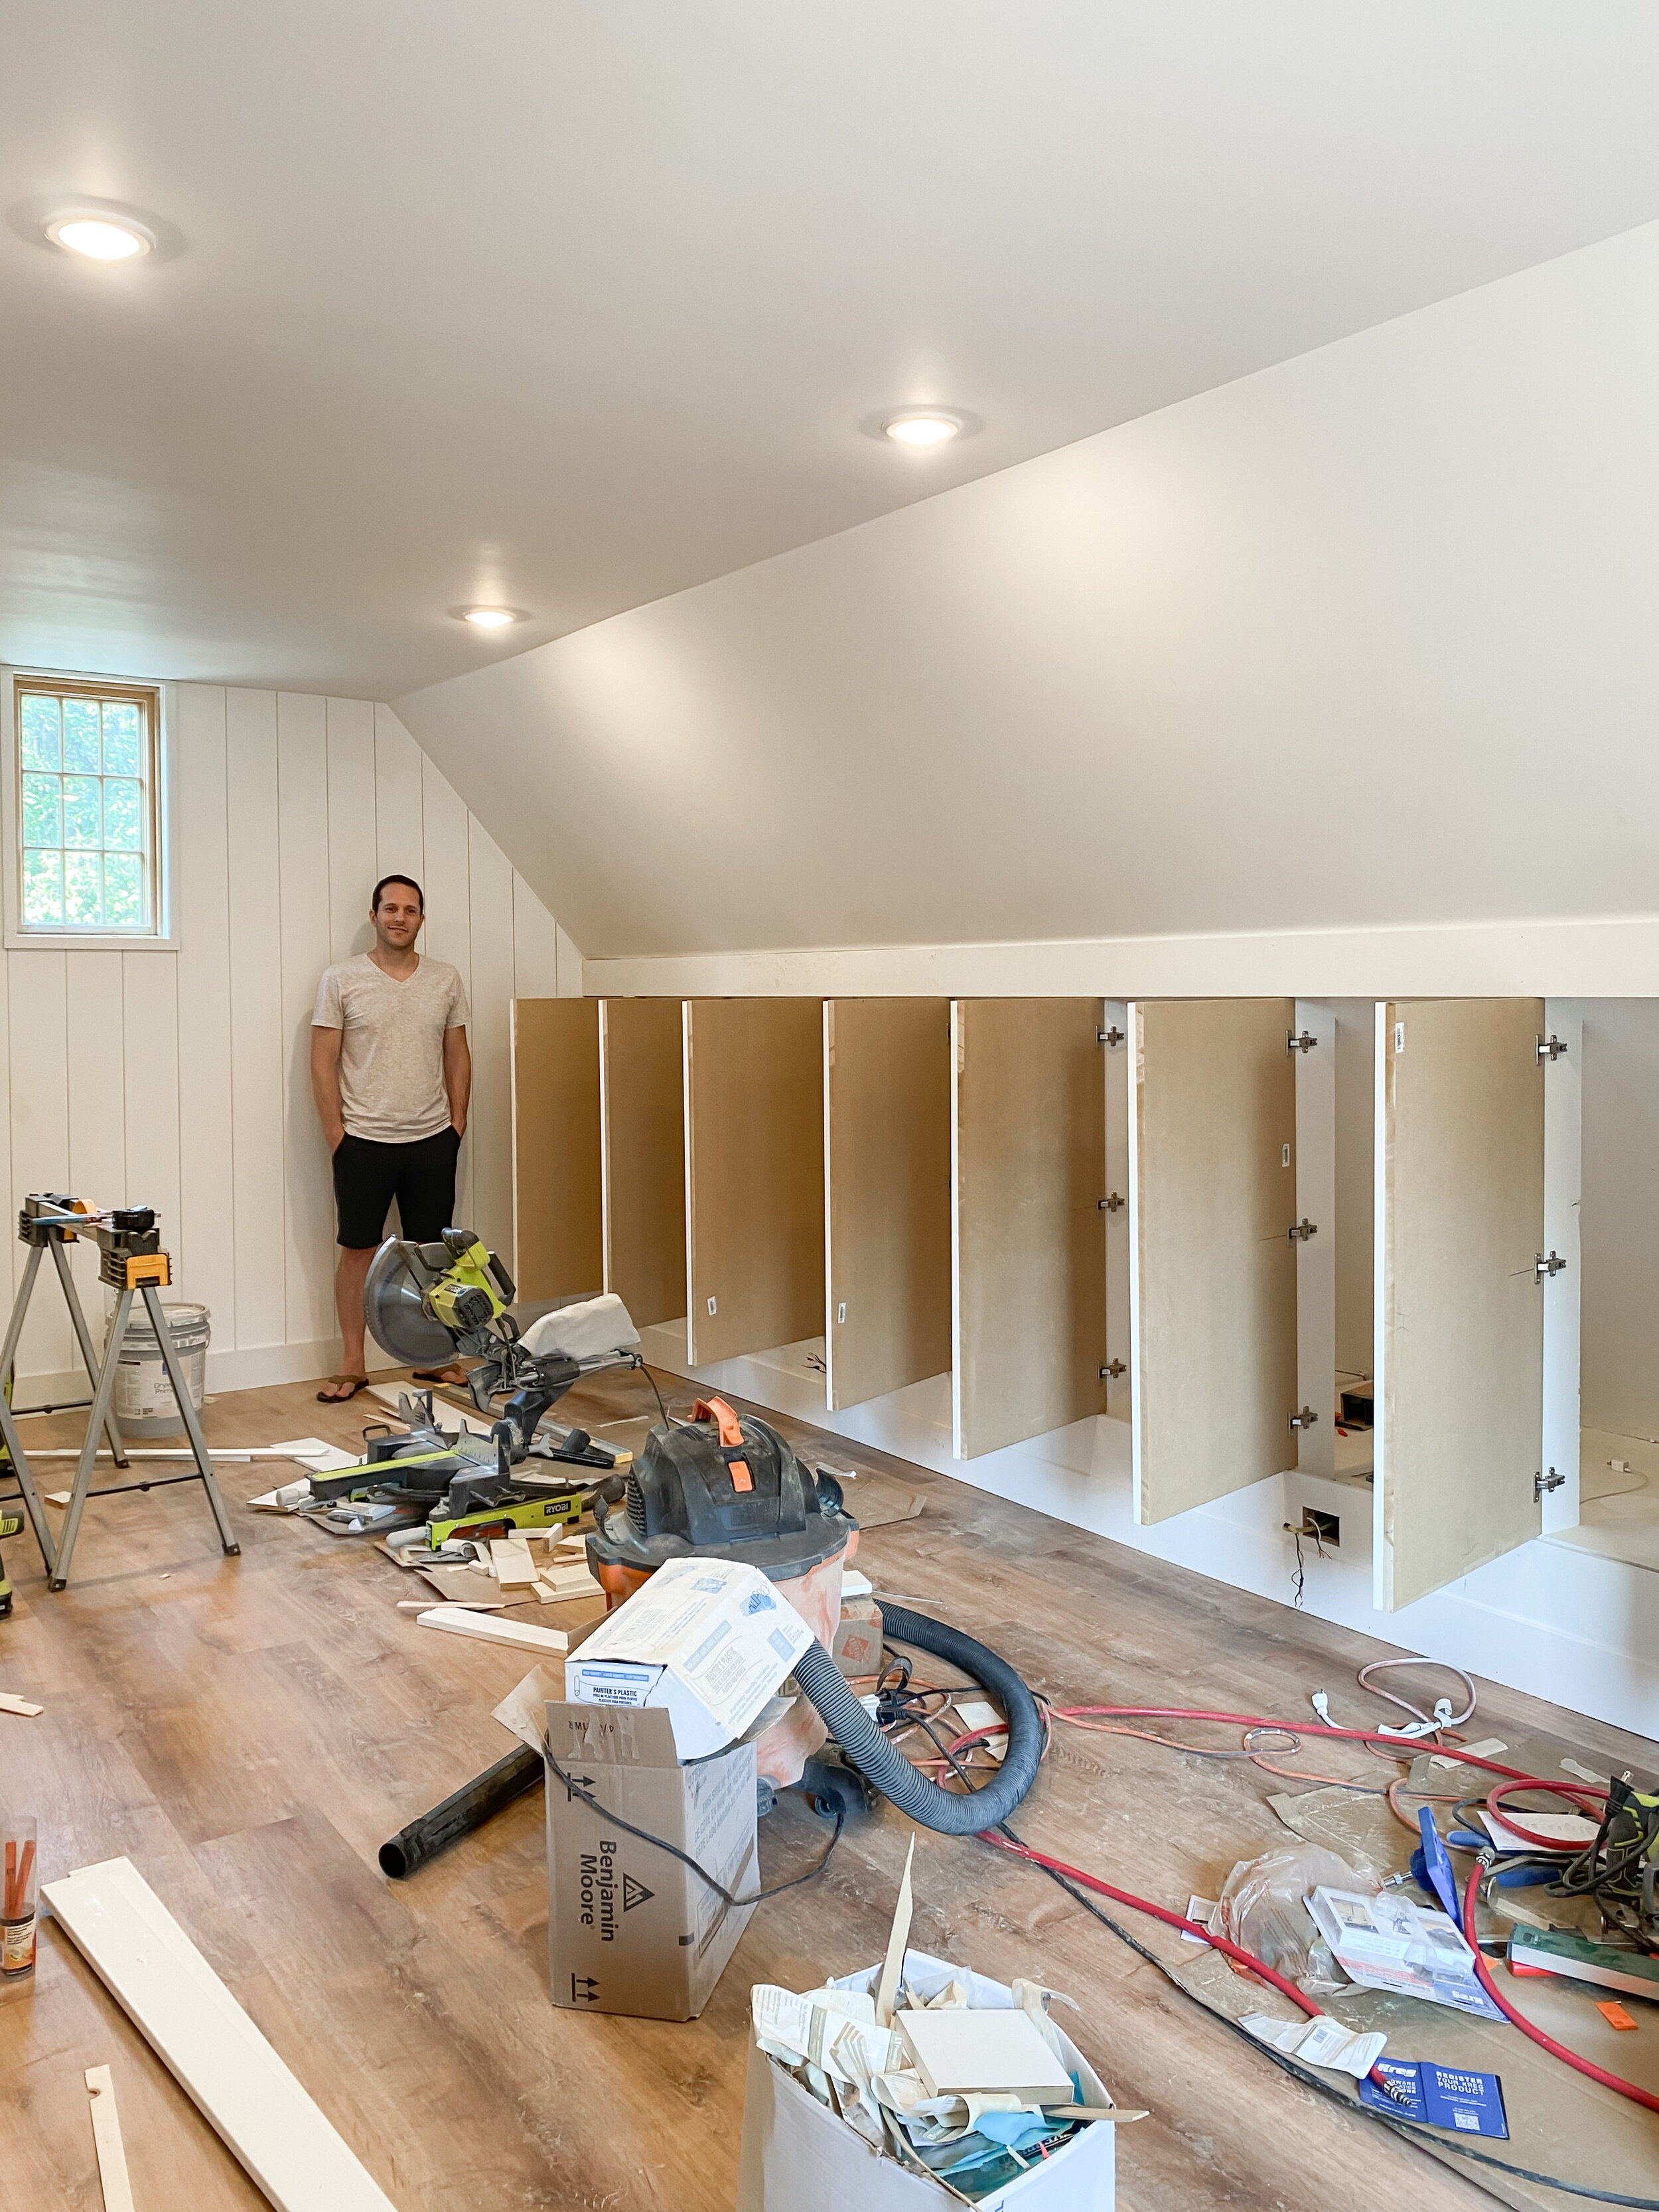
Brian made it a goal to finish the cabinets in one weekend and he accomplished it – so proud of him!  See finished space here.


Tools & Materials List

1 in x 4 in MDF Boards

1 in x 6 in MDF Boards

Unfinished Raw MDF Boards for Doors

Table Saw

Concealed Hinge Jig

Drill

Nail Gun

Clamps

Hinges; Soft Close Hinges

Door & Drawer Hardware Installation Kit

Paint Sprayer

Caulk

Sweetest Regards, Patti
before and after

Jack’s Nursery Transition into a Transportation Themed Big Kid Bedroom

Photos by Wing Ta @canarygrey

Last fall, Jack’s nursery got a makeover into a transporation themed big kid room and I may have teared up a little. He’s our last baby and this transition was bittersweet.

I never got around to doing a blog post on his big kid bedroom and thought it was time. Jack loves tractors, dump trucks, trains, trucks, race cars…basically anything with wheels. I wanted to incorporate a transportation theme that didn’t look busy or scream CARS. Something he would love, could grow with and reflected him but could easily be switched up, yet tastefully designed.

Here’s a look at his nursery before the makeover. You can read more here when we transitioned it from Livy’s nursery.

I really loved his nursery. And if I could, would’ve kept him in his crib for as long as possible lol. But Jack was ready for a big boy bed. He also loves books so we knew we wanted a bookshelf in here with some baskets for his favorite things. The kids’ toys are stored in the playroom but we let them keep a few things in baskets. We want their rooms to be a place of retreat, rest and not overstimulating with toys everywhere. This has worked really well for us to allow each room to have their purpose and not be a space for all things.

Awhile back, I saw the Bodie bed from Crate and Kids and knew it was the perfect bed for Jack’s room when he grew out of his crib. Months before he was fully ready, I was contacted by Crate and Kids. They wanted to help Jack with his big kid room transition and I couldn’t say yes fast enough! We love Crate and Barrel and their family of brands. It has been an absolute dream to be able to work with them.

First thing, we ordered everything way in advance to prepare for the moment. After that, I wanted to switch up the dark accent wall. The Night Watch color was cozy looking and perfect for snuggling a sweet baby. Now that Jack is no longer a baby, the dark moody color would make his tiny room feel cramped with the larger furniture pieces.

Jack loves stripes so I ordered this wallpaper that felt timeless. It’s something that could grow with him into his teen years but if he decides to switch it up down the road, it’s low commitment with just one wall. It was my first time wallpapering and we used pre-pasted wallpaper. I blogged all about how to do this if you’re a first timer, too! Read that here.

For additional wall art, I wanted it to be personal to Jack. He’s obsessed with a book from Brian’s childhood called ‘500 Words to Grow On’. So I decided to scan, print and frame his favorite transportation images from the book. The book was published in the 70’s and you can buy it used here. I love the vintage illustration!

Once the bedroom furniture and accessories arrived, we put it all together and Jack smiled ear to ear when he saw it! He even slept happily straight through in his big kid room for the first night!

Jack has been into solar systems because of his big sisters. When I saw this ceiling light, I knew he would think it resembled a solar system and it was the first thing he mentioned and chuckled!

*Note. I read a couple of reviews on their site about the wiring not fitting through the tube but that was not our experience.

This 6-cube bookcase is the perfect size for all of his books on top and baskets of his favorite things on the bottom.

This room is quite small and we had to really think through with the layout. It’s a bit unconventional having his bed by the windows but we were able to maximize the space with this configuration. He has been sleeping in here since November and we’ve not had any issues with him being cold.

As the icing for his transportation themed bedroom, we surprised Jack with this wooden motorcycle designed by Leanne Ford! He’s all about it!

If you want an over the top transportation themed bedroom, you could incorporate that into the wallpaper/mural, bedding and rug. For a more subtle approach like ours, here’s a summary of what we did which can apply to any theme.

  1. framed artwork with favorite vehicles. scan a photo or draw one out for a more unique touch.

  2. incorporate in decorative pillow like this dump truck one

  3. prop a few of their transportation toys on shelves

  4. display transportation books on floating shelf

  5. be extra and add in a wooden motorcycle rocker 😉

Watch this reel of his room transformation!


View this post on Instagram


A post shared by Patti Wagner (@patticakewagner)

Hope you enjoyed the tour of Jack’s transportation themed big kid bedroom, a room made just for him! We recently installed his Roman shades and I’ll share that once I’m able to shoot some photos.


Product Sources

Paint Color – Benjamin Moore White Dove

Wallpaper

Bodie Spindle Bed

Orange Stripe Sheet Set

Velvet Quilt and Sham

Truck Throw Pillow (currently on clearance $24.99; Reg. $29)

Mattress

Zig Zag Tassel Rug

Peg Rack

Felt Pom Pom Garland

Pedestal Picture Frame

Wood Pictue Frame

Floating Shelf is Ikea but similar one here

Ceiling Light

6-cube Bookcase

Washable Paper Cube Bin

Wood Dresser

Wooden Motorcycle by Leanne Ford

Touch Table Lamp

Alphabet Wooden Puzzle

‘500 Words to Grow On’ Book

Sweetest Regards, Patti
before and after

Repurposing and Converting Our Sleeping Porch into the Ensuite Bathroom: Before and After Photos

Did you hear?? Our plumbing inspection passed! I was going to publish this post regardless but it definitely gives me peace of mind to finally post before and after remodel photos of our sleeping porch that we repurposed and converted to our ensuite bathroom.

Knobs | Brass Mirrors (fabricated by Bauer Metal to hang from ceiling)| Sconces | Vase | 3 Hole Widespread Faucet | Round Marble Tray | Inside-Mount Cafe Rod Set the you can customize for size | Tiles from Mercury Mosaic | Custom Walnut Vanity from JKath

Nothing about repurposing a sleeping porch into an en-suite bathroom was easy. The permits, demo, diy’s, acting as general contractors and designers, throw in some no shows, a pandemic, supply chain issues, distance learning and you’ve got a recipe for a two year long project 😅. Thanks for hanging in there with me during this remodel!

Take a walk down memory lane in this post – a timeline detailing the progress

Read all about the design direction in this post

Before and After Photos of Our Ensuite Bathroom Remodel

Now onto the fun stuff! Can you believe this is the same view?

BEFORE. The state of the sleeping porch when we moved in.

AFTER: with the raised ceiling.

The original room had a ceiling of about 7’ high. We obtained a permit that allowed us to raise it by max of 1’ 1/2” which really opened up the space! We are still waiting on the cafe curtains and that will add some charm and privacy.

Read this post for Comparing Quartzite Porcelain as a Marble Alternative if you’re in the market for countertops.

Signature Hardware Shannon Widespread Faucet with cross handles. Can also be purchased here

We mixed aged brass and oil rubbed bronze (ORB) within our metal finishes. I’m a huge fan of mixing metals because it gives a nice contrast when done right. Many of our original hardware and fixtures have aged over time to a bronze look. I’m quite picky about ORB and our partners over at Signature Hardware does a fantastic job creating this finish.

The products we use should have great design elements that integrate nicely with older homes and Signature Hardware has been our source for many years and recommend for your bath, kitchen and hardware. I’ll highlight their products in this blog post and all product sources will be listed at the end.

BEFORE: right after demo’ing, we taped off the future clawfoot tub location.

AFTER: clawfoot tub of our dreams!

It’s been a dream to have a clawfoot tub in here and this one is perfect! It’s the 59” Lena Cast Iron Clawfoot Tub from Signature Hardware and we ended up painting the feet white. In order to not push the tub forward closer to the door, we used a Deck-Mount telephone faucet vs. a floor mount.

*Tip. Make sure to use the 6” deck coupler height with this style tub in order to meet code.

BEFORE: during the demo process, we discovered a roof leak.

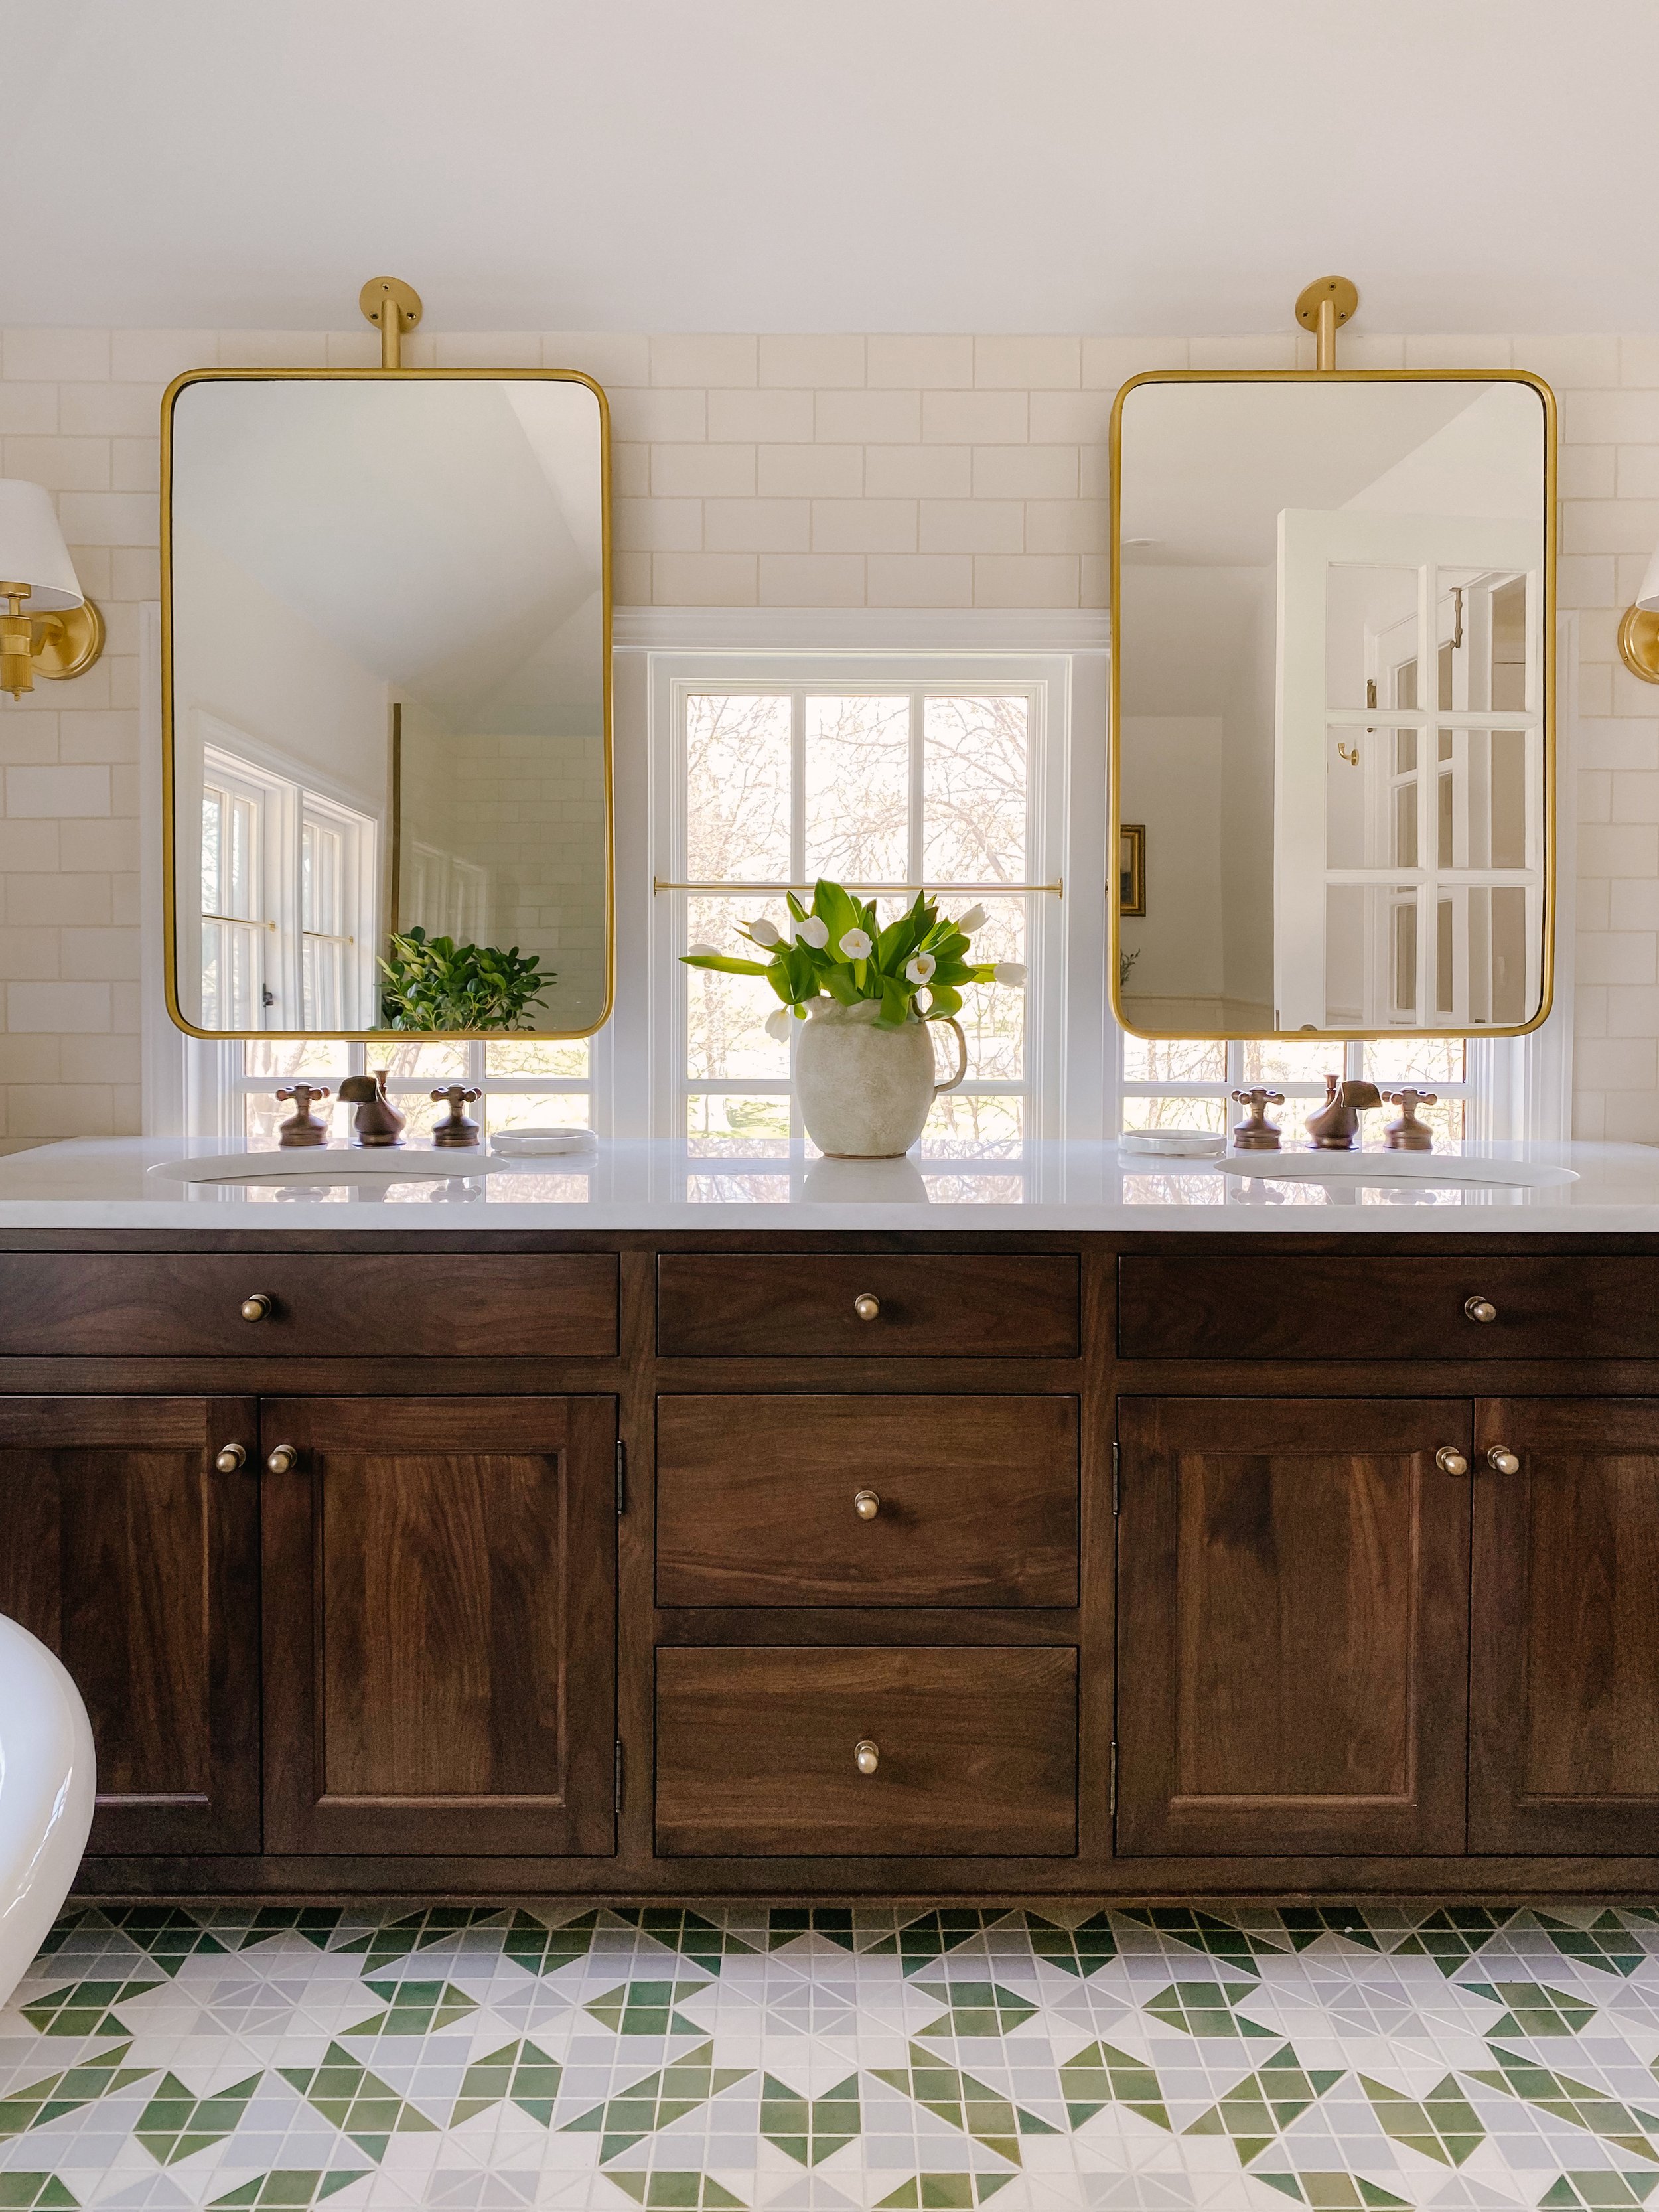
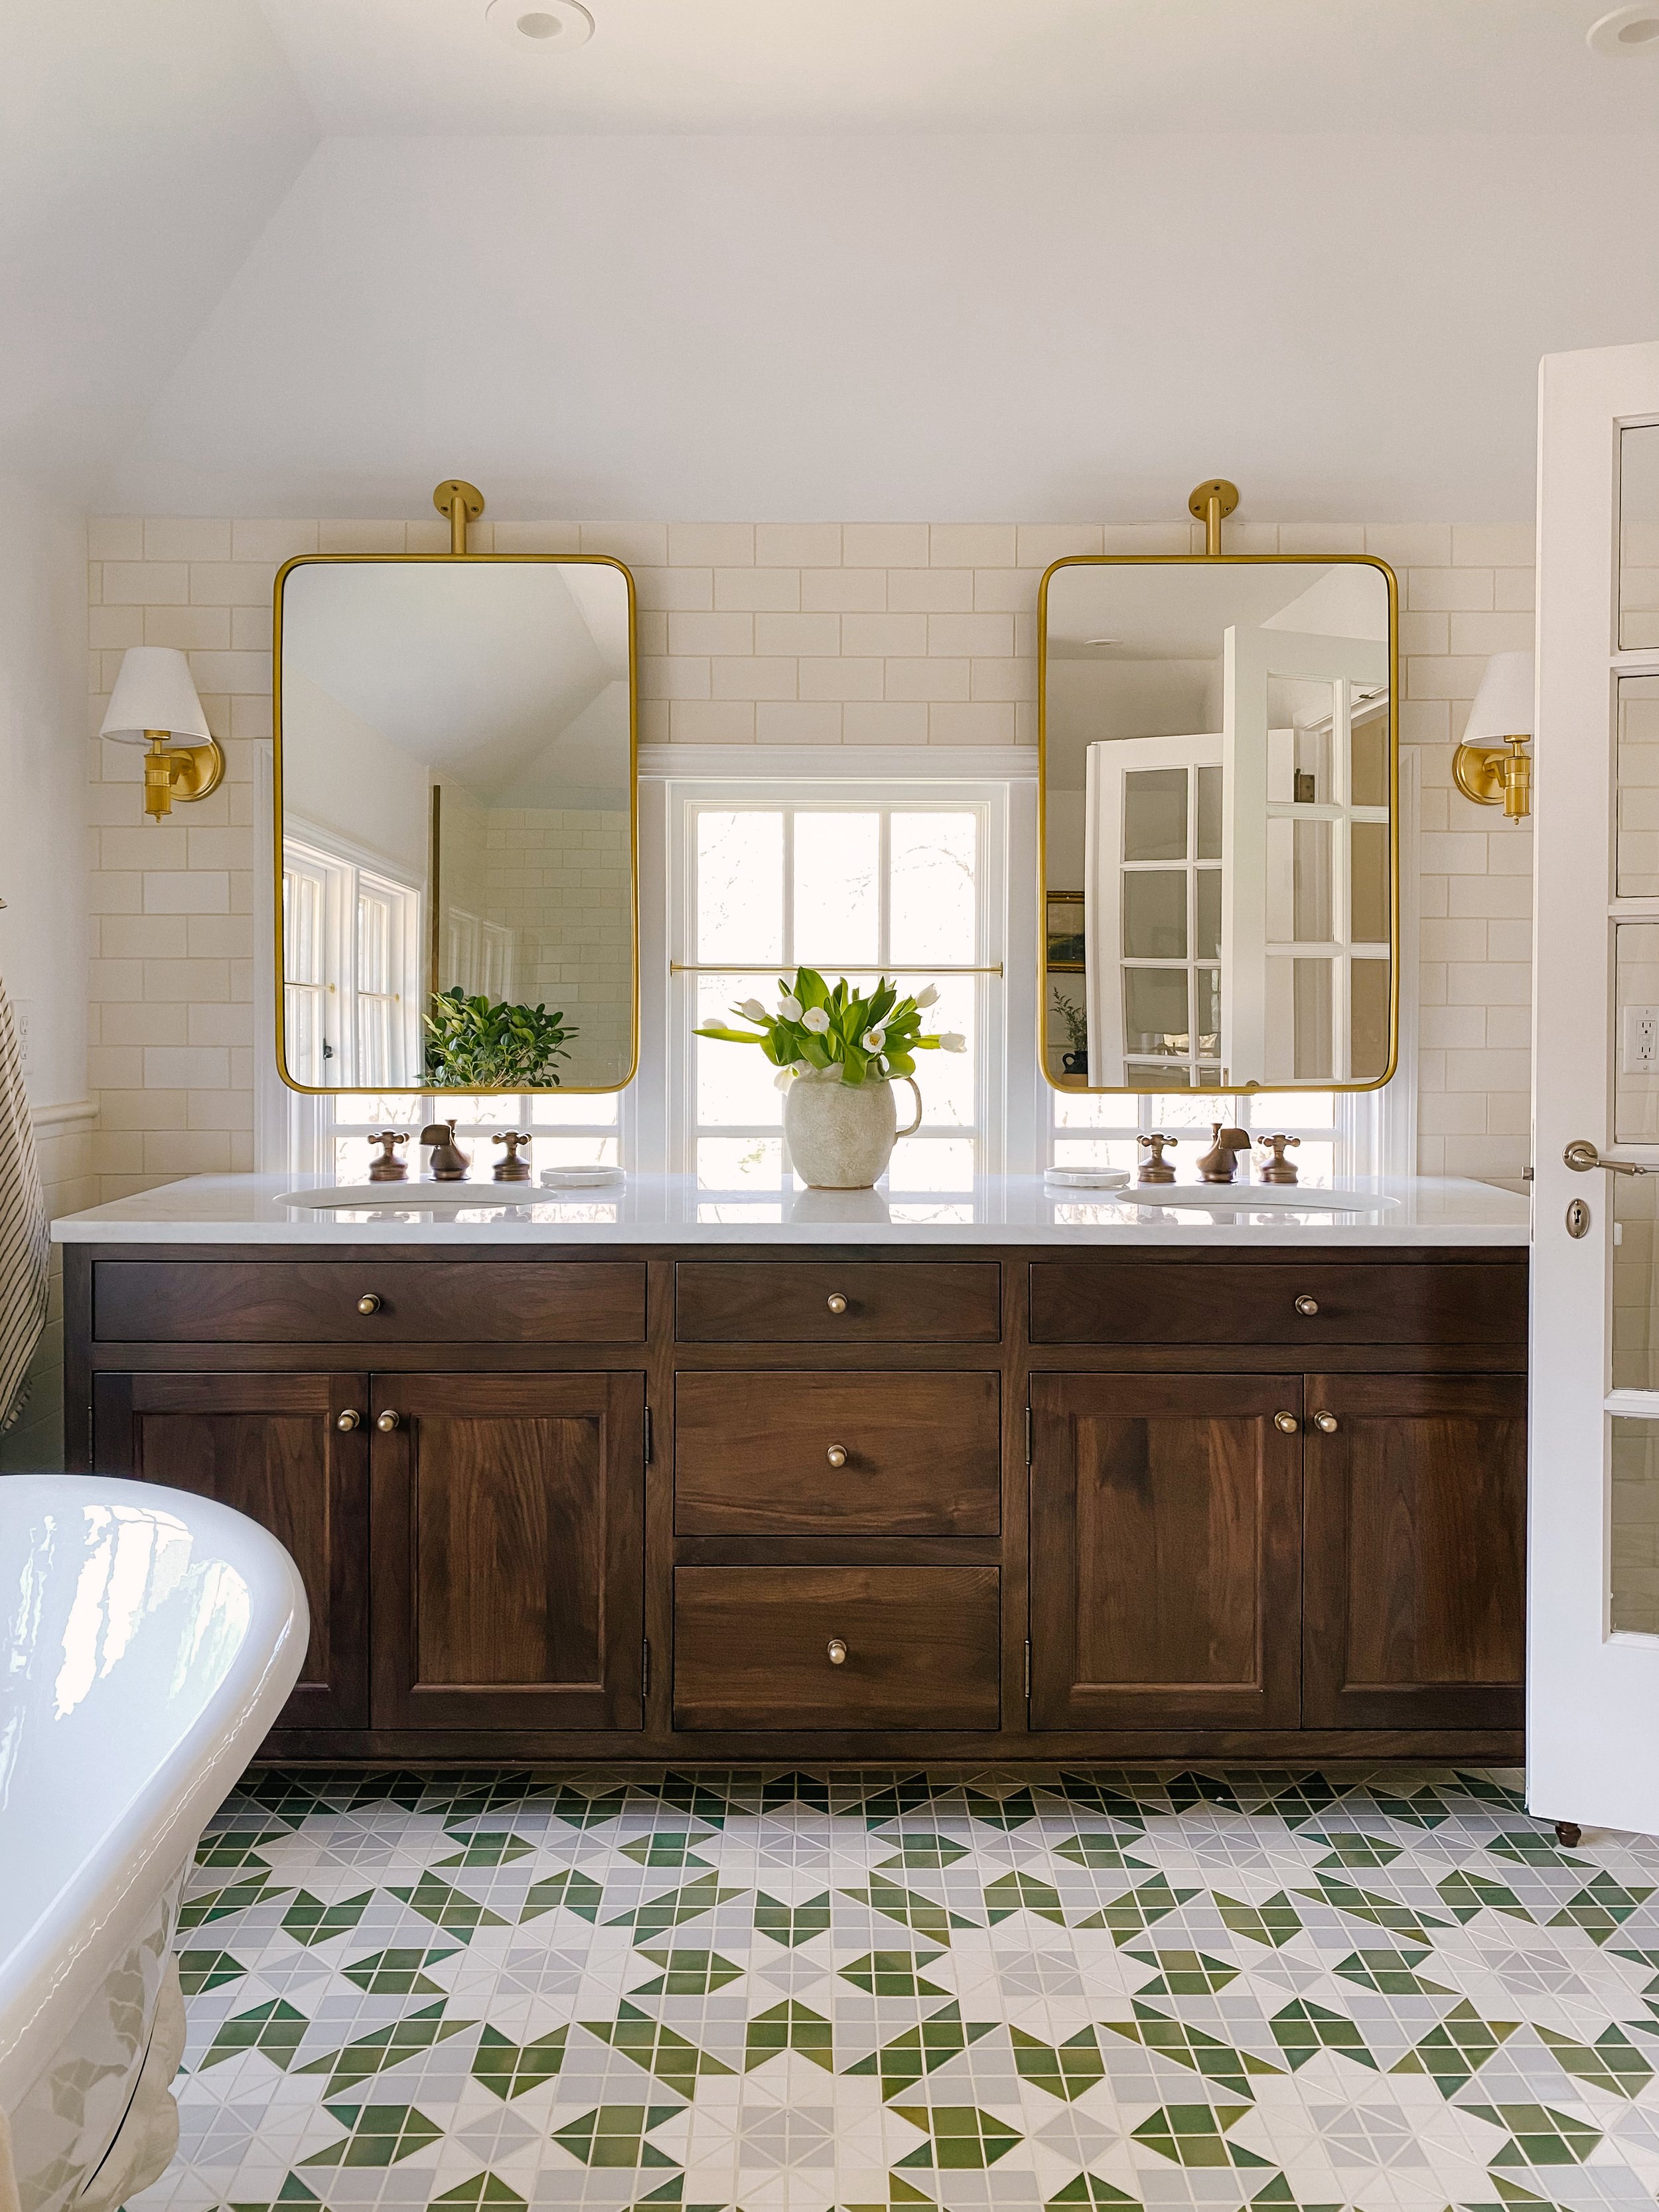
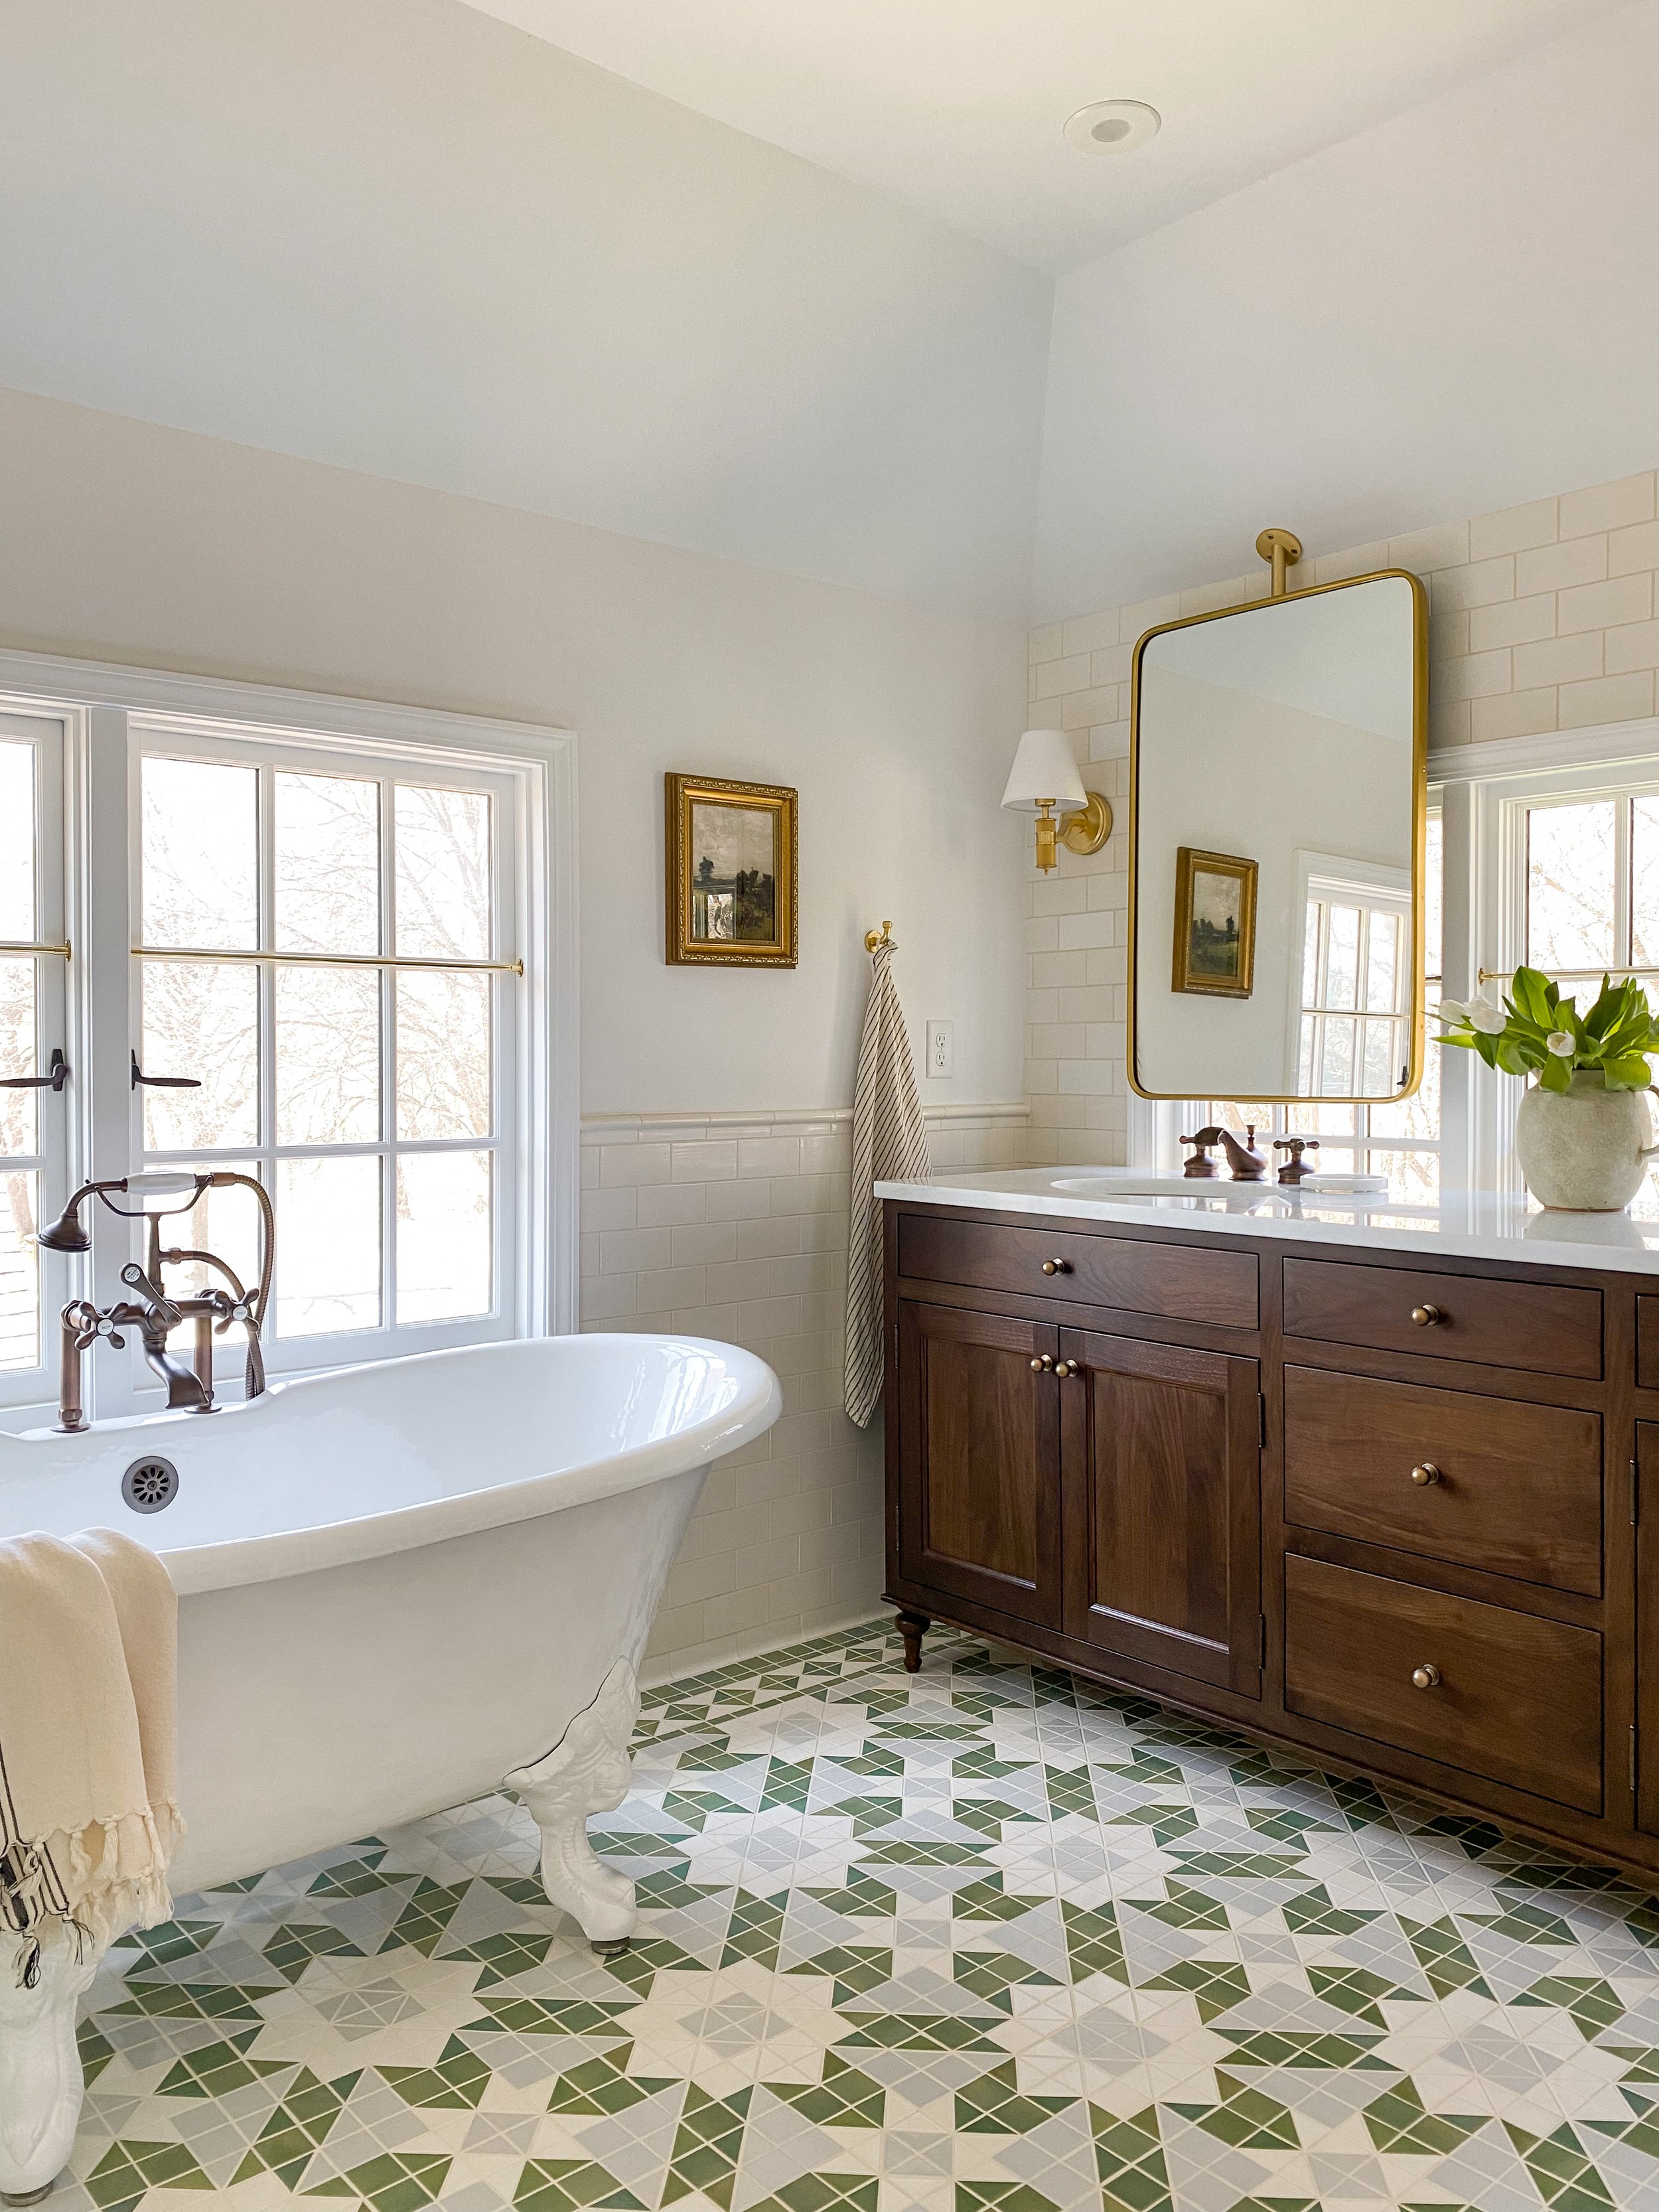
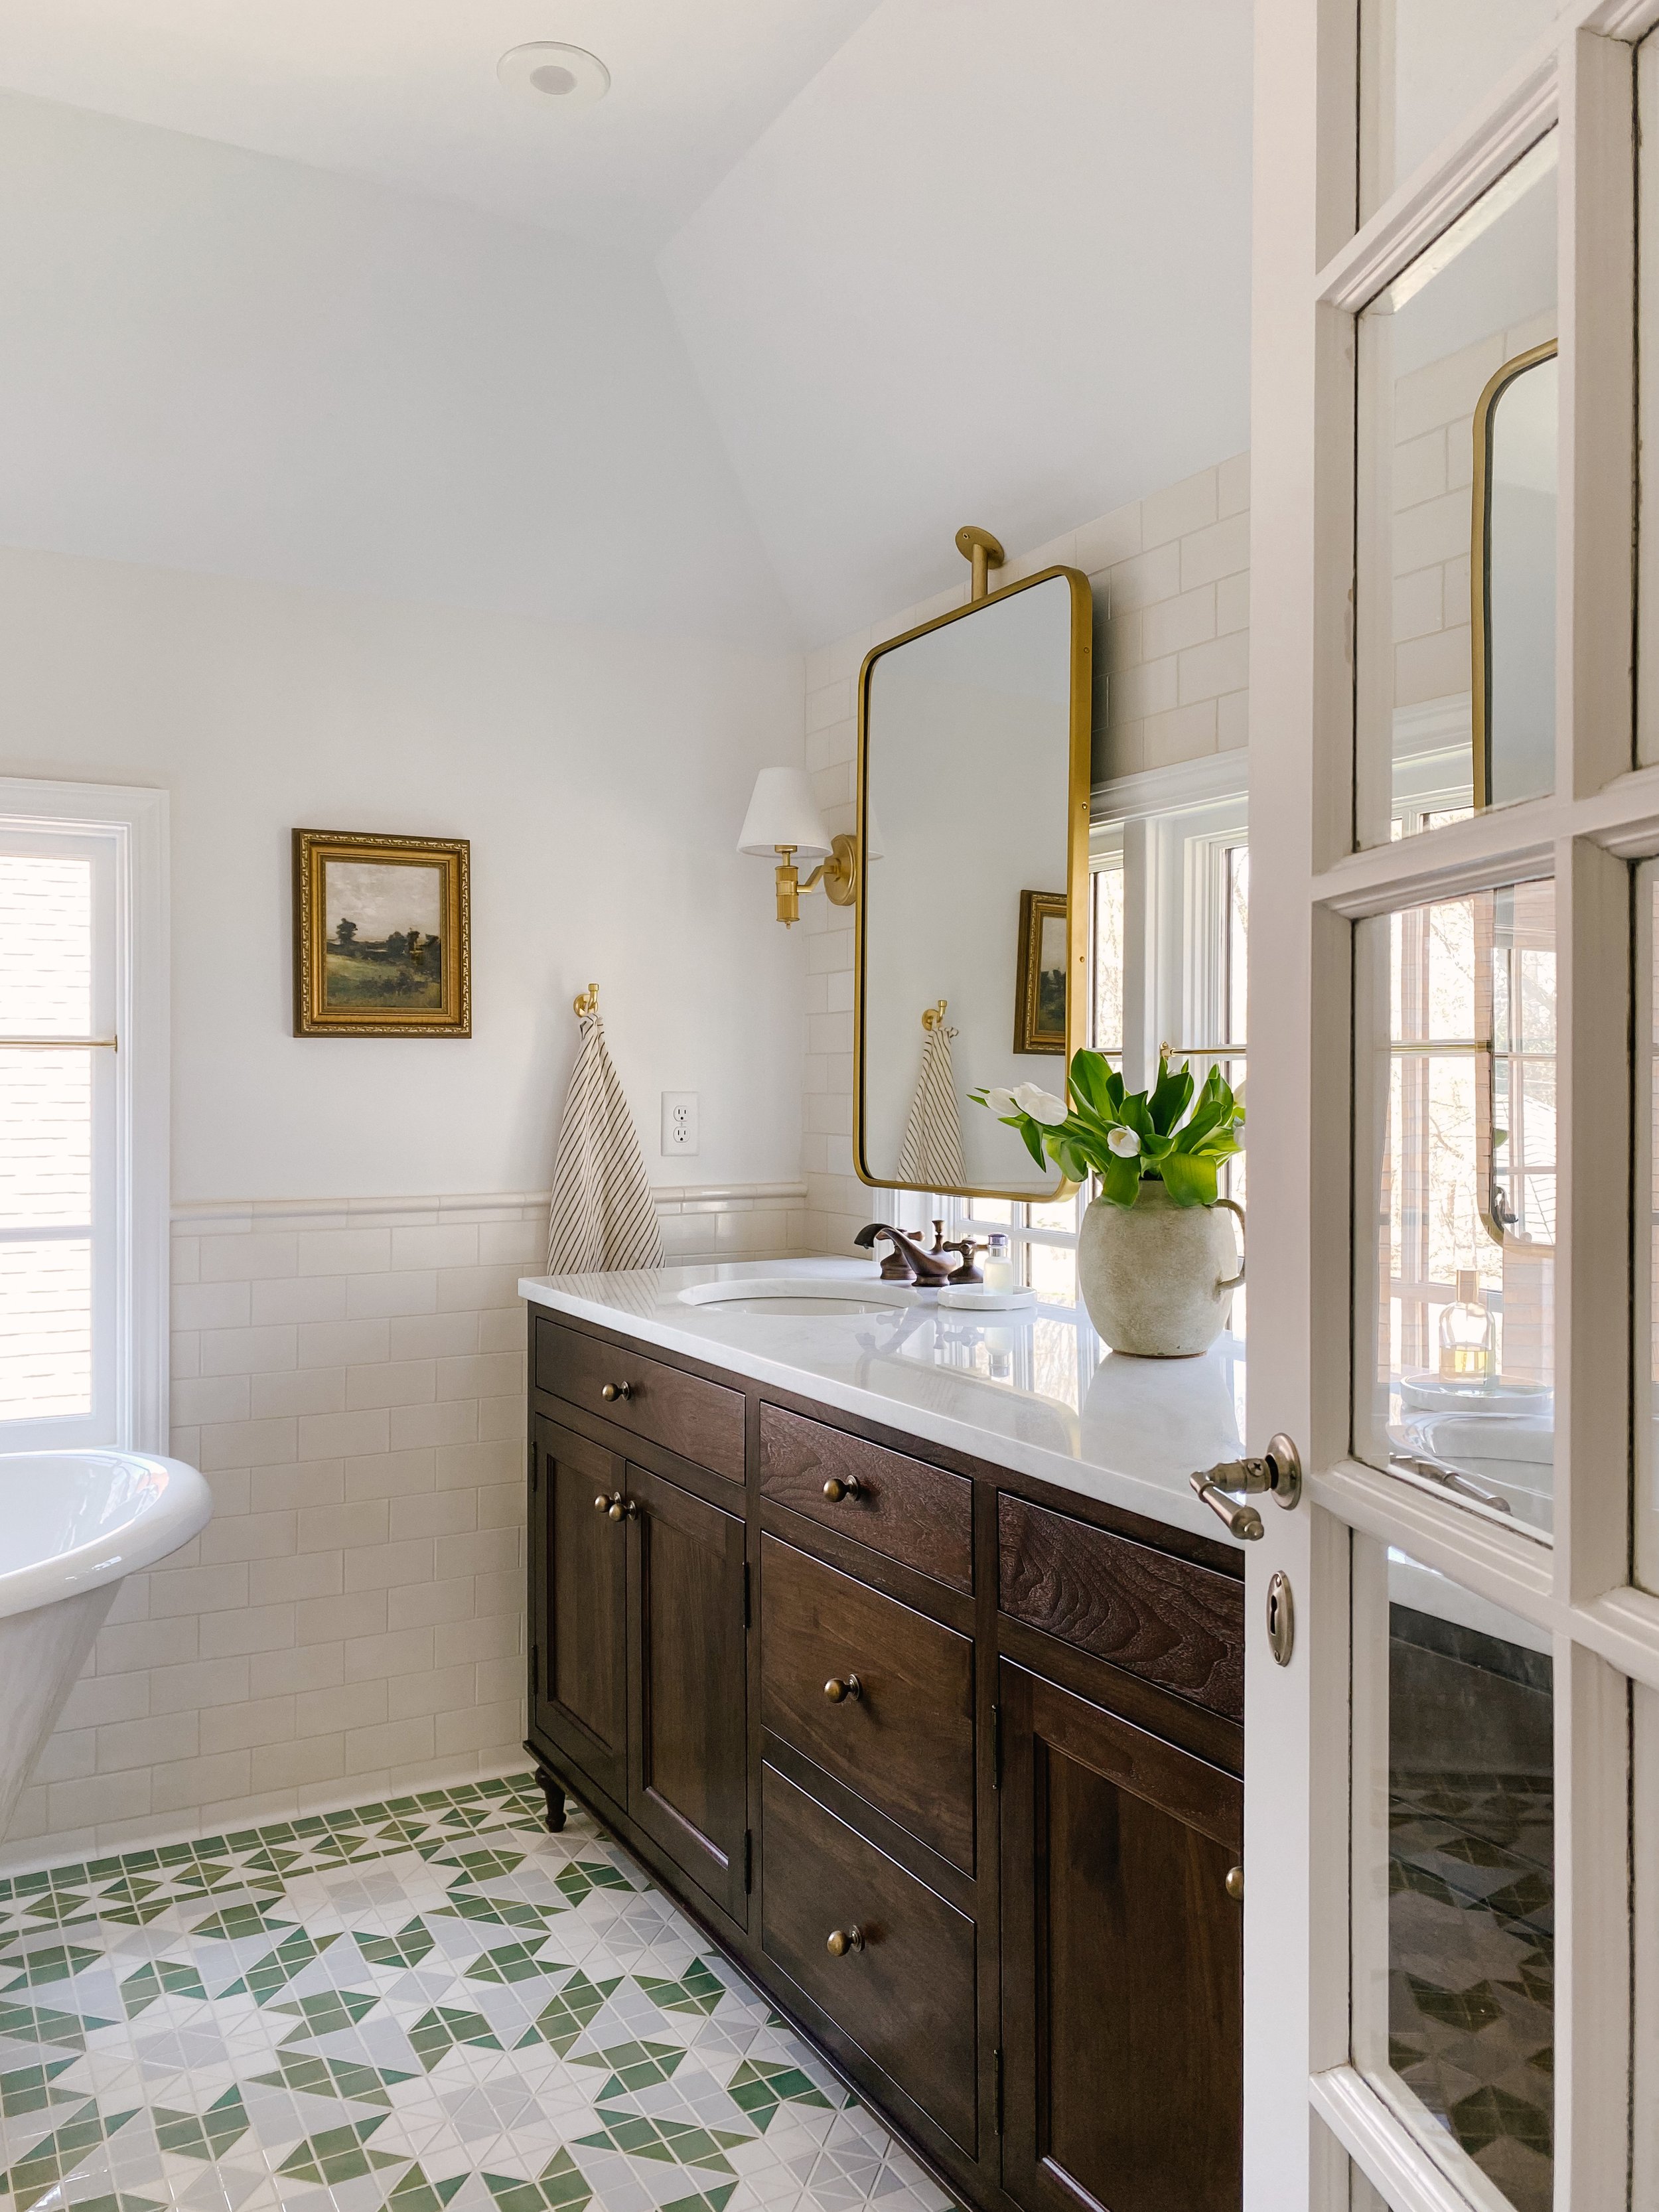
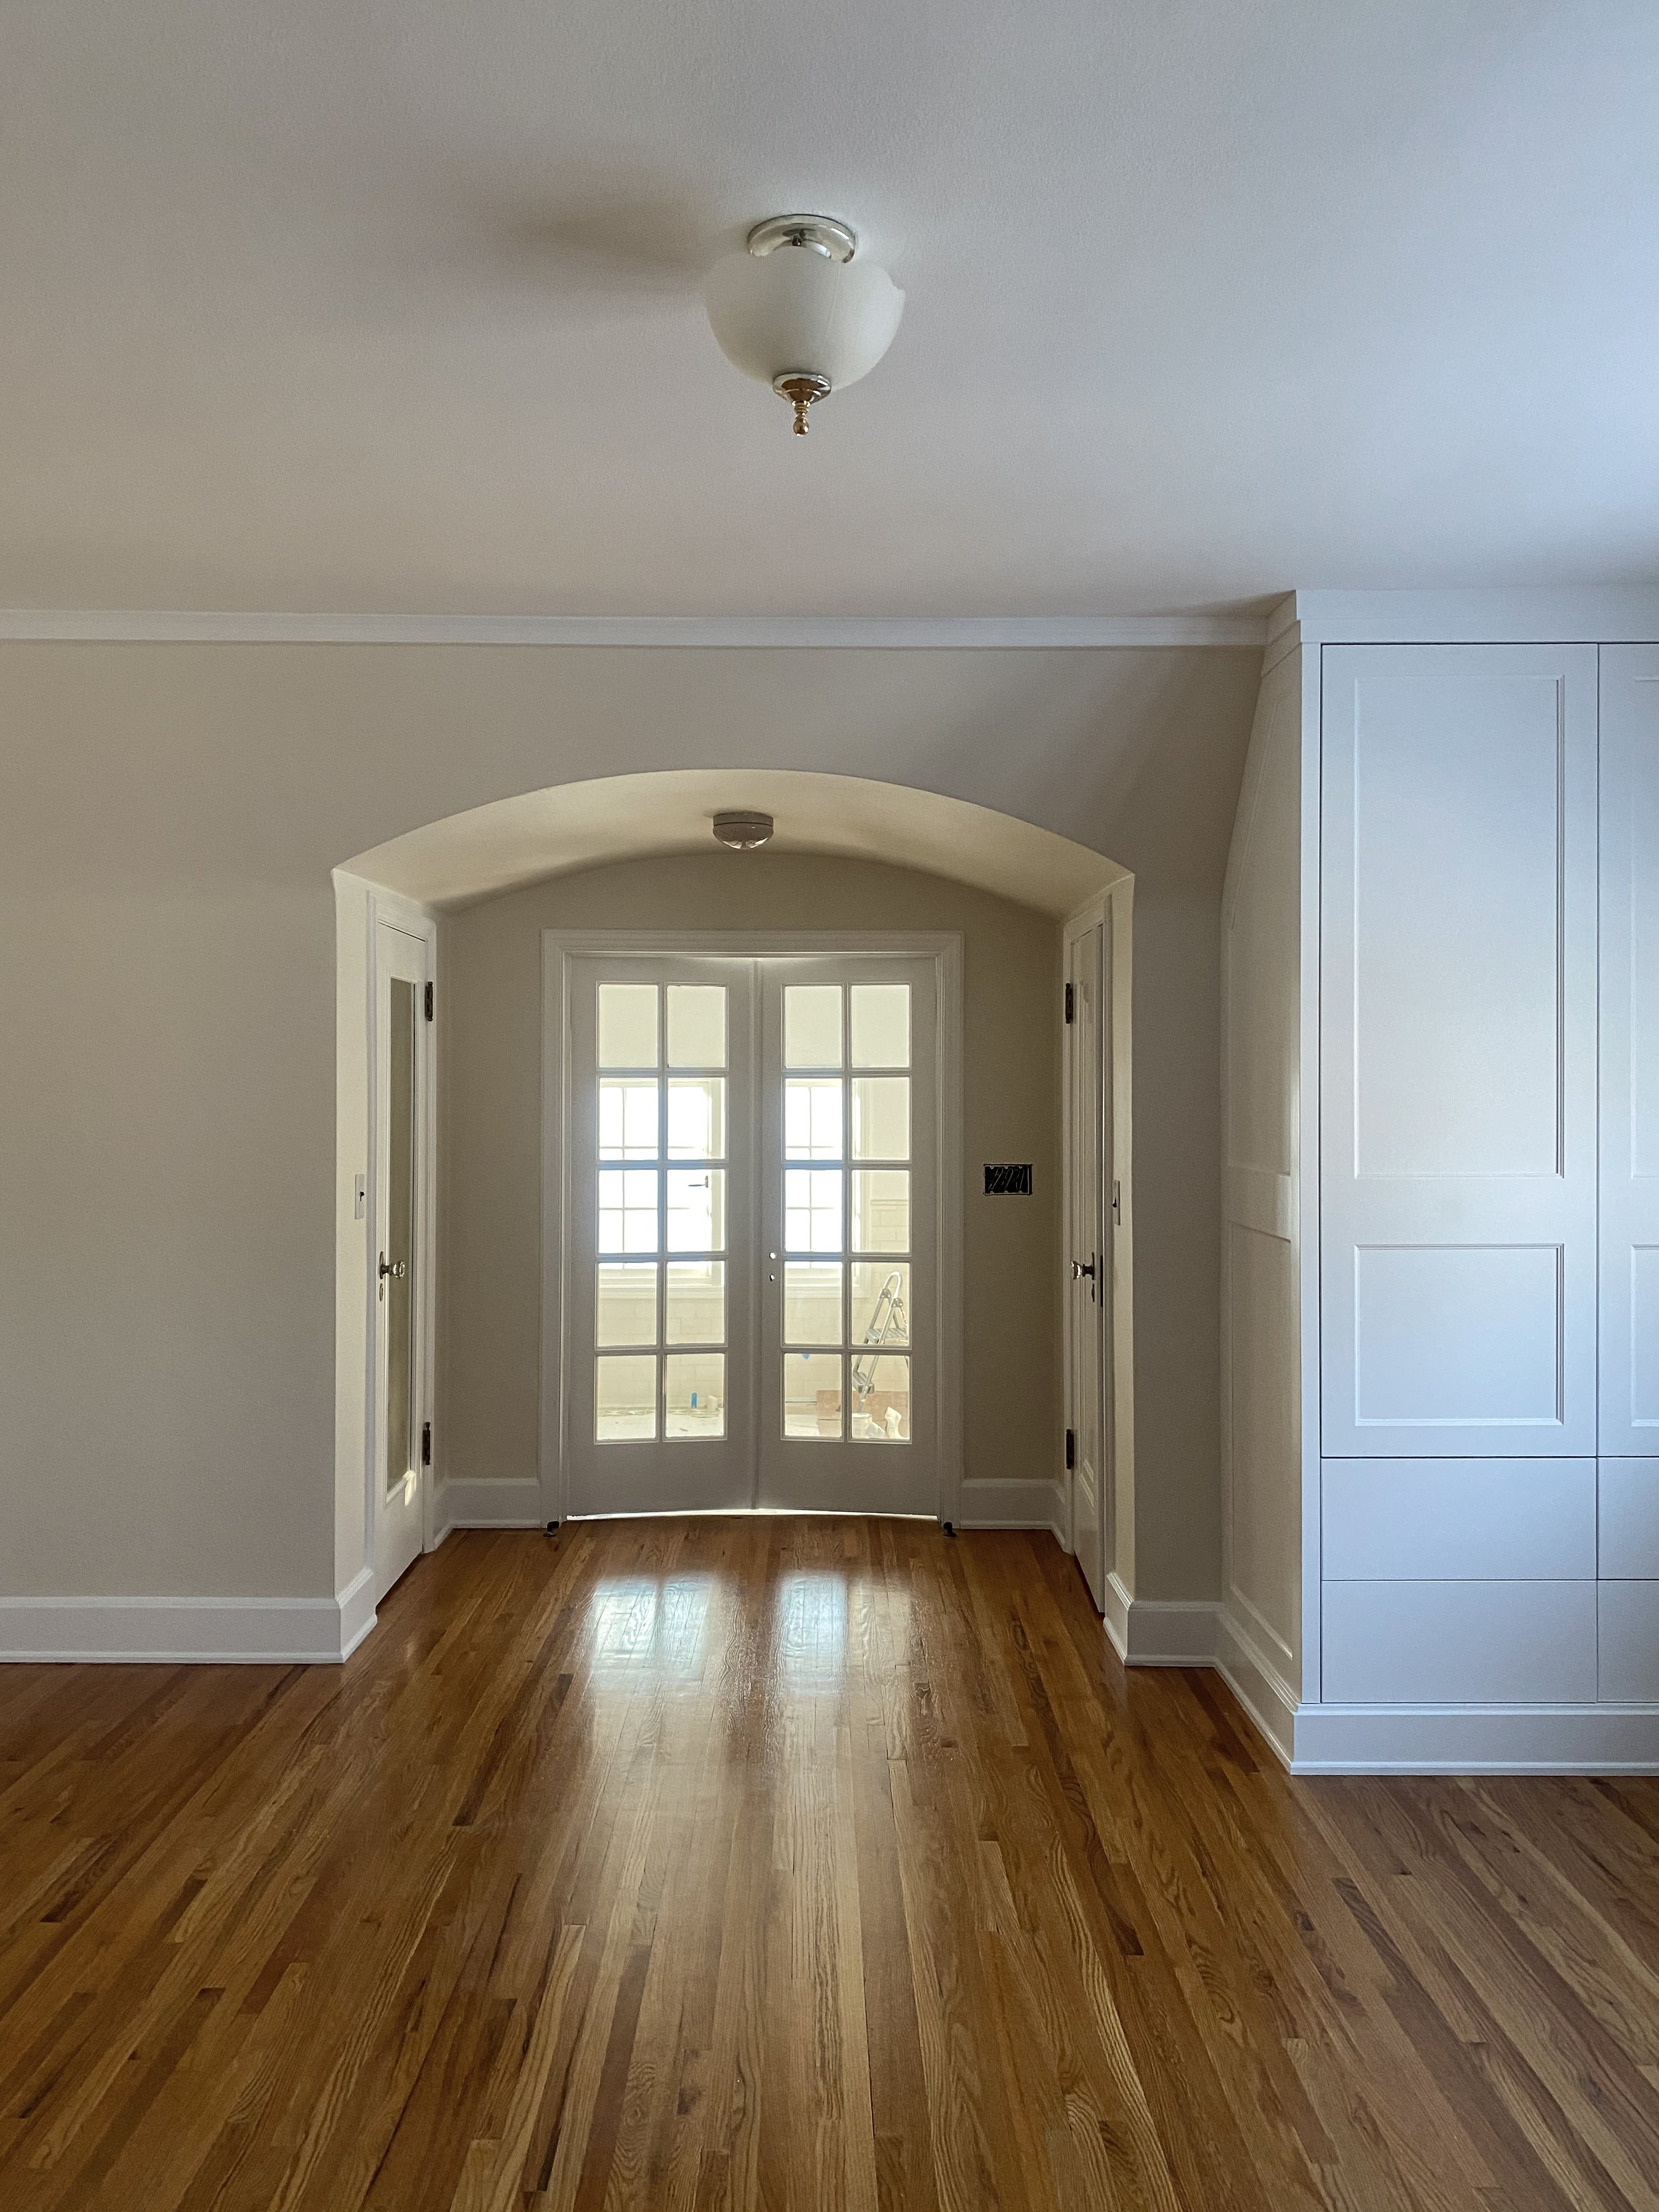
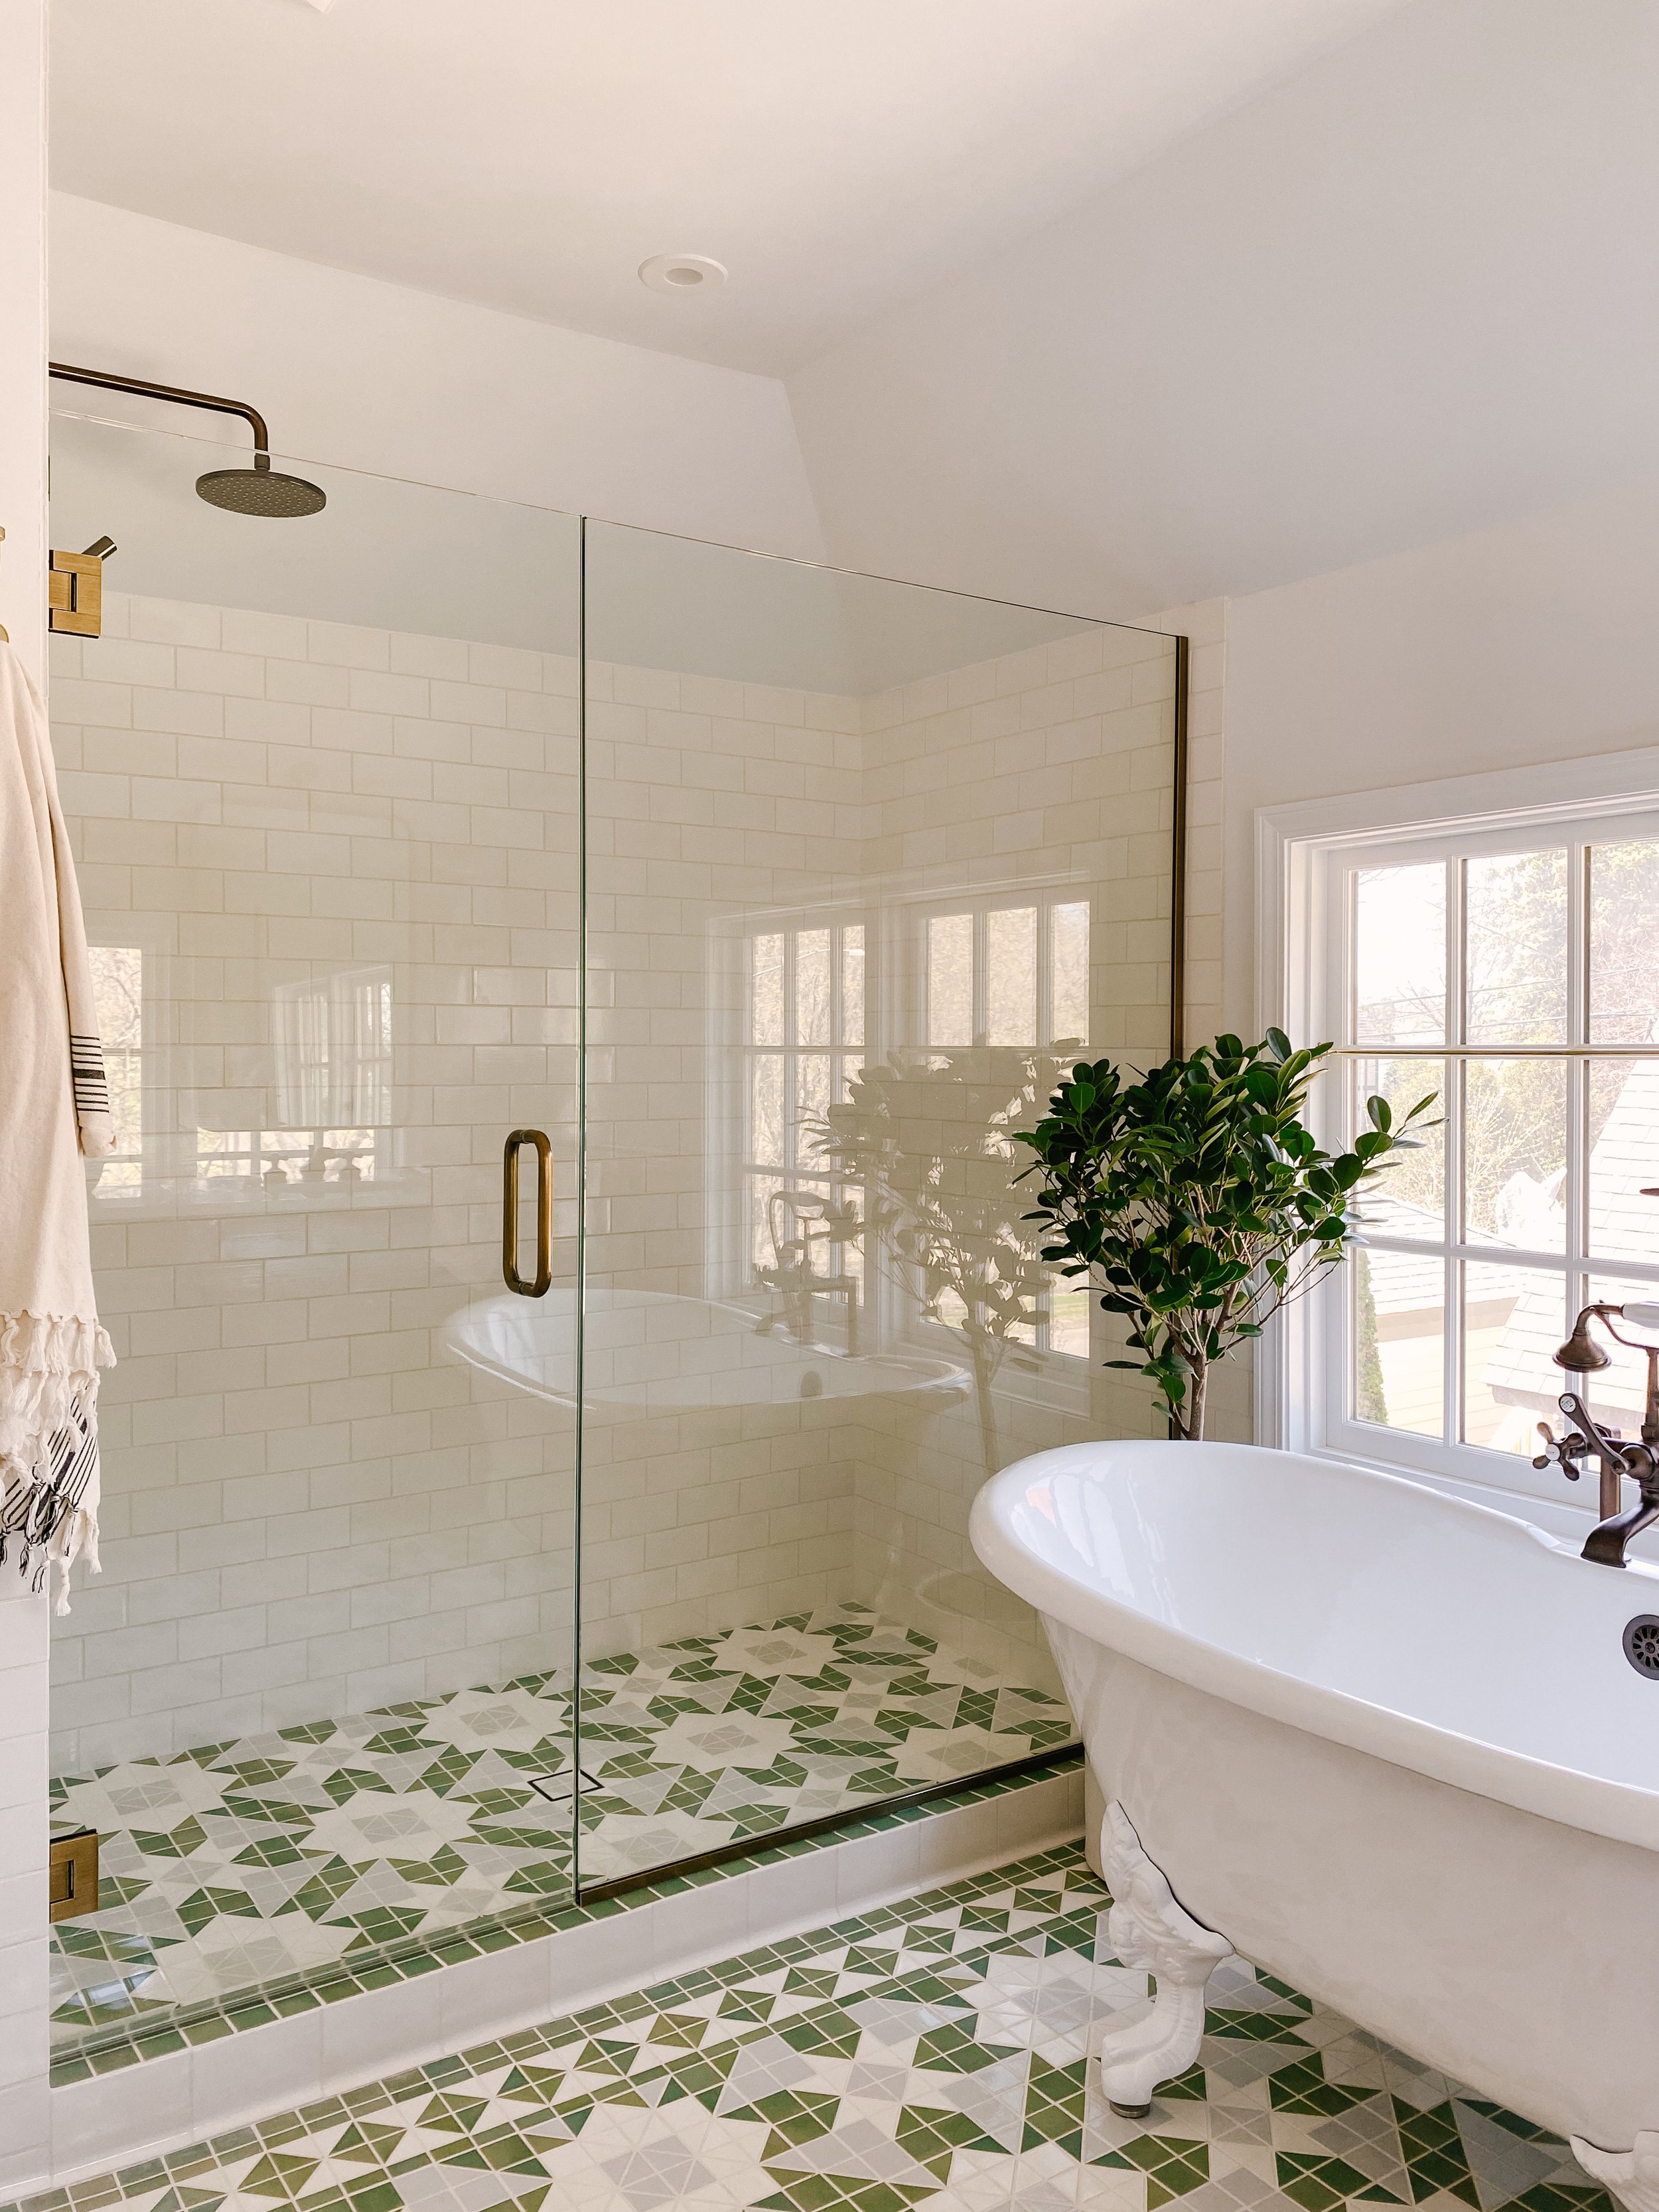
AFTER: can’t even believe this is the same view!

Thinking about installing shower enclosures? Read this post here to be more informed.

What You Should Consider Before Deciding on Glass Shower Enclosures

BEFORE: when Brian first took down the ceilingAFTER: love seeing all the elements come together! Knobs | Brass Mirrors (fabricated by Bauer Metal to hang from ceiling)| Sconces | Vase | 3 Hole Widespread Faucet | Round Marble Tray | Inside-Mount Cafe Rod Set the you can customize for size | Framed Artwork | Hand Towel | Bath Towel | Tiles from Mercury Mosaic | Custom Walnut Vanity from JKath | Bathtub from Signature Hardware

Even the view into the toilet is pleasant…

Framed ArtworkBath Towel | Tiles from Mercury Mosaic | Skirted Toilet with handle changed to ORB finish | Towel Hooks | Double Robe HookEvery morning, I wake up and can’t believe this is my view into our ensuite bathroom bathroom. I love every detail. The wait was long to get here but worth it. Now we don’t all have to squish into our other little green bathroom in the morning 😂.

This room is actually 95% done. Building inspection is up next, our vanity toe kick is being replaced today, the side splash will be added in a few weeks and cafe curtains should be up in a couple of months. But today, we celebrate!


Product Sources


Wall and Floor Tiles are Mercury Mosaics

Wall and Ceiling Color is Benjamin Moore Chantilly Lace (Paint is Made for Bathrooms)

Shannon Widespread Sink Faucet (comes in multiple finishes and also be purchased here)

59” Lena Cast Iron Clawfoot tub (feet painted white)

Deck-Mount Telephone Faucet with Cross Handles and Deck Couplers

Vanity Mirrors (note we had it fabricated to hang from the ceiling)

Sconces | Similar one

Vanity is custom from Jkath Design

Vanity Antique Brass Knobs

Countertop is Polished Marble in Absolute White

Glass Shower Enclosure is U-Channel style in antique brass (read more on shower enclosures here)

Inside-Mount Cafe Rod

Exira Thermostatic Shower with Hand Sprayer

Square Shower Drain (Recommended if You Have Tile in Your Shower)

Single Towel Hooks

Double Robe & Towel Hook

Framed Vintage Replica Painting (set of two)

Skirted Toilet with handle changed to ORB finish

Ceramic Pitcher Vase

Off-White Planter

Turkish Bath Towel

Sweetest Regards, Patti
design

What You Should Consider Before Deciding on Glass Shower Enclosures

We had our glass shower enclosure installed recently and I can’t stop hanging out in the ensuite bathroom.

Now that I have compared glass shower enclosures, I’m excited to share my findings. Prior to our ensuite bathroom, I only had one experience with installing a glass shower enclosure. It was for our guest bedroom and we went with a basic u-channel and glass door with chrome clamps because honestly, we didn’t think there was more to think about. But oh, there is!

Glass shower enclosure design decisions

Here’s what you should consider before deciding on glass shower enclosures.

1. U-Channels vs. Clips Only vs. U-Channel + Clip Combination

While there are pros and cons to each, deciding on which style is mostly based on aesthetics. I talked to our installers and researched online. I came across this post from Builders Glass of Bonita, Inc., that I found to be helpful. I’m breaking that down below.

U-Channels

  • Cons: it’s anodized aluminum which isn’t bad but perhaps not as appealing as brass.

  • Pros: more cost effective, quicker to install, less silicone is visible so less mildew.

glass shower install bathroom example
U-Channel example. Source: Jessica Helgerson Design

Clips Only

  • Cons: more expensive because holes have to be cut in the glass and the labor raises the price of the glass, more time consuming for installers, requires silicone seals that can mildew over time, possible issues with water splashing out.

  • Pros: has a ‘frameless’ appearance which is appealing to a lot of people right now, hardware is anodized brass and looks elevated, gives a clean modern aesthetic.

Glass shower example in a farmhouse minimal bathroom

Clips only example. Source: Phuong @Raising3foodies

U-Channel + Clip Combination

This type has clips on the side and u-channel on the bottom.

  • Cons: more expensive than u-channel only because holes have to be cut in the glass and the labor raises the price of the glass, requires silicone seals on the clips only side that can mildew over time, possible issues with water splashing out.

  • Pros: has a more ‘frameless’ look than all u-channels, u-channel at the base prevents mildew issue of clips and silicone, better pricepoint and easier installation than clips only.

Glass shower example in a minimalistic bathroom

Source: Builders Glass of Bonita, Inc.

2. Finish options for glass showers

Depending on your installer, there are so many finishes to consider. Polished chrome, brass, satin brass, satin nickel, gun metal, oil rubbed bronze, polished copper…and the list goes on! We stopped in our installer’s shop multiple times holding up our three top finishes before deciding on THE one.

3. Handle Style for our glass shower

You’ll want to make sure you decide on this before ordering your glass. They have to pre-drill all holes before the glass is finished off. Make sure you cover all the details with your installer to get exactly what you want. When we realized that we had options, the two holes were already drilled for a 6” handle which limited our selections.

What did we decide on for our glass shower?

We went with U-Channel only and 6” length D-pull in antique brass. I know clips only is a very popular style right now and I can see why. It gives a ‘frameless’ look that feels sleek and modern but we felt the u-channel was more fitting of our old home and style. The antique brass matched our vanity hardware and pulled together our metal combo of oil rubbed bronze and aged brass.

Glass Shower with green tiling in Patti Wagner's home

Tip: after installation, our installer recommended waiting 72 hrs. Then clean the glass and spray with Rain-X Shower Door Repellent to keep the glass looking its best. I believe you have to spray Rain-X about once a month. Update: It’s been about a year and we’ve only sprayed once and our glass still looks great! We do squeegee them after every shower.


If you followed along to my instagram, you saw that there was a hiccup with the u-channel finish they brought over. It was the wrong finish instead of the antique brass. Luckily, I was home during the install or it would’ve been a disaster. It’s always best to check on project installs in person to catch any issues. Update: A number of my local readers have asked about our installer. Unfortunately, due to their lack of customer service to address some installation issues that were acknowledged by their own crew, I don’t feel comfortable recommending.

Hope this post helps those looking to install a glass shower enclosure!

Sweetest Regards, Patti
before and after

Pink Bedroom Makeover Reveal for Our Two Girls Shared Room

Last week, I shared a post on my Instagram of the pink bedroom makeover reveal for our two girls’ shared room. They love it so much! I’m going to break down the three key changes that really made a difference in their shared room.

There were also lots of questions that I couldn’t cover within my stories so I’m sharing it all here with lots of before and after photos as well. Read here for the design direction on paint color and decor. And keep scrolling for answers to frequently asked questions.

BEFORE

As a reminder, this is where we started with their room. Nothing bad at all. But now that the girls are older, it just lacked their personal touch.

Before

AFTER

Now their room is more of a reflection of them. A soft pink room with horse and cow artwork, floral touches and feels more cozy. All the things they requested!

After

These are the three key changes that really made a big difference in their shared bedroom makeover.

  1. Painting the walls in Farrow & Ball Pink Ground. Switching up paint color can give a dramatic update to any room. It was important to get our girls’ input on the color. But there are hundreds to choose from for each color. As parents, you can pick a few options (I say no more than four) that you can live with but still fits their request.

  2. Raising the curtains. Why didn’t we do this initially? Their bedroom has an 8’ ceiling height so this simple change made it feel bigger! We used our old curtains from IKEA that were removed from our bedroom French doors so this change didn’t cost us anything.

  3. Switching out the rug. We got this vintage rug from Twenty Third By Deanne. This is an amazing small decor shop with beautifully curated selections. This soft neutral colored rug works so well with their pink walls. Deanne’s shop just dropped some new rugs, along with a cozy boucle pillow collection so check it out! Now I just need to grab my favorite rug pad and we’re good!


More Before & After Photos

Their pink bedroom is so darling with a touch of elegance and will grow gracefully with them.

FAQs

What’s the paint color?

Answer: Farrow & Ball Pink Ground

Are the bed frames a twin size?

Answer: Yes

Why did you not paint the trim?

Answer: We originally thought about it but decided we wanted the white contrast on the trim. Plus, it would be a lot of work to sand down all the trim to repaint. And would be more work if we decided to paint the room down the road. Also keep in mind, Farrow & Ball is more expensive than most paint .

Will you be painting the ceiling?

Answer: No. We think it could look nice with it being painted but we also love it without so didn’t feel the need for the extra added work.

What happened with the new flush mount lighting?

Answer: It’s on backorder! We ordered this Scallop Flush Mount

Where are their toys?

Answer: The girls only keep books and their dollhouse items in the room. The rest of their toys are in our family + playroom. We’ve pretty much kept this rule from the beginning and it has been really good for all of us. For one, it minimizes the mess and two, the kids are not overwhelmed/over stimulated so they are more intentional with their activities.

Shop The Room


Product Sources:

paint color: Farrow & Ball Pink Ground

trim color

bed frame

sheet set

bedskirt

vintage throw pillows from Twenty Third by Deanne

vintage rug from Twenty Third by Deanne

basket

night stand is no longer available but I recommend this

horse artwork

bookcase with legs (used to be in our playroom)

cow artwork

faceted curtain rod are no longer available but I recommend this

curtains are from ikea but these are similar

wardrobe armoire is from Ikea. similar one here

lamp

gingham large pillow

humidifier

sound machine

Essentials: Tuft & Needle mattresses, waterproof mattress protectors, memory foam youth pillows


Sweetest Regards, Patti
before and after

Wagner Girls’ Room Makeover

Ever since Jack got his room makeover, our girls have been asking for one, too. Ava is almost 8 and Livy is almost 6 years old. Their room is simple and sweet and was a great starting point (tour more of their room here). But there’s one thing, it’s lacking personality. They would love to have color on the walls and some artwork to express their interests and passions.

Girls’ current room

Brian and I have been putting the wheels in motion and after over a month of planning, we are getting close to revealing their room makeover! Paint will be here on Friday, most of their decor has already arrived so we are ready to tackle the work this weekend!

Their biggest request was for a pink wall so that’s when I started conceptualizing the design. I want this makeover to be a reflection of them so their input from the paint color to decor is very valuable. I picked up four paint swatches with different variations of pink and for fun, did a poll in my IG stories.

Benjamin Moore Rose Bisque was the follower favorite!

Ava really liked Benjamin Moore’s Rose Bisque and Livy liked Farrow & Ball’s Pink Ground. I told them to take their time to come to a decision together. After painting the swatches, we headed out to Austin for Spring Break and stayed in this lovely AirbnB. The girls slept in this cute room painted a light pink color that inspired both to agree on Pink Ground. Admittedly, I wanted Rose Bisque because it seems a little more sophisticated but I love that this was both their decisions and they’ve persuaded me. Pink Ground is a creamy pink so their room will still feel warm but also light-filled with their beautiful windows!

Once they decided that, I skipped the mood board and pulled together a design development board which includes actual products to source. I did two versions. The first one was a wishlist. The second one was scaled down by $1K to better fit the budget and timing but doesn’t take away from the intent and is just as good! And we can add on pieces like the sham and duvet cover down the road.

One tip I like to share is to jot down words of how you and the person occupying the space wants it to feel.

Design Development Board 1: Dream Version

Board Product Sources:

Semi Flush Mount Lighting

Horse Framed Art

Cow Framed Art

Gingham Sham

One of a Kind Vintage Rug from Twenty Third By Deanne

Hand Carved Table Lamp

Duvet Cover

Design Development Board 2: Scaled Down but Just as Sweet Version

Board Product Sources:

Flush Mount Lighting

Horse Framed Art

Cow Framed Art

Set of 2 Cottage Striped Shams

One of a Kind Vintage Rug from Twenty Third By Deanne

Rattan Shade Table Lamp

Sheet Set

Their room will continually evolve so I don’t ever consider a reveal to be “done”. Just at a good point to share which I’m hoping to share on Sunday or Monday. But most importantly, I’m excited for the girls to have a room that reflects them both!

Sweetest Regards, Patti
community

My Top Road Trip Planning Tips with Small Children

Our family loves to take road trips. The longest destination was to Austin, TX which was about 17 hours. We made one stop each way to rest. This break-up is nice because we get to explore other cities in between.

We have three young kiddos. Ages 3, 5 and 7 years old. It may seem daunting to travel with young children but we’ve learned that planning is key. Don’t worry, these tips don’t involve bribery items!

Important: Before you head out on your road trip, make sure to shut off your main water supply. We always do this if we’ll be gone for a long period. And we were so thankful we did it this time around because when we returned, we found a leak in our kitchen ceiling! Had we not turned off the water, our plumber said we would’ve came home to a disaster!

Here are my top tips for road tripping and traveling with small children:

  1. Schedule in a Stop: For our most recent road trip to Austin, TX, we stopped overnight at Tulsa. On our way back, we stopped overnight in Wichita. We got to try out some restaurants and drove around these neighborhoods to get the feel of the city. It’s a great way to maximize our trip and include the journey as part of the fun and to rest + refuel.

  2. Individual Snack Box/Bag: Fill their insulated lunch box/bag with both healthy and delicious treats. Every hour, they can pick something from the snack box and you can alternate between healthy and delicious treats. Kids just love to munch on things in the car.

  3. Drawing Tablet: We love these 15″ tablets that don’t have any access to the internet. They have come a long way from my magna doodle days! They draw colorful clear lines. They can press a button to erase and draw over and over nonstop which is better than a notebook because my girls would go through hundreds of paper!

  4. Pre-Download Movies/Shows: Brian and I both drive older model cars so we don’t have any built-in screens. We purchased this mount holder to hold the iPad in between the passenger and driver front seats so our kiddos can watch a limited amount of movies and shows.

  5. Neck Pillows: We forgot these for our two oldest and really regretted it. Think when you’re sleeping in an airplane, it’s the same thing in the car. Having neck support is a must. I gave the girls our jackets but it didn’t really help so it was more difficult for them to nap comfortably. Luckily, they were troopers and didn’t complain too much.

  6. Sit Stand Double Stroller: Can’t tell you how much we love this stroller! We do a lot of walking when we travel. Jack sits in the front and the girls take turns hopping on and off when they’re tired of walking.

Road Trip Travel Essentials

Sweetest Regards, Patti
Fashion

Spring 2022 Fashion & Outfit Inspo

by: Joan Albrecht

Spring is right around the corner! It is such a great time to freshen up your wardrobe and bring in fun bright pieces. It is also the time of year to take a vacation to warmer places. These pieces are perfect for updating your everyday spring wardrobe or freshening up your vacation attire.

  1. Mango Gingham Wrap Dress: I just ordered this little number. It is so adorable and feels like a staple dress. Gingham is very “in” now but I think it is a style that will always be around. The dress is also currently on sale for $25.20!

  2. Evereve Lila Gauze Buttondown Dress Love this mossy green maxi dress. It looks super comfortable and is made of a gauzy material that is such a great lightweight material.

  3. Evereve Matching Set- Rials Miley Gauze Top & Rails Leon Gauze Pants: I adore this set! it looks comfortable yet so chic, and the neutral flax color is gorgeous.

  4. Madewell The Jean Jacket: a jean jacket is a must for the springtime. it is so easy to throw on and complete every outfit. I love this one from Madewell, it is the perf wash!

  5. Abercrombie & Fitch Linen-Blend Wide Leg Pant: You can’t talk about spring without florals! Love the floral pattern on these pants, perf for elevating your spring outfit.

  6. H&M V-neck Cardigan: Another spring wardrobe stable. This is the perf cardigan to throw over dresses or T-shirts to keep you comfortable during unpredictable spring weather.

  7. Madewell Ribbed Sweetheart Tee: Love this beautiful blush top! the sweetheart neckline is super flattering and this top is a bright basic!

  8. Madewell Holwood Sunglasses: Spring is a great time to amp up your sunglasses. I am obsessed with these ones. They are such a great neutral color and will go with every outfit!

  9. Packable Straw Hat: Such an adorable hat sun hat. It is perfect for vacationing in sunny places and it can even be rolled up for packing!

  10. Madewell Cady Lugsole Sandal: I am obsessed with these sandals! they are the perfect neutral color and can go with everything. The straps look cute and functional, great for running around and exploring!

  11. Everlane Forever Slip-On Sneaker : a classic white sneaker that is comfortable and goes with any outfit.

If you missed it, don’t forget to check out Everyday Fall Fashion Round Up

Sweetest Regards, Patti
design

The Best Looking Spring Wreaths

I used to design faux florals back in the days. I loved researching popular florals for each season, designing tabletop and wreath arrangement while working with our vendors to improve the quality. These days, a lot of them can fool the eyes! And silks mixed with dried ones can look incredible!

Faux florals never die and excellent for those with allergies so I see why people love them. Etsy is a great place to find the best handmade wreath arrangements. I gathered up some of my favorite wreath designs from highly rated shops to get your front door ready for Spring. From simple greens to colorful, you’re bound to find one that fits your front door personality!

Save this post if you have the LTK app. If not, download it from the app store and search for “patticakewagner” to follow my shop on there.

1.Eucalyptus Wreath 10” $28

2. Lavender Wreath 16” $91

3. Lavender Eucalyptus Boxwood Purple Wreath 28” $189

4. Eucalyptus Lambs Ear Rose Wreath 16” $91

5. Forsythia Wreath 18” $72

6. Lambs Ear & Frosted Eucalyptus 18” $108

7. Cream Peony Wreath 22” $200

8. Pink & Coral Tulip Wreath 20” $145

9. Year Round Eucalyptus & Bayleaf Wreath 22” $180

10. Eucalyptus Lambs Ear Wreath 16” $91

11. Colorful Peony Wreath 22” $195

Note: some wreaths are available in multiple sizes and prices are subject to change from what is listed

Sweetest Regards, Patti
Beauty

My Must Have Affordable Beauty Products for a Simple Routine

by Joan Albrecht

When it comes to a beauty routine, I like to keep it pretty clean and simple. I am like Patti and my skin is very prone to breakouts. I used to get really bad cystic hormonal acne on my chin but finally found a skincare routine that helps! I also want to share my tried and true hair care and makeup products. The best part is that most of these are all pretty affordable!

Finding what works best for you is about trial and error. It may take some experimenting but a lot of these products you may have seen all over social media and IMO, are deff worth the hype!

Skincare

Along with eating healthy, drinking lots of water, exercising, and getting enough sleep, these products really helped with my skin! I have normal to dry skin and it gets super dry in the winter so all of these products are very hydrating.

1) First Aid Beauty Ultra Repair Cream $38.00: this face lotion is the most pricey on my list but so worth it! super hydrating and is great for the winters or if you have really dry skin.

2) Cerave Hydrating Facial Cleanser $11.59: great simple and affordable hydrating face wash!

3) Supergoop Unseen Sunscreen $34.00 sunscreen is very important and should be used daily. this one feels super soft and smooth. love that it is clear and you don’t have to rub it in!

4) Rae Complexion Supplements $14.99: I recently started using these supplements and see a difference in my skin. I also love how affordable they are!

*In addition to these products I also take spironolactone and a topical ointment prescribed from my dermatologist. I recently found Astrophe and the products they have are very similar to what my dermatologist prescribed! I have not tried them out yet but they have really great reviews.

Makeup

I don’t like to splurge too much on makeup products. I used to but I heard somewhere that most makeup products have similar formulas no matter the price. I also tend to run out of a lot of these products quickly so I don’t really like spending that much money on them.

1) Elf Wow Brow Gel $4.00: Elf products are such a great affordable makeup line! I use this after filling in your eyebrows to keep them in place

2) Urban Decay Eye Shadow Potion $13.00: this primer is great for keeping your eyeshadow on all day/night

3) Elf Camo Concealer $6.00: very affordable and has super great coverage.

4) Elf Infant Lift Eye Brow Pencil $3.00: great for filling in your brows and giving them a full look and you can’t beat the price!

5) Sky High Mascara $8.99: this mascara really adds length to my lashes!

6) Urban Decay Setting Spray $15.00: I just started using this setting spray and I think it really helps to keep my makeup in place!

7) Milk Cream Highlighter $21.00: I love adding a little sparkle to my finished makeup look! this highlighter is nice and light.

8) Hoola Bronzer from Benefit Cosmetics $30.00: this has been in my routine for years! the product lasts a long time and is great for adding color to your face and defining your features.

Hair Products

I have been on a Moroccan Oil hair kick recently. I love their hair oil, leave-in, and hair mask. However, I did recently try their shampoo and conditioner and did not love it. I have been wanting to try Prose out, I have heard really great things!

1)Morrocan Oil Hair Oil $15.00: I use a little hair oil at my ends if my hair is looking dry and frizzy. Smells so good! A little goes a long way so a small bottle will last you a long time.

2) Amika Heat Protectant Serum $26.00: another product I have been using in my routine for years. It smells so good and does such a great job of keeping your hair healthy when you use heat.

3)Moroccan Oil Intense Hydrating Hair Mask $16.00: this leaves my hair so soft and smooth.

4) Moroccan Oil Leave-in Conditioner $28.00: such a great leave-in product! smells amazing and keeps your hair smooth and strong.

LTK’s Top Beauty Products:

Like to Know It is a great resource to find top-rated products from home decor to beauty to fashion. Make sure to download the app and follow me on there @patticakewagner to shop my Instagram posts and get my exclusive app-only content. Here is a round-up of LTK’s most popular beauty products!

Sweetest Regards, Patti
design

My Favorite Neutral Earth Tone Vases

Adding something simple as a vase can warm up a space if you choose the right look. I love a variety of sizes, textures and silhouettes for my vases.

In today’s post, I’m pulling together my favorite neutral earth tone vases that I own and ones I’ve come across that I would love to have in my home. I’ve been on the hunt for a dark charcoal black vase but they can be quite pricey. I’ll have to keep my eyes out!

Neutral Earth Tone Vases

1.Tuscan Farmhouse Distressed Ceramic Pitcher Vase $46

2. Full Moon Clay Vase $29.95

3. Artisan Vase 16.5″ Jug $149

4. Handcrafted Weathered Terra Cotta Vases $59

5. Vintage Gray Vase $198

6. Antique Distressed Ceramic Vase $157

7. Amphora 12” Vase $59

8. Terracotta Large Decorative Vase $120

9. Delun Clay Pot $200

Sweetest Regards, Patti
design

Repurposing a Vintage Metal and Glass Flush Mount Lighting Using Our Favorite Gold Spray Paint

Like I mentioned before in my last post, I had been searching for a long time for a smaller flush mount lighting with a gold accent to go in our bedroom. One day, it popped up on FB marketplace for $20! It was a vintage metal and glass flush mount original to the owner’s 1950’s home. I quickly paid and picked it up the next day!

Except, it was copper and in rough shape. But I knew it would be easy to update the metal to a gold finish!

Cleaning the Vintage Metal and Glass Flush Mount Lighting

First, it needed some good cleaning. I simply used soap and water to clean away the dust and dirt from the metal and glass. I was able to use my fingernails to scrape off the old paint from the glass. It was much harder to get the paint off the metal though. After researching online and using what I had in the house, I heated up 1/4 cup of vinegar and soaked it right on the paint, waited 10 minutes and scraped way with a razor blade.

A few people suggested these other methods to remove paint from the metal:

Sanding the Vintage Metal and Glass Flush Mount Lighting

Since we were planning to change the metal piece to gold, we didn’t continue to explore other methods to remove the paint. We lightly sanded it down using grit-220 sanding disc.

Priming and Painting the Vintage Metal and Glass Flush Mount Lighting

We primed the metal using the Rust-oleum primer and spray painted it gold using Rust-oleum Metallic Gold Spray Paint. This is our preferred gold spray paint that we’ve used for previous projects. It gives a nice metallic shine vs. a matte look. You’ll want to coat the metal really good using nice and even strokes.

Pro Tip: use a Culver’s cup to set the metal plate on top 😉

Let the paint on the metal dry and cure before installing.

We wanted to somewhat match the metal gold color to the new larger flush mount light fixture that will also be installed in the bedroom. I love how the Rust-oleum Metallic Gold Spray Paint gives a nice shiny finish.

For $20 + gold spray paint, we were able to restore this vintage light fixture. Looks so much better than what was there before!

BEFORE

AFTER

It took me some patience and luck to find this vintage metal and glass flush mount lighting. But if you’re out of patience, you can check out this post of nice looking smaller flush mount lighting that I rounded up.

Sweetest Regards, Patti