
Rentfluencer Episode 1: Maya’s Minimalist Modern Bedroom Makeover
Watch the full video episode here.
Photos by Canary Gray for HGTV.
On this episode of HGTV’s ‘Rentfluencer’, I had a blast working with Maya to help upgrade their first post-college apartment bedroom!
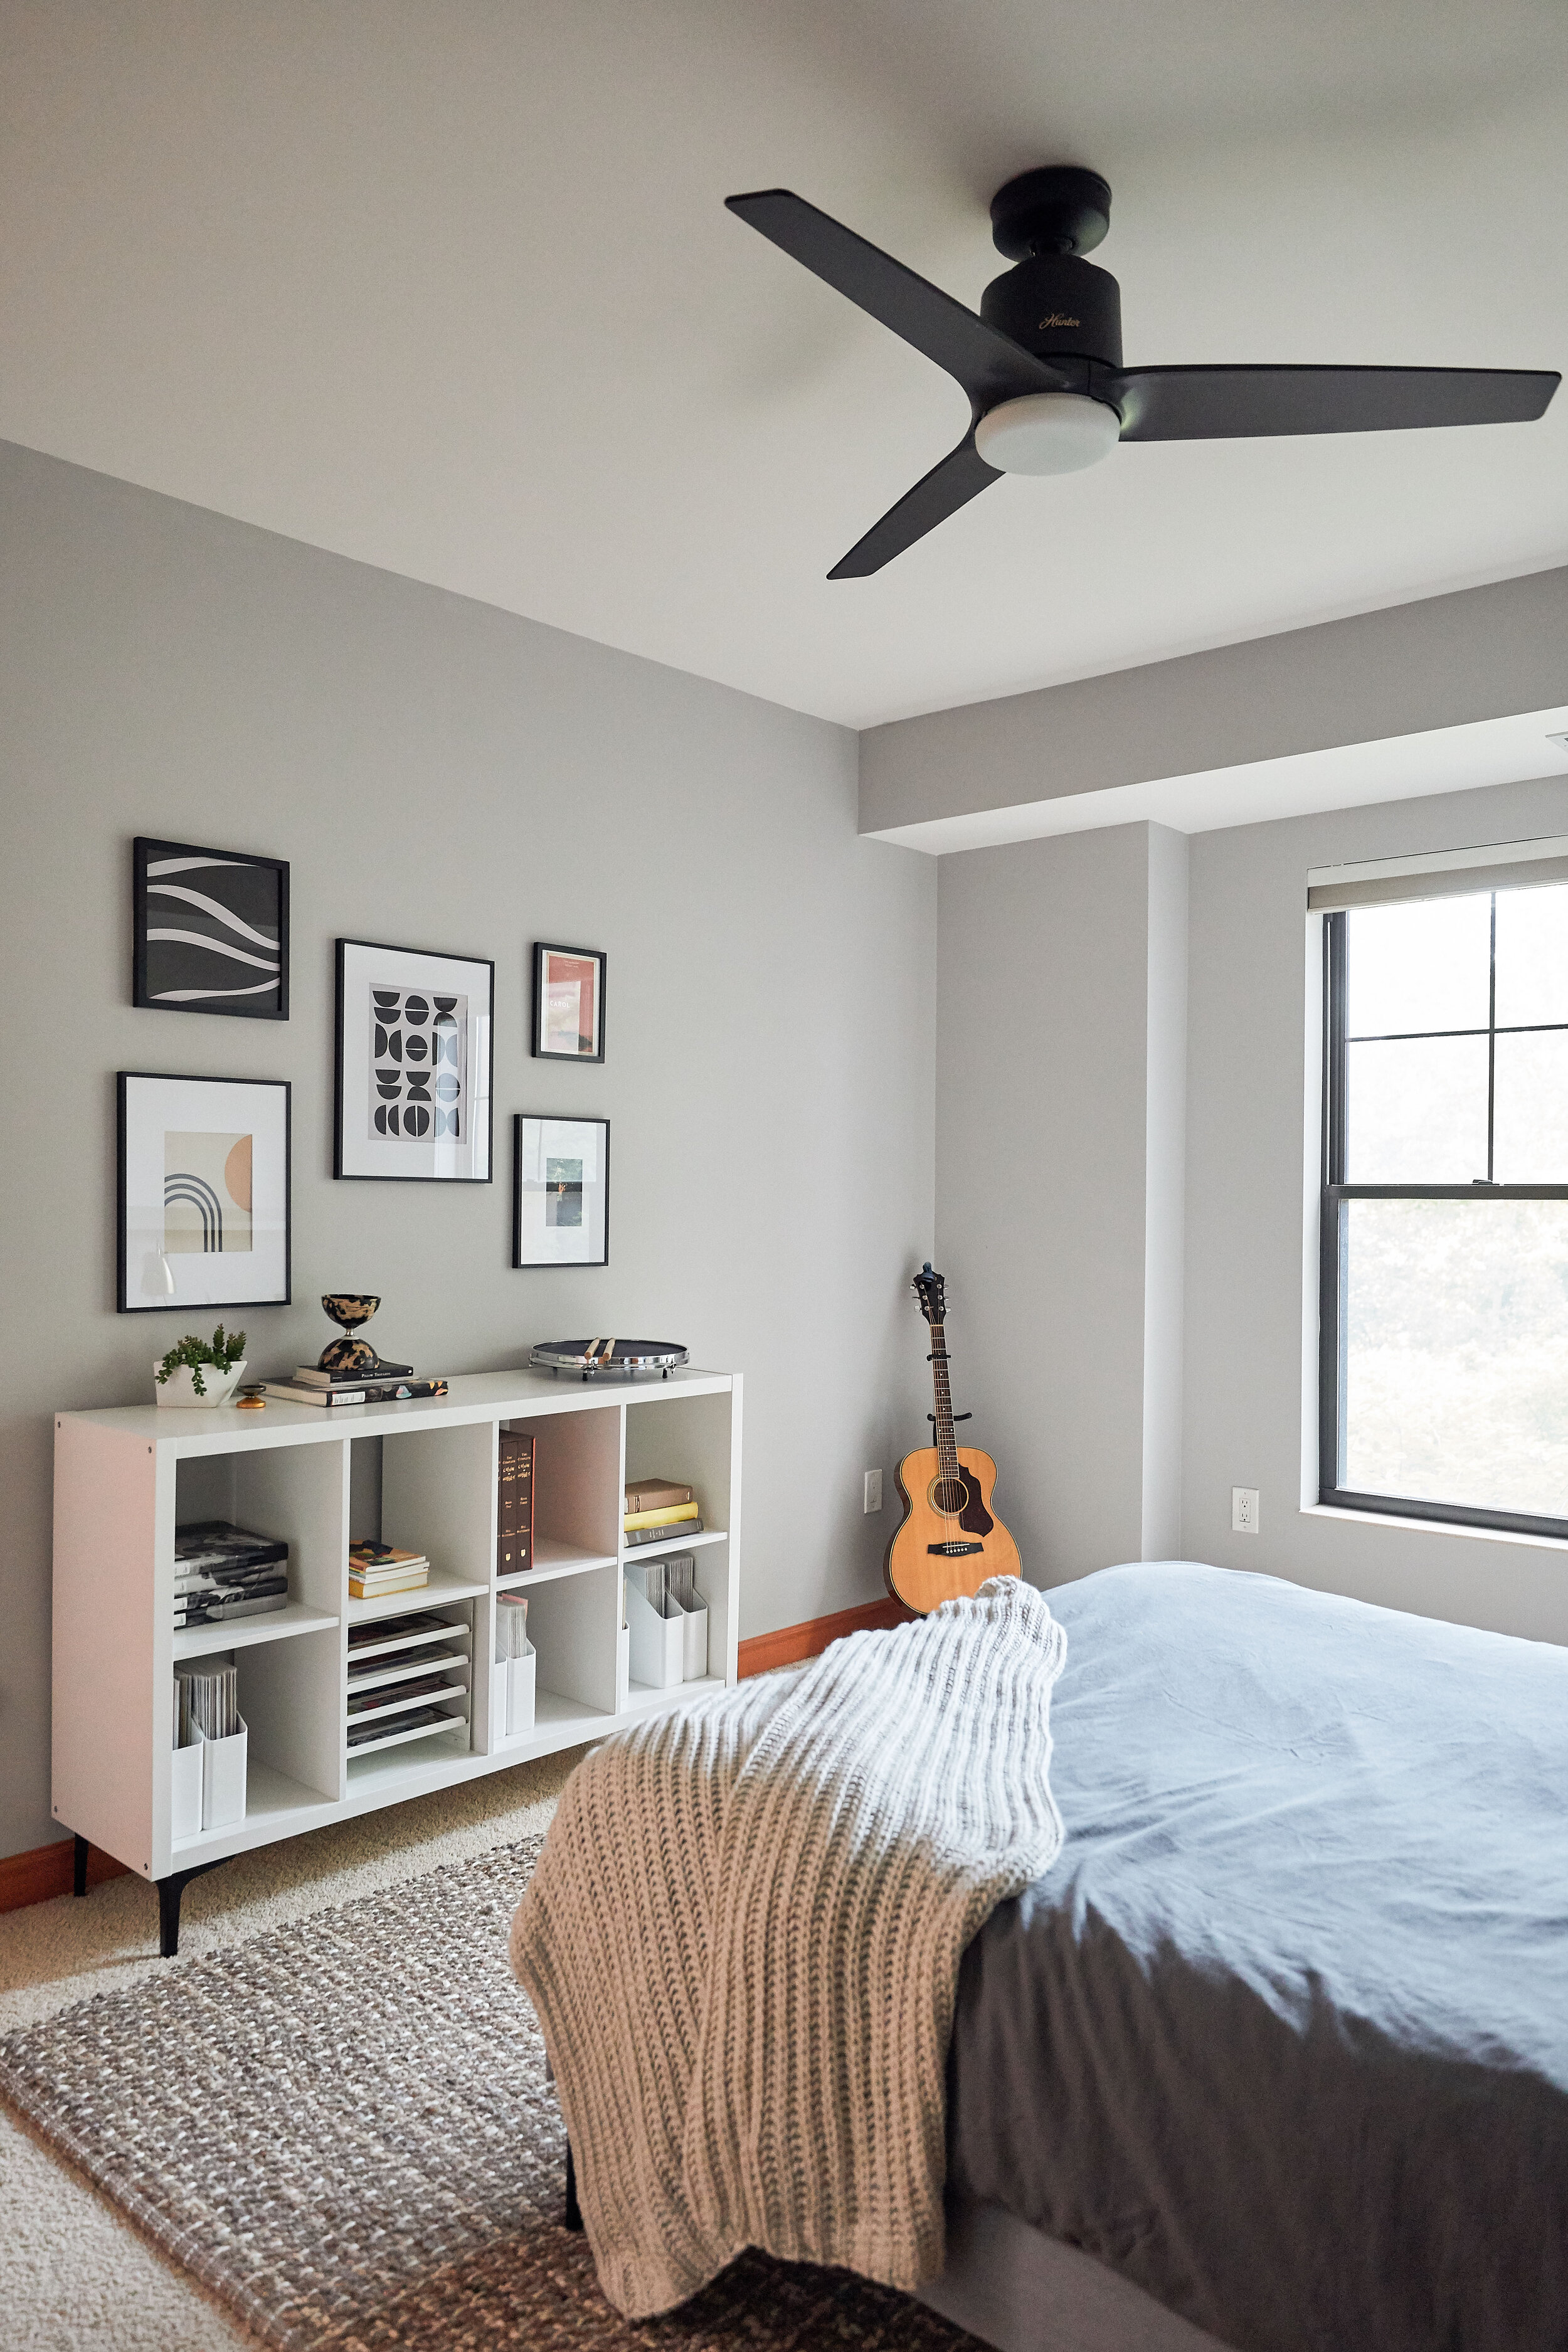
Photo by Canary Gray for HGTV
Backstory: we had another renter but they decided to not renew their lease so their landlord wouldn’t give permission for the makeover. Maya was casted late in the process so we had a shorter time frame (compared to other spaces) to bring it all together and it turned out to be a rewarding challenge!
Maya lives in the Loring Park neighborhood of Minneapolis and is such a fun person with a modern style but you wouldn’t know that from looking at their bedroom.
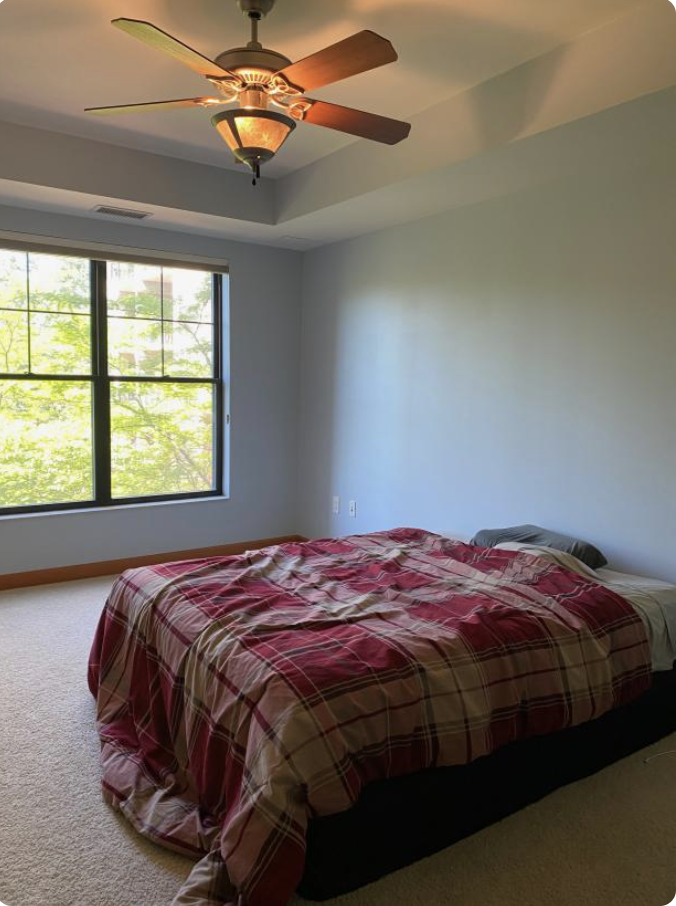
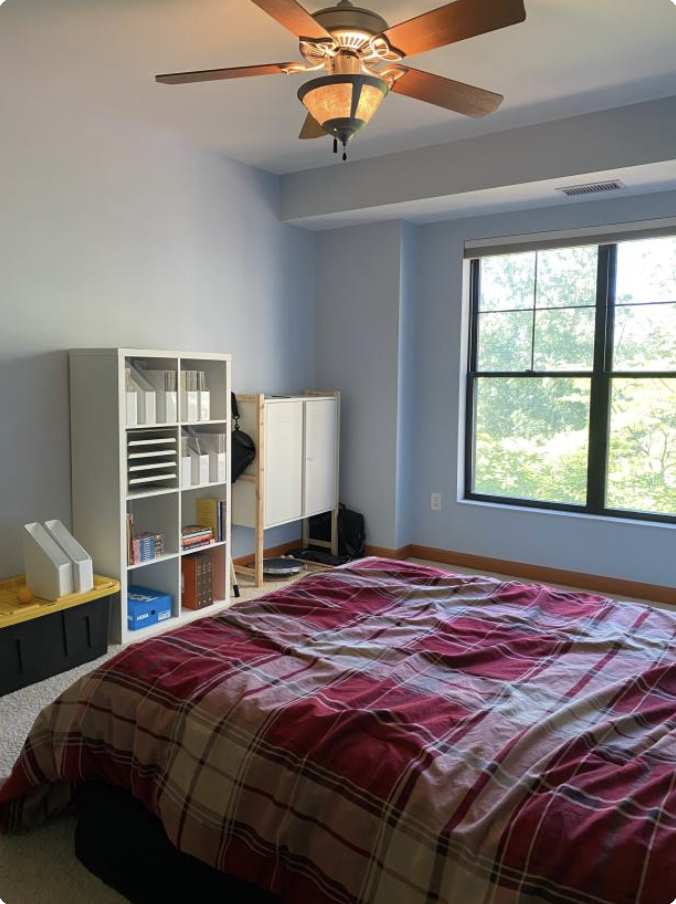
“It looks like a really nice jail” was how they described it.
Maya identifies their style as slim, modern, functional and not too much fluff – they def have a minimalist vibe going on. Their dream for their bedroom is to make it feel homey and to be surrounded by things they love like their comic books and juggling stuff. Maya is very organized but their bedroom is lacking a personal touch in terms of decor.
How I upgraded Maya’s place from dorm room chic to stylish first apartment
*Landlord Tip: Always ask for permission when painting walls, drilling holes for drywall anchor/large screws, replacing fixtures. And communicate up front if you’re expected to paint colors back, patch holes and put back old fixtures. The expectation for property owners is that the unit is in the same condition as when a tenant moves in, minus the normal wear and tear. Maya had a great relationship with their landlord and received permission for these changes.
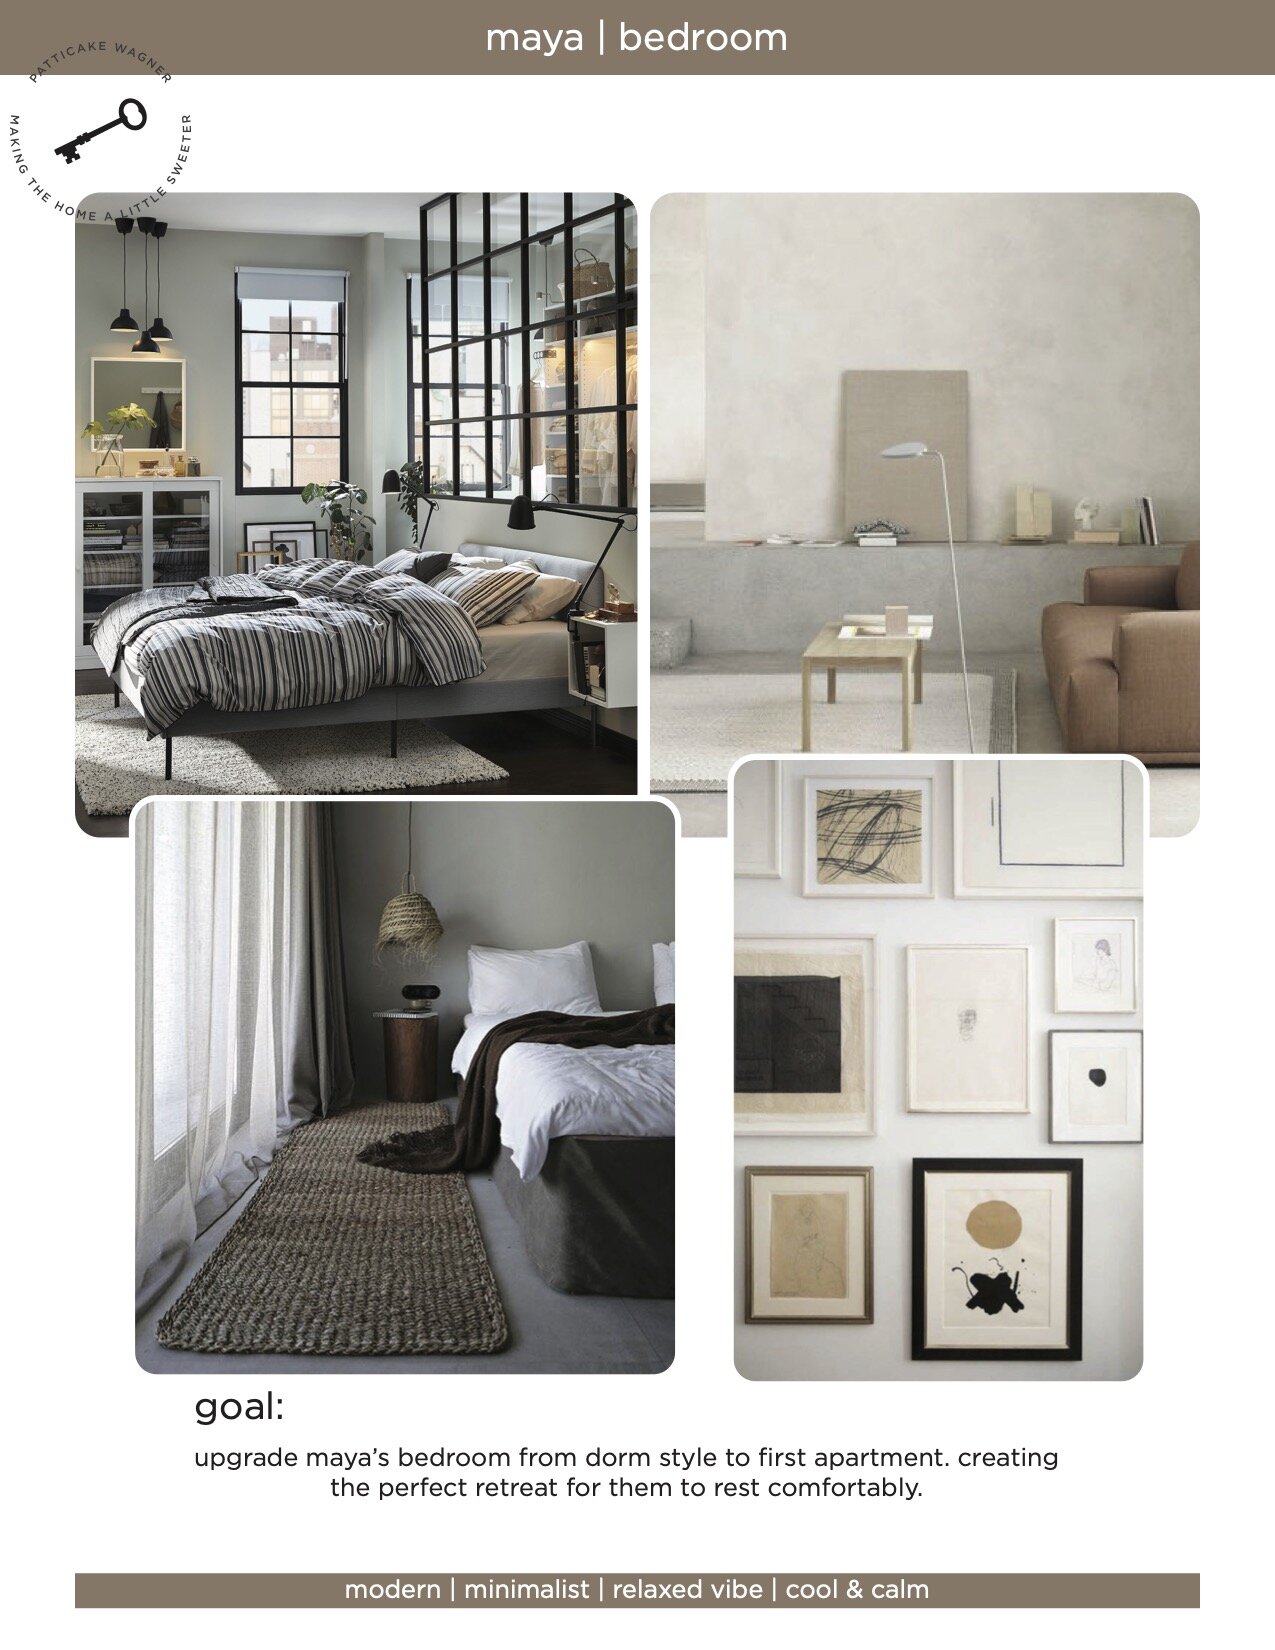
I always start out with a mood board to visualize my design direction. Watch my design process here. Once I nail that down, I get to working by creating a style guide and sourcing products. Here were the steps I took to upgrade Maya’s bedroom from dorm style to first apartment style!
-
Upcycled functional but basic bookshelf
-
Added warmth to the walls with two tones of paint and a picture ledge
-
Swapped out the ceiling fan to something that fits more of a minimalist style
-
Upgraded to a real bed frame and nightstands
-
Brought the room together with a rug, wall sconces, and plants.
-
Added a personal touch with a gallery wall
1. Quick and simple makeover to bookshelf
To upgrade Maya’s bookshelf I flipped it over so that it was horizontal. Then installed metal furniture legs. It was so easy but really elevated the bookshelf!
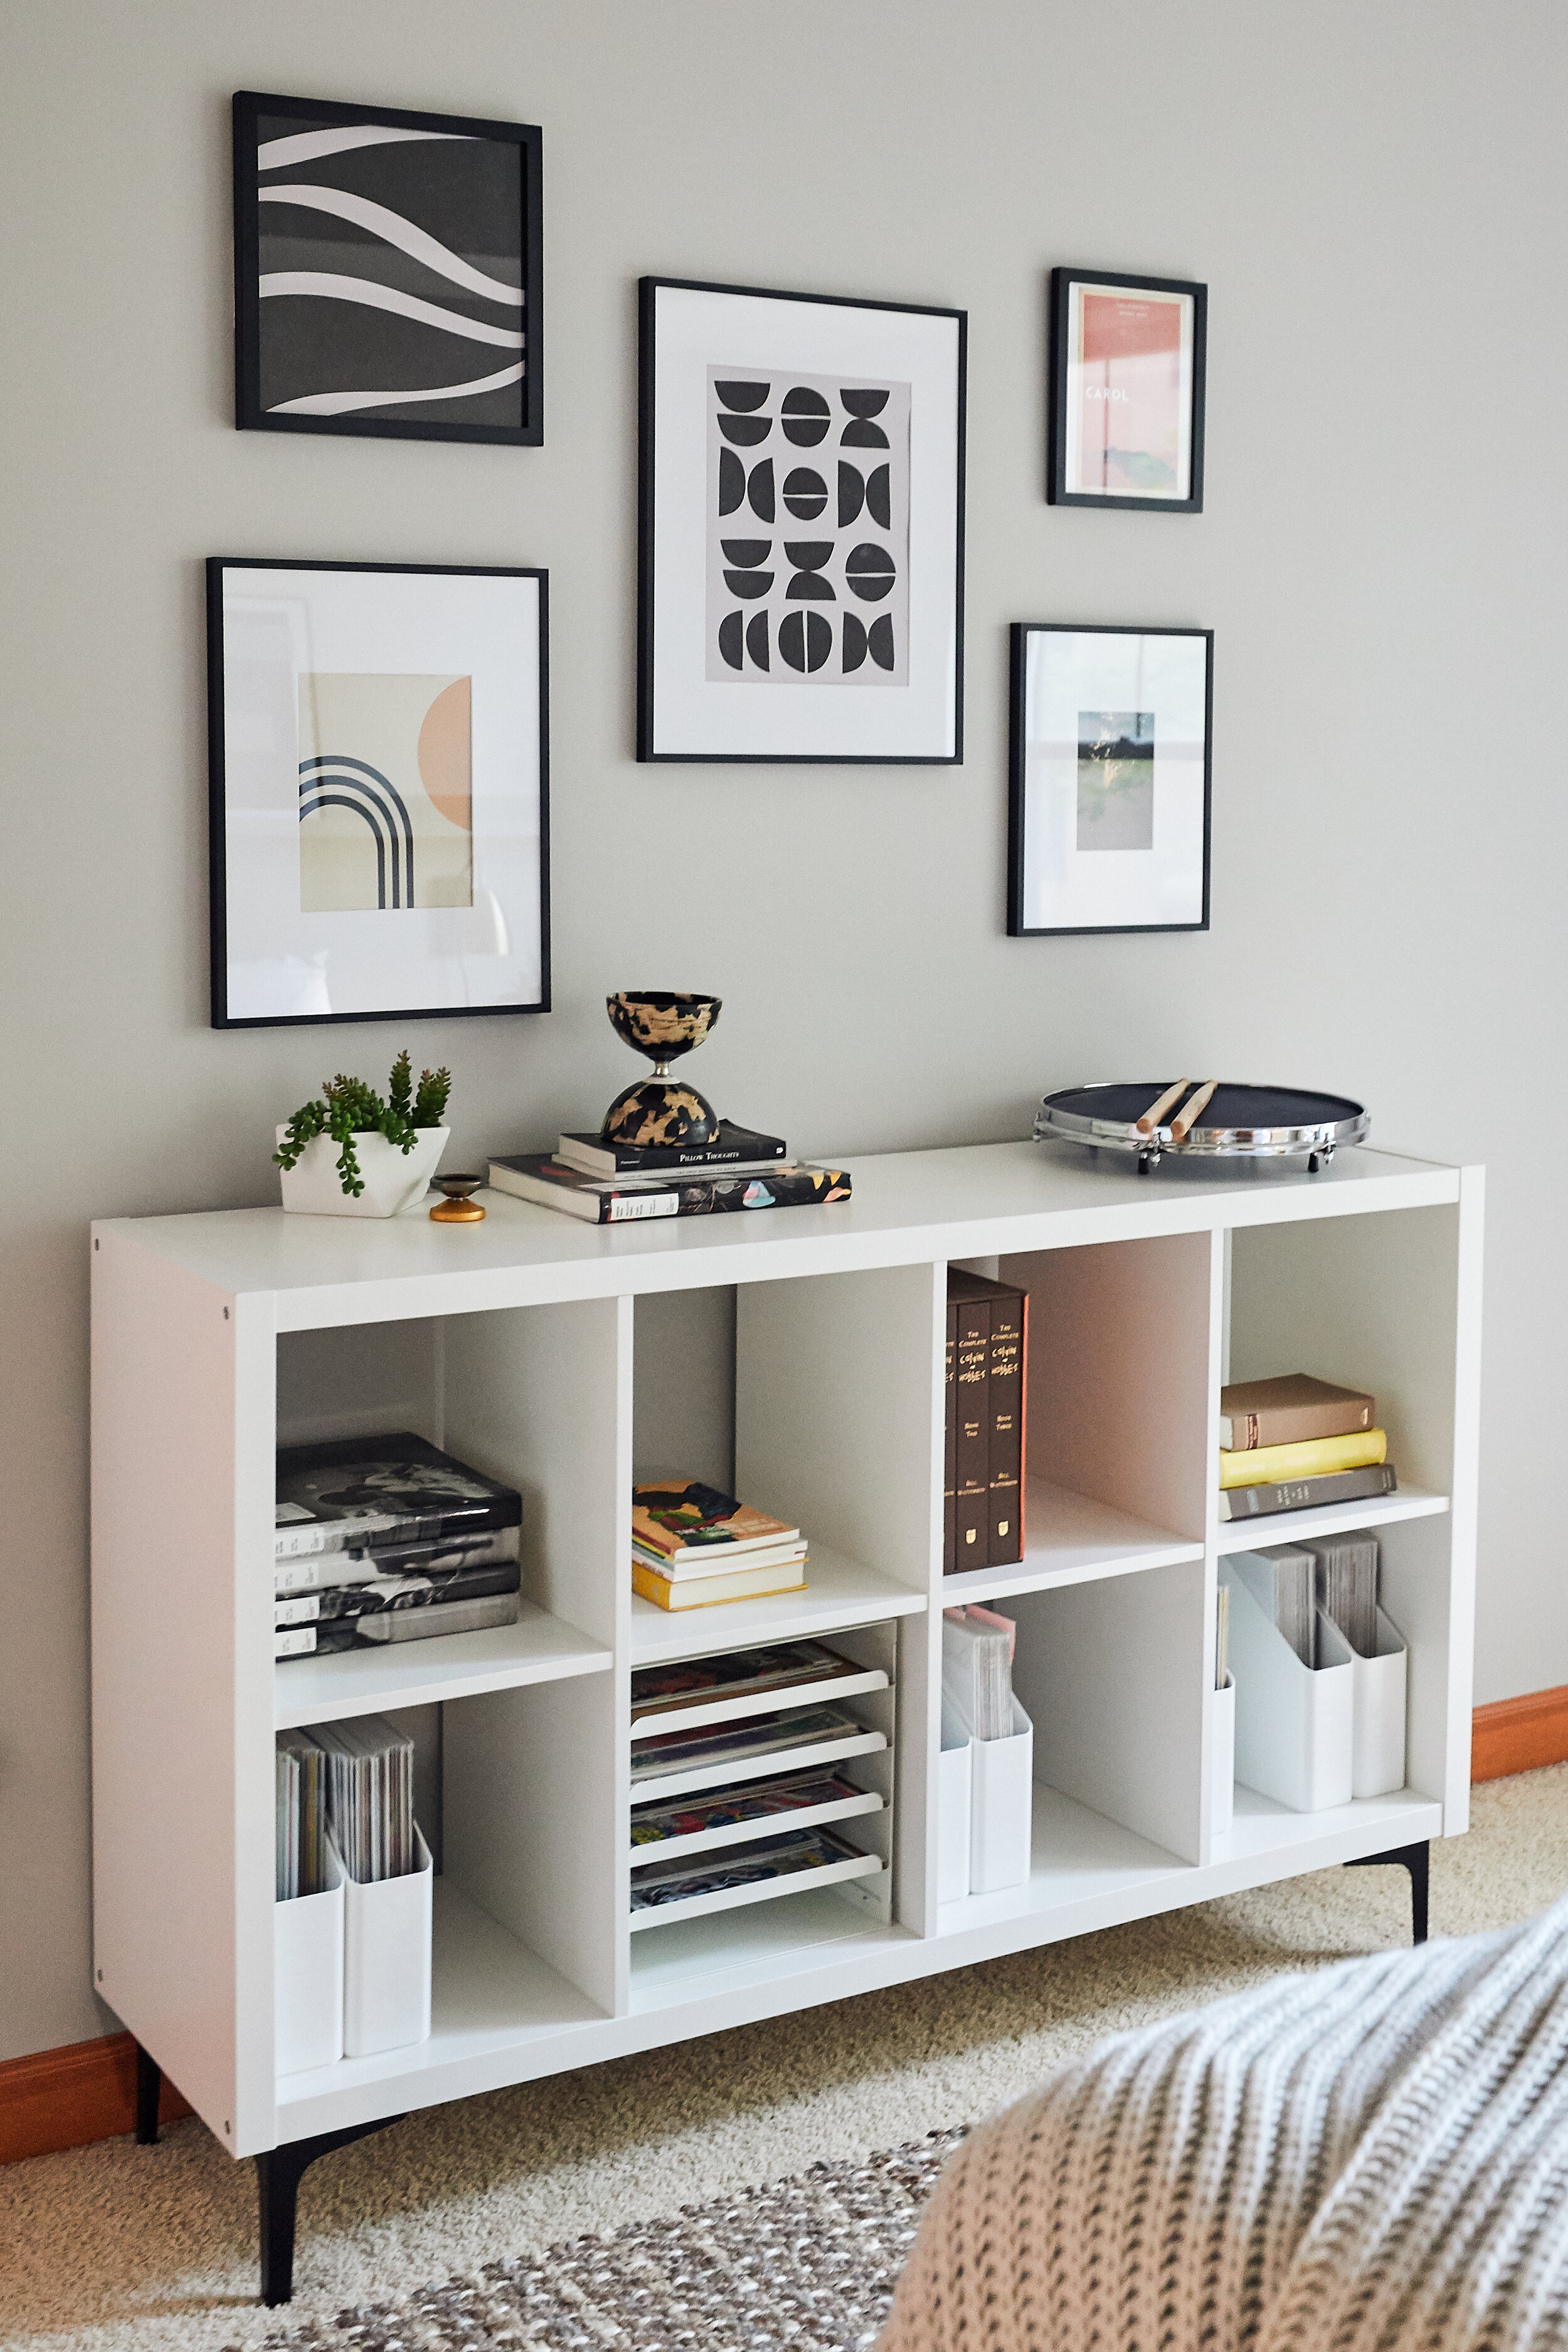
Photo by Canary Gray for HGTV. Sources: metal furniture legs, picture frames, Etsy downloadable art coral pink carol print, neutral abstract prints, and neutral geometric print
2. Warming up the walls
Paint color can truly change the look of a room and is something most landlords will allow you to do if you ask for permission. The original blue was a really pretty color but it didn’t work well with the trim.
I used a light tone of gray for all four walls. The color is SW Fortitude. On the wall behind the bed, I used two shades of grey that really play up the custom picture rail. I used a light tone on top and a darker tone of gray on the bottom. For the bottom, I used SW Bedrock. The dividing point for the lighter and darker paint color on the wall is the DIY picture ledge.
DIY Picture Ledge
We used DIY’d this exact picture ledge for our bedroom and it’s really easy to put together. I glued three pieces of wood and clamped together before using a nail gun to secure. *Pro tip: Use lightweight pine so your shelf won’t be too heavy to mount. I painted the ledge in the dark grey tone before mounting it. With permission from the landlord, we secured the ledge to the wall.
This project is super easy! I love that you can customize the ledge to fit your space. Another great thing about the picture ledge is that you can style it however you want without any commitment!
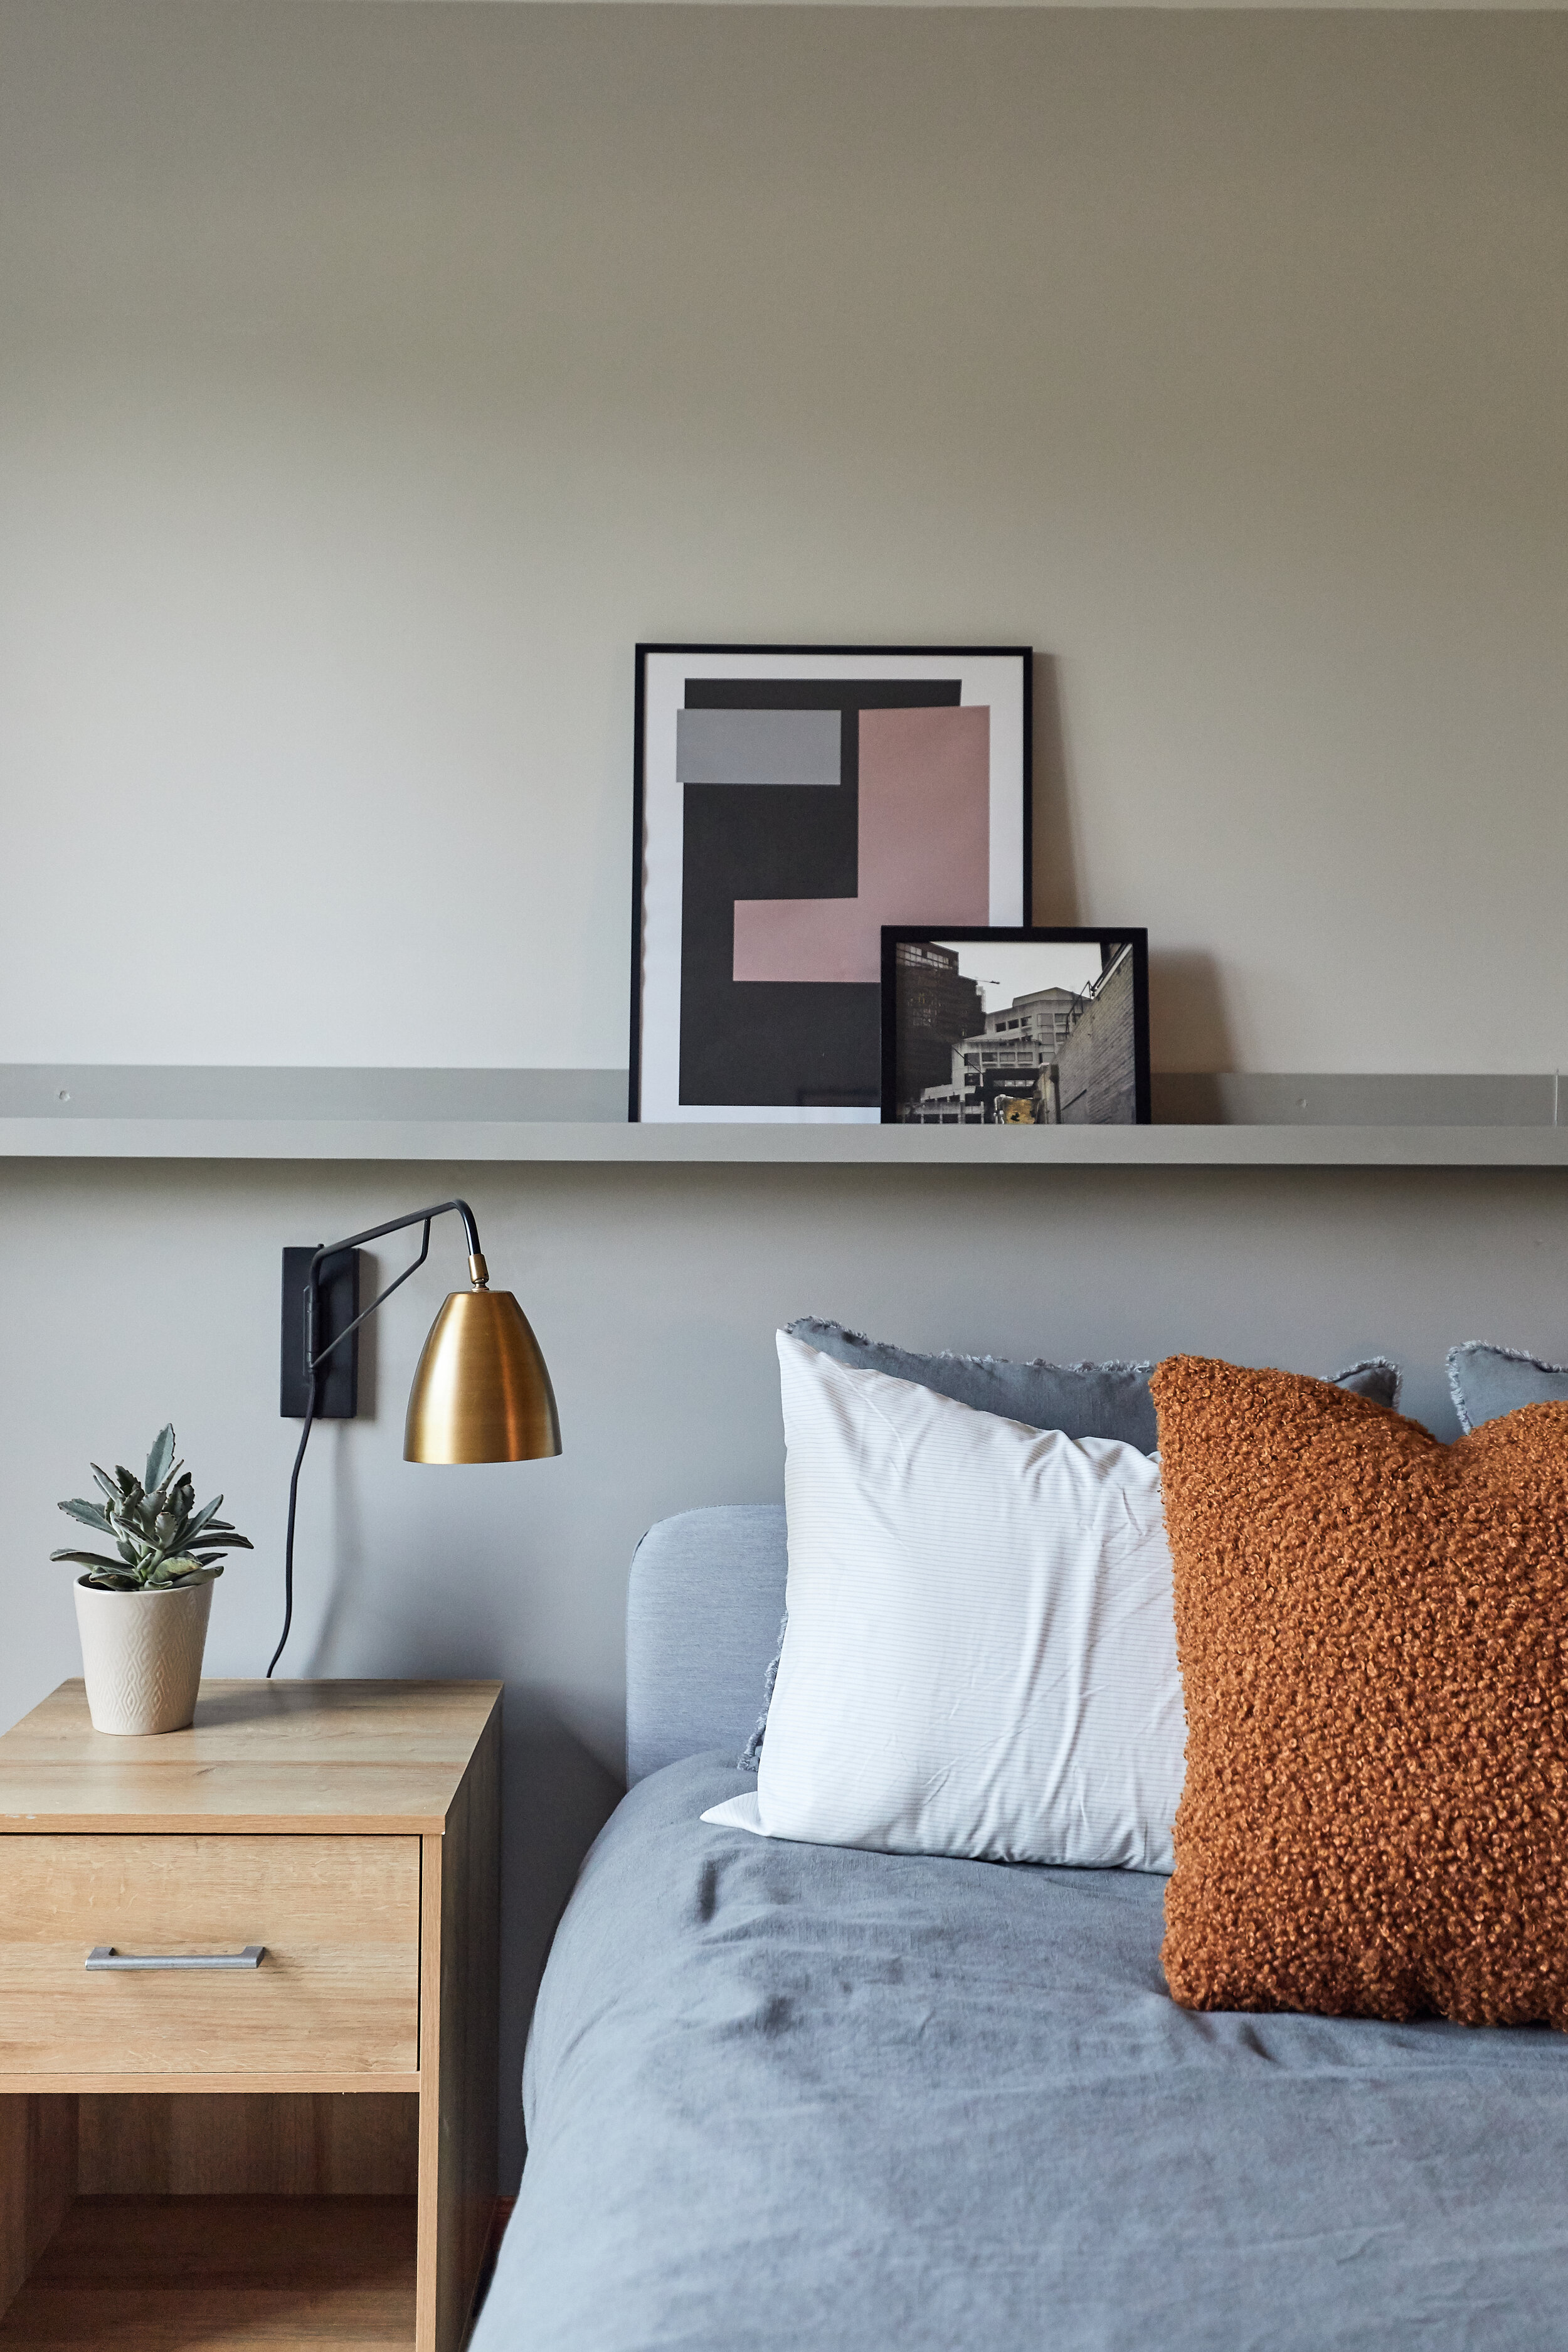
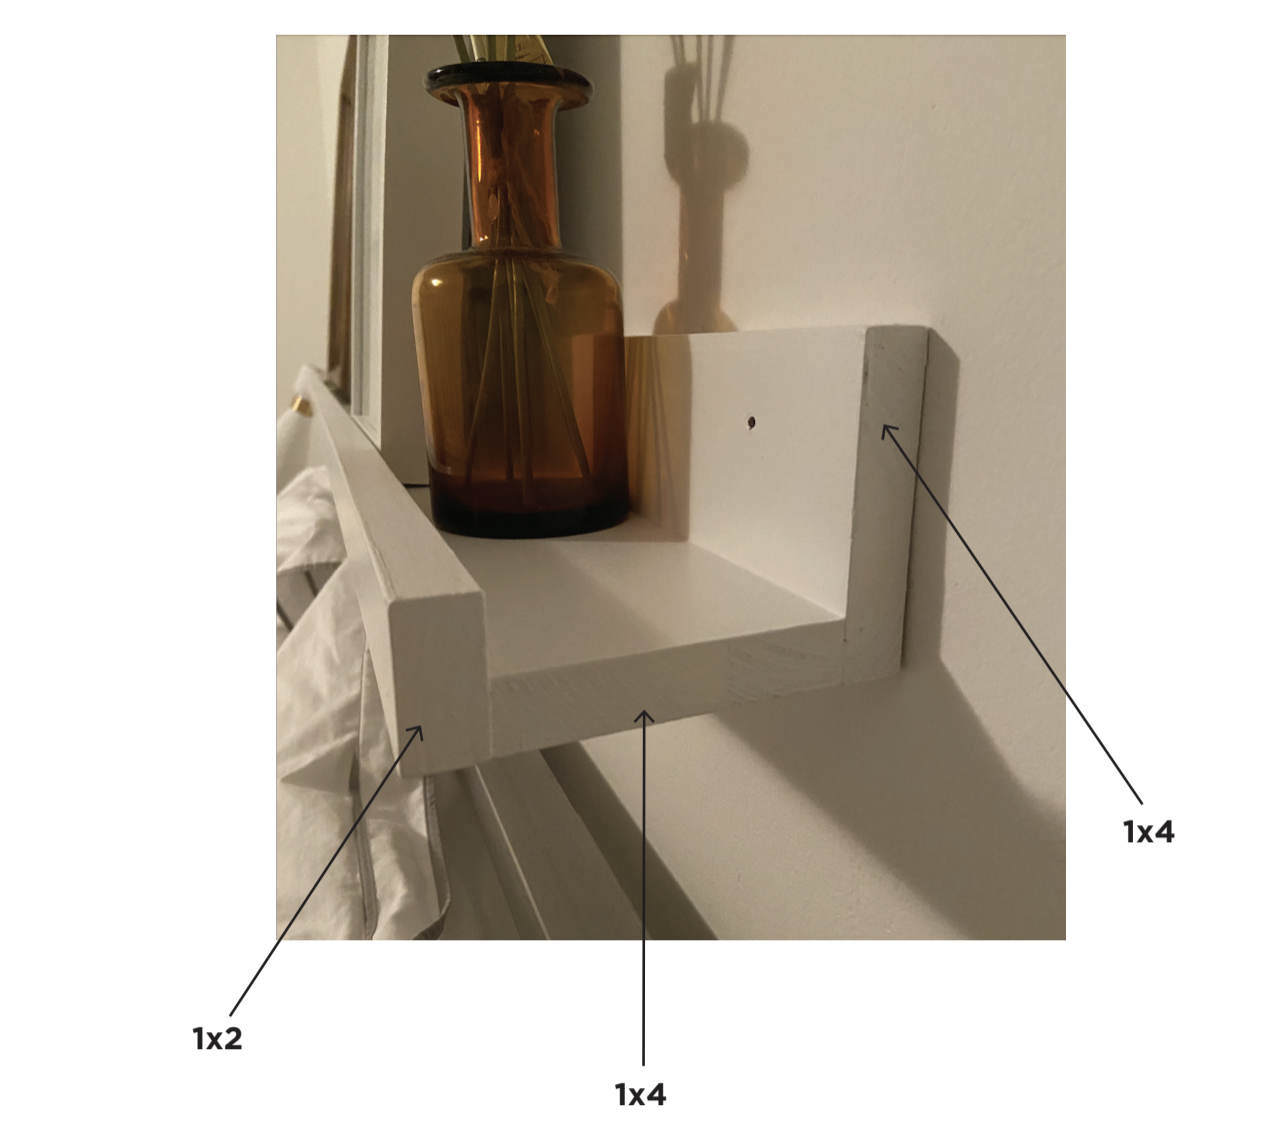
Photo by Canary Gray for HGTV. Sources: Primed Boards in 1 in. x 2 in. & 1 in. x 4 in.
3. Swapping Out the Light Fixture
A fan is something that can easily be changed up (with the landlord’s permission). Before changing out a light fixture, turn off the power at the breaker box. Make sure you keep your old fan so you can put it back when you are ready to move out. The light fixture fit Maya’s style and works well with the window.
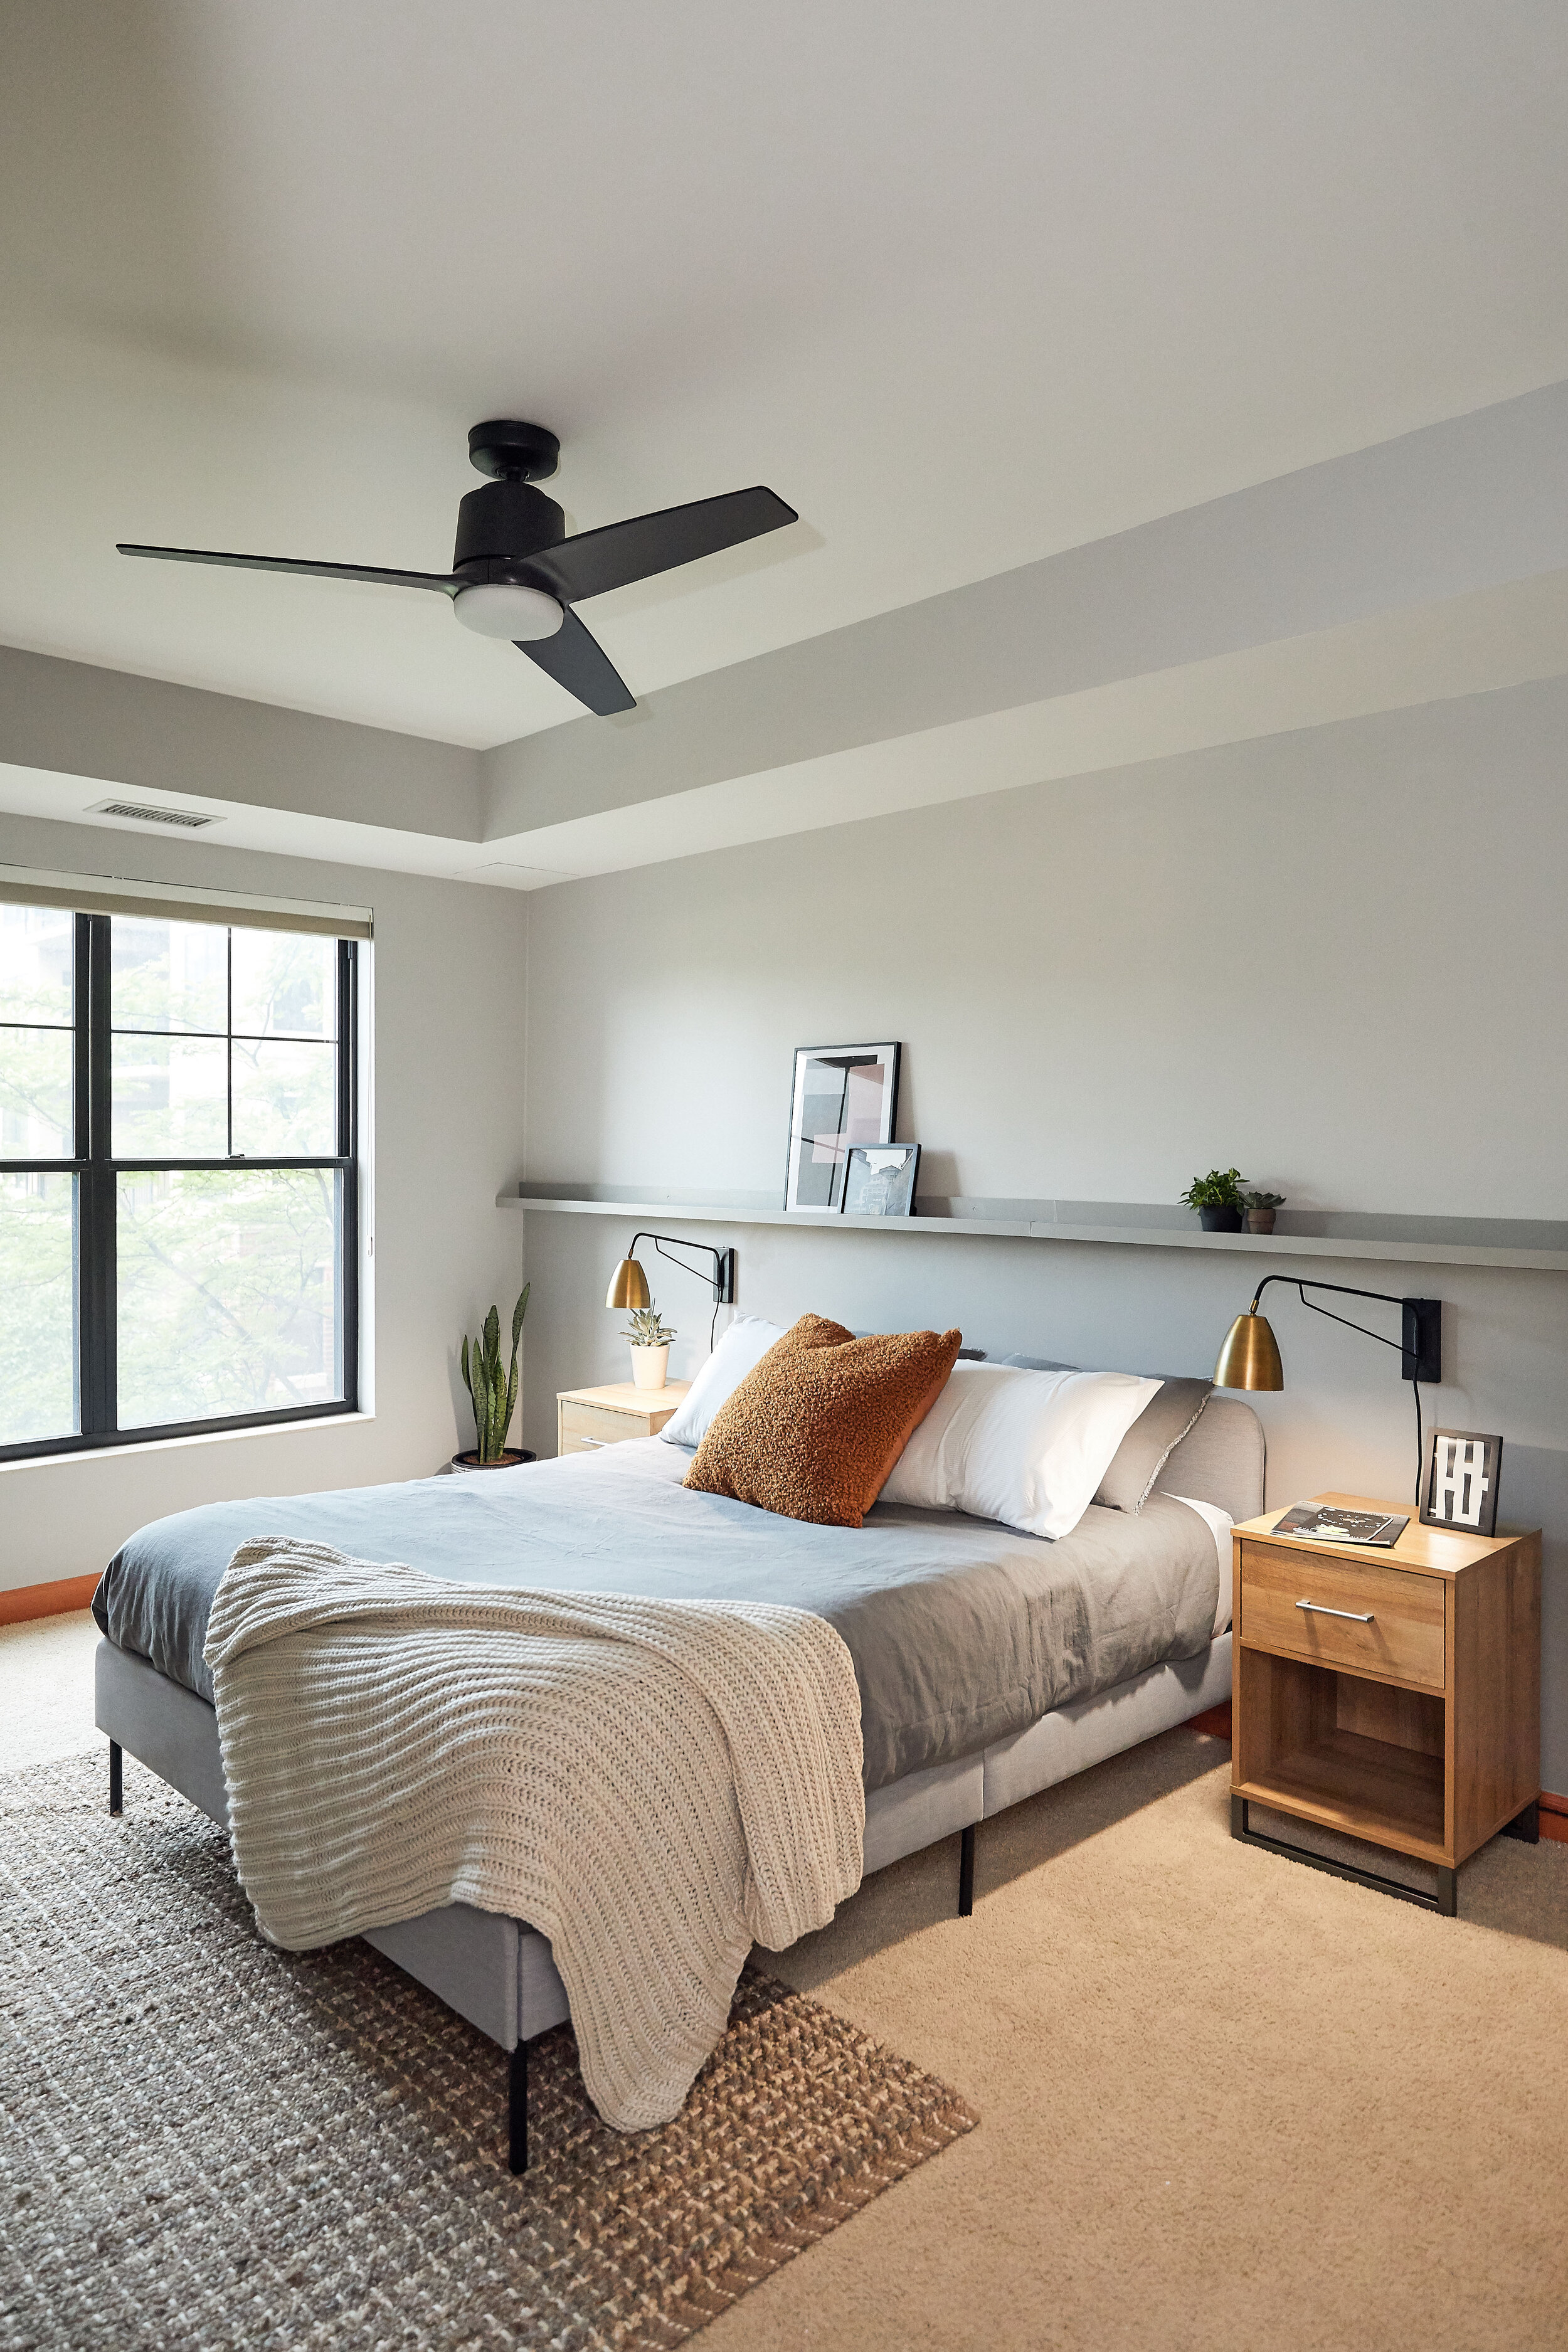
Photo by Canary Gray for HGTV. Sources: Bedframe, bedding, duvet set, rug, knit throw, decorative pillow, wall sconces, nightstands.
4. Update bed and nightstands
One major thing Maya’s bedroom was missing was an actual bed frame. To go with the modern vibe I chose a simple, affordable and sophisticated gray bed frame. For bedding, I went with classic stripe sheets, a gray duvet cover, a neutral throw blanket, and a little pop of color with an accent pillow.
For the nightstands, I went for a natural wood with dark metal to tie in with the oak trim and black window frame.
5. Bringing the room together
Many people think they can’t add a rug to a carpeted room, but you def can! I love this knit wool woven rug. It adds dimension and warms up the room. These brass + black metal combo sconces help elevate the space and are practical, too. Of course, no space is complete without some plants sprinkled in!
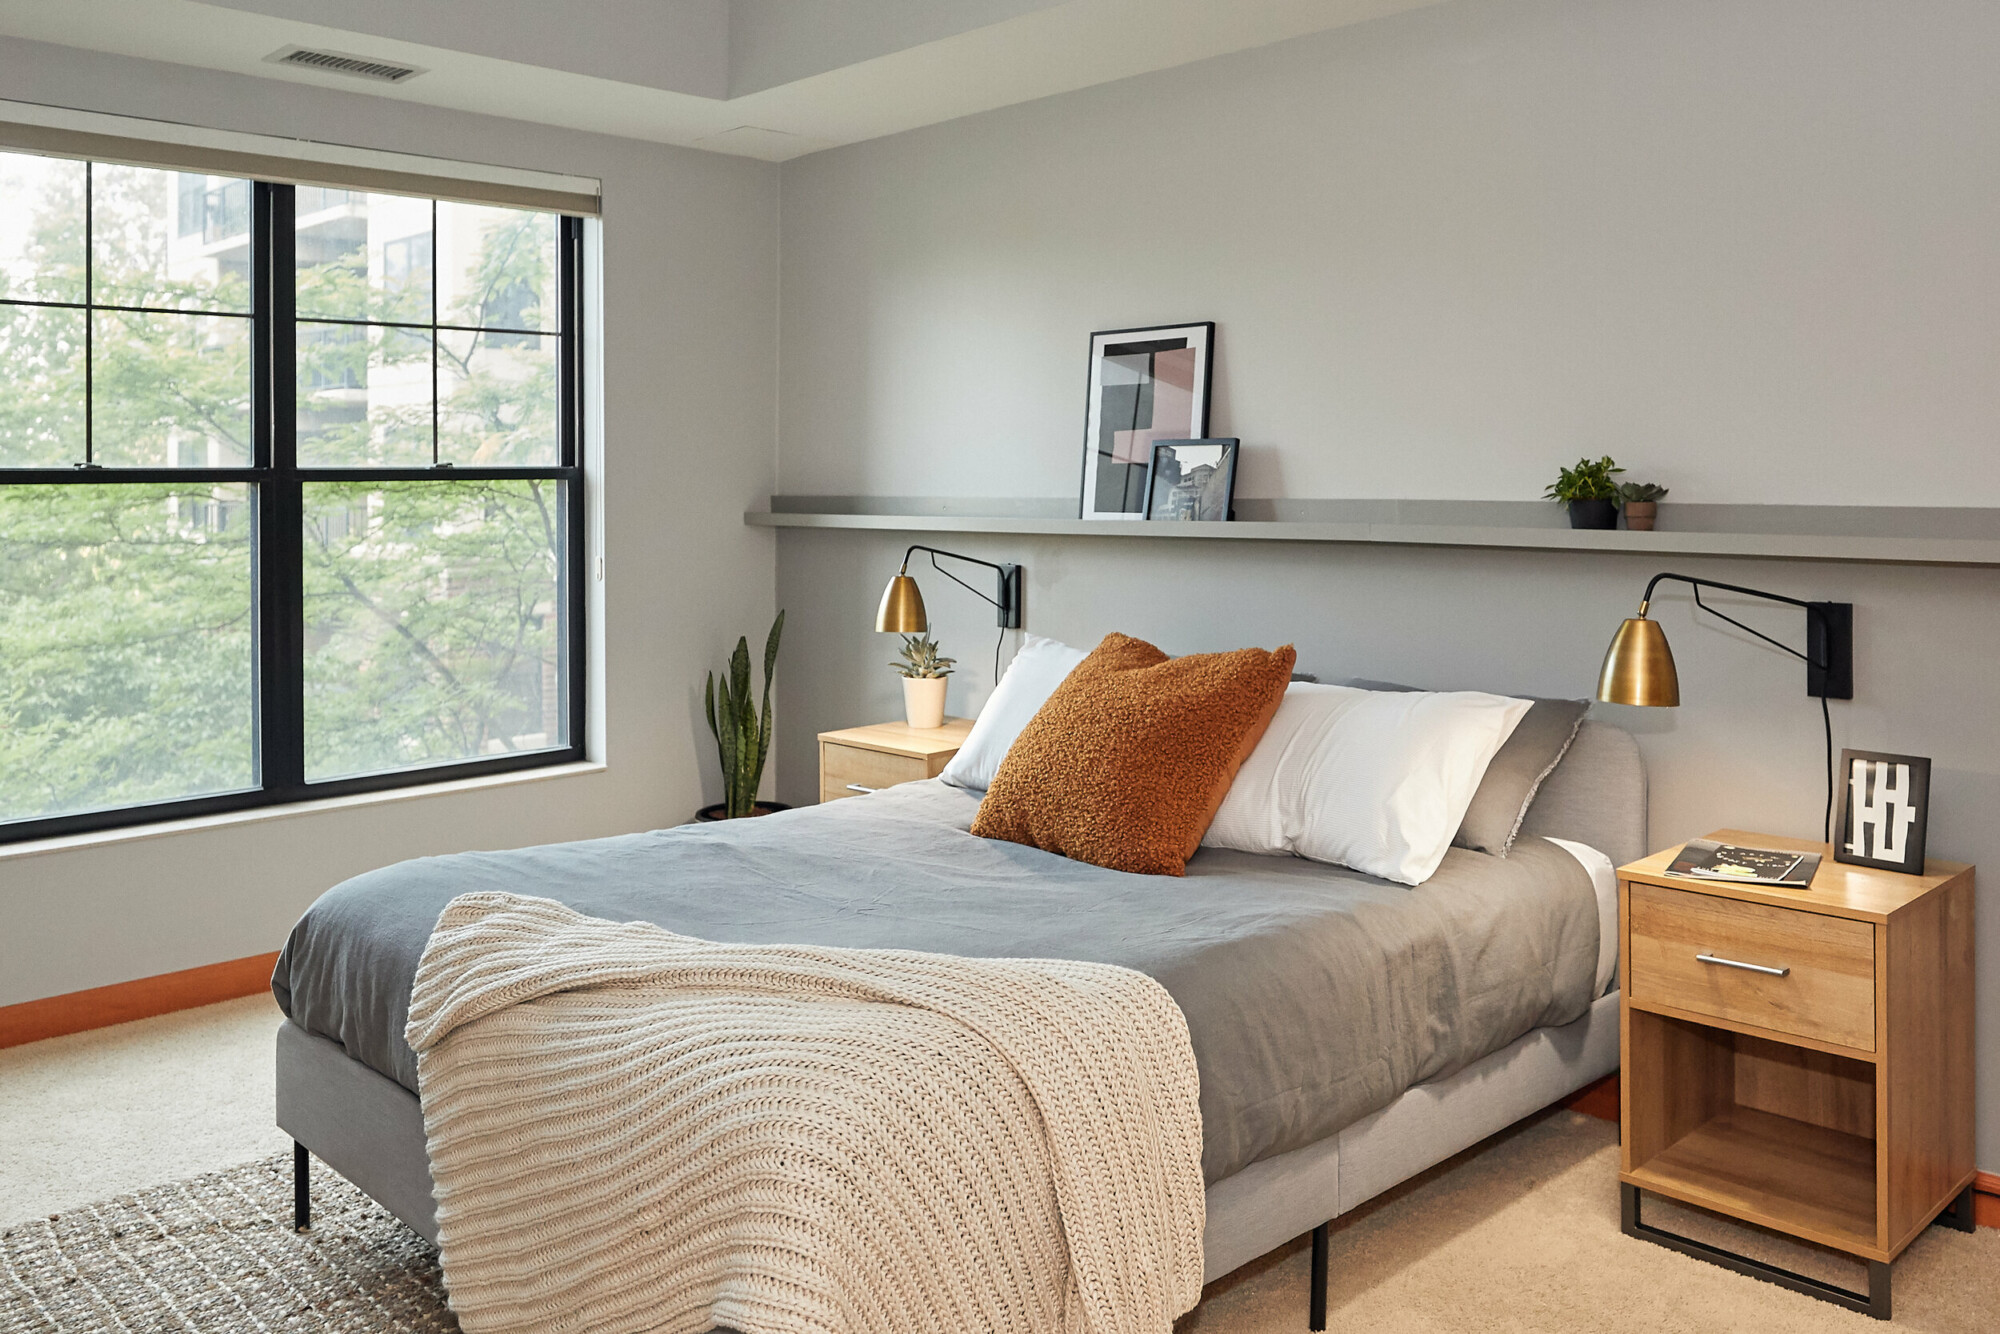
Photo by Canary Gray for HGTV. Sources: Bedframe, bedding, duvet set, rug, knit throw, decorative pillow, wall sconces, nightstands.
6. Creating a Gallery Wall
For the gallery wall, I used a mix of inexpensive prints and Maya’s photography for a personal touch.
*Pro tip: buy downloadable designs online and print them at home or your local copy center for pennies! I used prints from Etsy – coral pink carol print, neutral abstract prints, and neutral geometric print
To figure out the design layout I made paper templates of all the frames with butcher paper. The great thing about this technique is that you can move it around until it feels just right. Remember there is no right or wrong- it just has to feel good.
Next, using removable adhesive strips mount your framed artwork where the butcher paper was, and viola! You have yourself an aesthetically pleasing gallery wall.
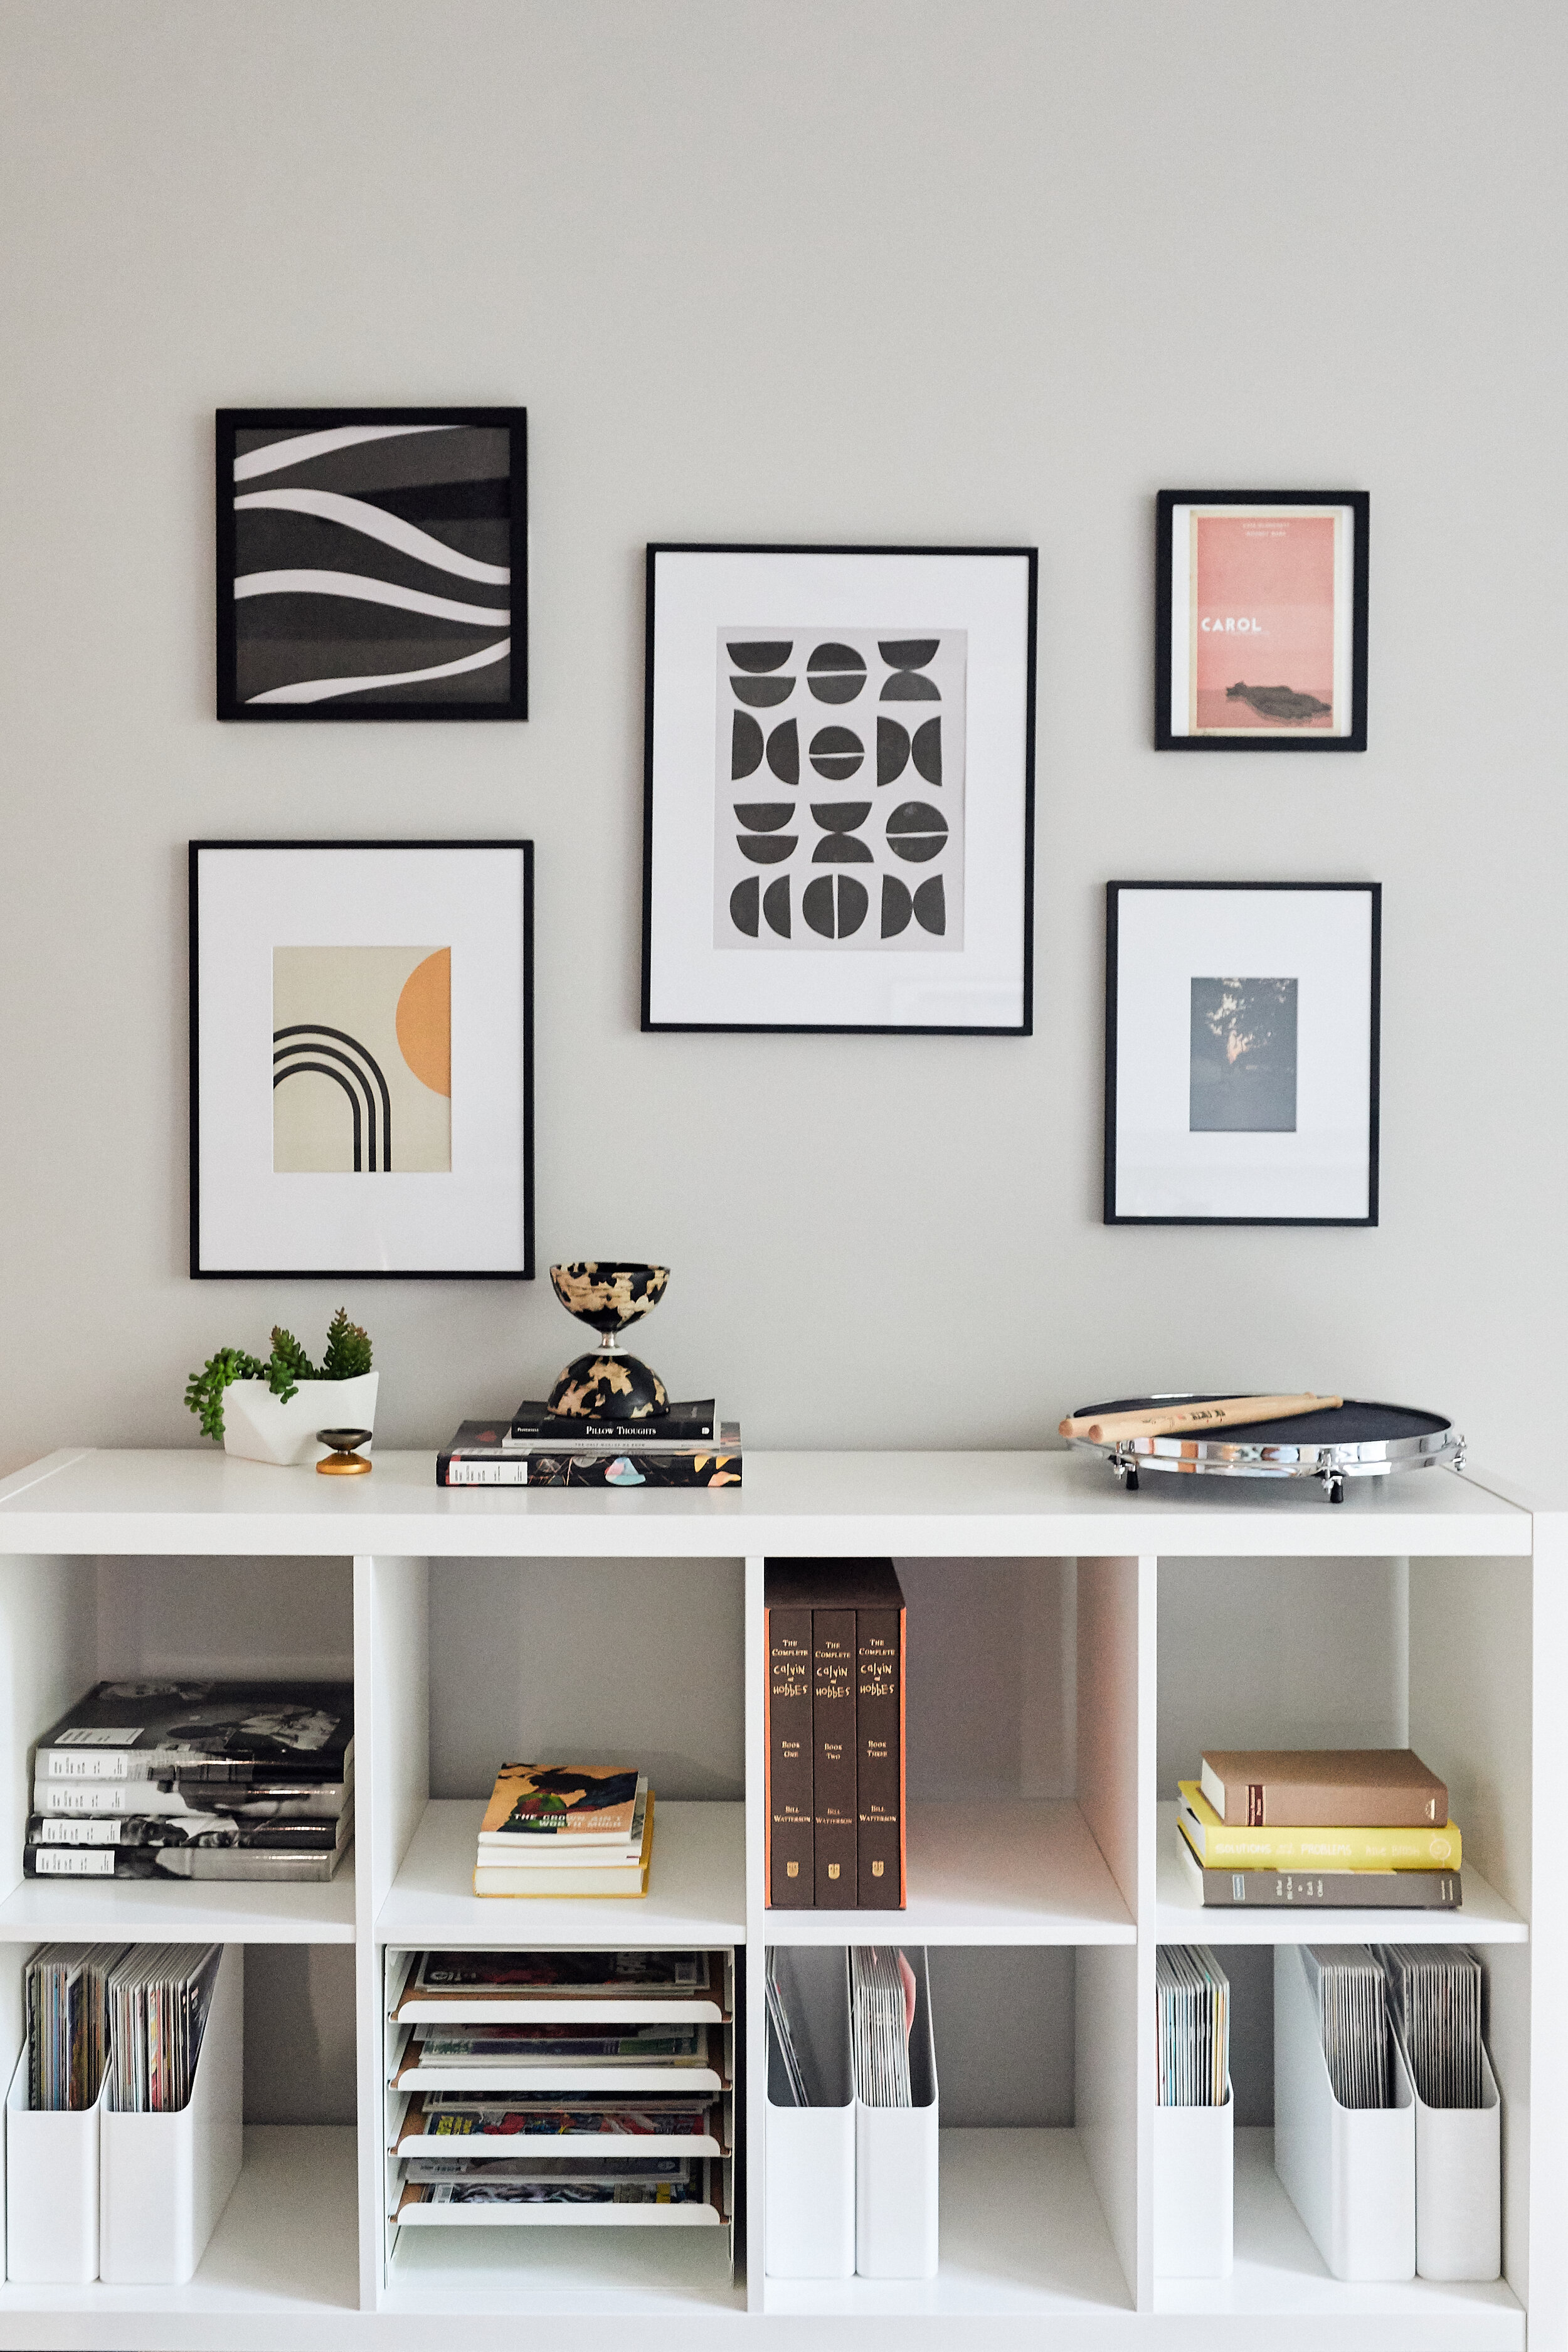
Photo by Canary Gray for HGTV. Sources: metal furniture legs, picture frames, Etsy downloadable art coral pink carol print, neutral abstract prints, and neutral geometric print
I am so happy with how it turned out and loved seeing Maya’s reaction to the big reveal! Hope you enjoyed this episode of Rentfluencer!
All of the photography was done by my talented friend and the show’s art director Wing Ho. You can check out all of her work on her website canarygrey.com or give her a follow on her insta @canarygrey
Product Sources:
-
Primed boards for DIY picture ledge
-
Gallery wall prints: coral pink carol print, neutral abstract prints, and neutral geometric print
DON’T FORGET TO CHECK OUT ALL THE RENTFLUENCER EPISODES:
EPISODE 6: Marisol and Nick’s Dining Room Makeover; Watch full video Here
EPISODE 5: Caitlin’s Living Room Makeover; Watch full video Here
EPISODE 4: Brit and Haley’s Patio; Watch full video Here
EPISODE 3: Kasey’s Combo Closet and Home Office; Watch full video Here
EPISODE 2: The Sams’ College Kitchen Update; Watch full video Here
EPISODE 1: Maya’s Minimalist Modern Bedroom Makeover; Watch full video Here

